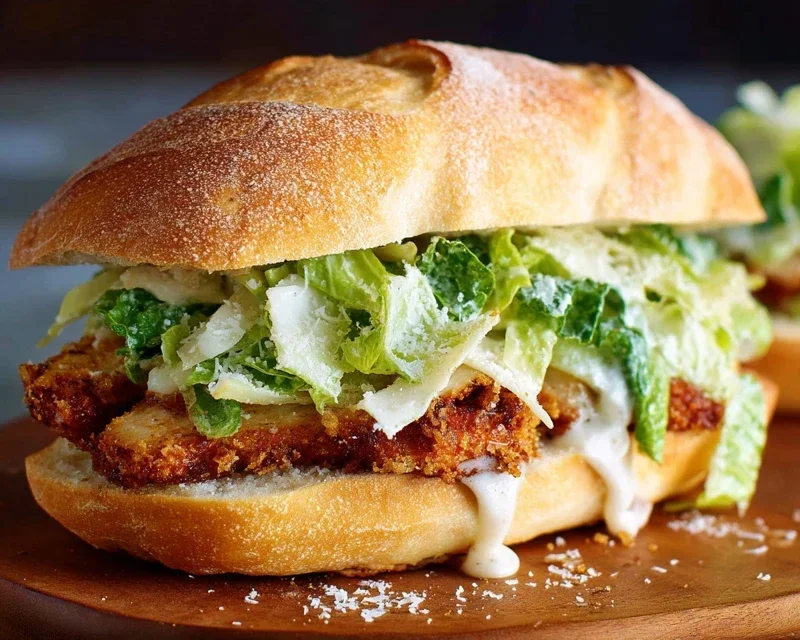
Crispy Chicken Caesar Sandwich-Easy Delicious Recipe
The ultimate Crispy Chicken Caesar Sandwich is a culinary masterpiece that takes a beloved classic and elevates it to an entirely new level of handheld deliciousness. Forget limp lettuce and bland chicken; we’re talking about a symphony of textures and flavors that will make your taste buds sing. Imagin extracte biting into a perfectly golden, incredibly crispy piece of chicken, nestled within a soft, toasted bun, all smothered in that quintessential creamy, tangy Caesar dressing. It’s a sandwich that captures the heart of everyone’s favorite salad but delivers it in a satisfying, portable package. This isn’t just another sandwich; it’s an experience. The inherent goodness of a Caesar salad, with its garlic, Parmesan, and anchovy notes, is amplified by the satisfying crunch of expertly fried chicken. We’re about to unlock the secrets to creating this iconic Crispy Chicken Caesar Sandwich right in your own kitchen, ensuring every bite is pure bliss. Get ready to transform your lunch game with this irresistible Crispy Chicken Caesar Sandwich.
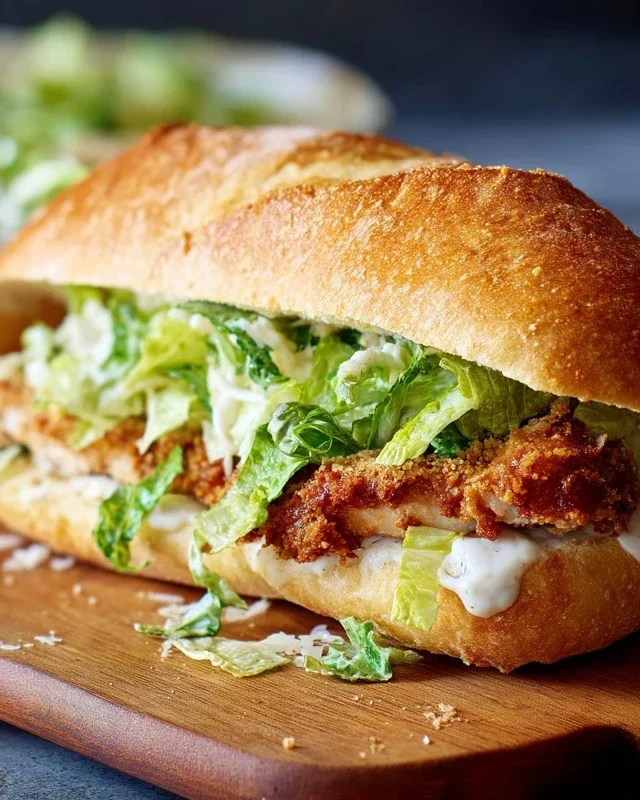
Crispy Chicken Caesar Sandwich
There’s something undeniably satisfying about a perfectly crispy piece of chicken nestled between soft bread, especially when it’s coated in a creamy, tangy Caesar dressing. Forget the soggy, sad versions; we’re talking about a sandwich that’s bursting with flavor and texture. This Crispy Chicken Caesar Sandwich is my go-to for a quick weeknight meal or a weekend indulgence. The key lies in getting that chicken beautifully golden and crunchy, and ensuring the Caesar dressing is vibrant and punchy. It’s surprisingly simple to make at home, and the results are leagues above anything you’ll find at a fast-food joint. So, let’s dive in and create a sandwich that will have you coming back for more.
Ingredients:
Making the Creamy Caesar Dressing
The heart of any great Caesar salad, and by extension, this sandwich, is the dressing. We’re making it from scratch for the best flavor. In a medium bowl, combine the full-fat mayonnaise and the Greek yogurt. The mayonnaise provides that classic rich creaminess, while the Greek yogurt adds a pleasant tang and a lighter texture, making it less heavy. Next, stir in the Dijon mustard. This adds a sharp, pungent bite that cuts through the richness. Worcestershire sauce is our secret weapon here, contributing a deep, umami flavor that’s subtle but essential. Then, add the fresh lemon juice. The acidity is crucial for balancing the richness of the mayonnaise and yogurt, and it brightens up all the other flavors.
Now, for the Parmesan. Using freshly grated Parmesan cheese makes a world of difference. It melts into the dressing beautifully and offers a nutty, salty depth that pre-shredded cheese just can’t match. Mince your garlic cloves very finely, or even use a garlic press, to ensure they integrate smoothly into the dressing. You don’t want any big chunks of raw garlic. Finally, season with ¼ teaspoon of black pepper and a pinch of sea salt. Whisk everything together until it’s smooth and well combined. Taste and adjust the seasoning if needed – you might want a little more lemon juice or a pinch more salt, depending on your preference. Set this glorious dressing aside.
Preparing the Crispy Chicken
Now, let’s get to the star of the show: the crispy chicken. For this recipe, we’re using chicken cutlets. If you can’t find pre-cut cutlets, you can easily make your own by taking boneless, skinless chicken breasts and slicing them horizontally to create thinner pieces. This ensures they cook evenly and quickly, and become wonderfully crispy.
First, pat your chicken cutlets completely dry with paper towels. This is a crucial step for achieving maximum crispiness, as excess moisture will prevent the coating from adhering properly and will steam the chicken instead of frying it. Season both sides of each cutlet generously with sea salt and ground black pepper. Don’t be shy with the seasoning here; it will infuse flavor into the chicken itself.
Next, we’ll prepare our dredgin extractg station. In a shallow dish or pie plate, combine the all-purpose flour with ½ teaspoon of salt. This simple flour coating is what gives our chicken that irresistible crunch. Some recipes call for a multi-step breading process with eggs and breadcrum extractbs, but for a classic crispy chicken sandwich, a well-seasoned flour coating is often all you need and leads to a delightful, light crispiness.
Frying the Chicken to Golden Perfection
It’s time to fry! Pour enough oil into a large, heavy-bottomed skillet (like a cast-iron skillet) to come about ½ inch up the sides. You want enough oil to submerge at least half of the chicken cutlets while they’re cooking. Heat the oil over medium-high heat until it shimmers and a small piece of chicken coating dropped in sizzles immediately. This usually takes around 350-375°F (175-190°C). If the oil isn’t hot enough, the chicken will absorb too much grease and become soggy. If it’s too hot, the coating will burn before the chicken is cooked through.
Carefully place the seasoned chicken cutlets into the hot oil, making sure not to overcrowd the pan. Overcrowding will lower the oil temperature, leading to greasy chicken. You’ll likely need to fry them in batches. Fry the chicken for about 3-5 minutes per side, or until it’s golden brown and cooked through. The internal temperature should reach 165°F (74°C). Use tongs to gently turn the chicken, ensuring an even crisp all around. Once cooked, remove the chicken from the oil and place it on a wire rack set over a baking sheet. This allows excess oil to drain off and keeps the chicken crispy, preventing it from steaming on a plate.
Assembling Your Masterpiece
With our perfectly crispy chicken ready and our zesty Caesar dressing prepared, it’s time to assemble the ultimate sandwich. Slice your favorite sandwich rolls or bread horizontally. You can lightly toast them for extra texture if you prefer. Lay a generous amount of our homemade Caesar dressing on the bottom half of each roll. Don’t be afraid to slather it on! We want every bite to be infused with that classic Caesar flavor.
Next, place a couple of crisp romaine lettuce leaves on top of the dressing. The crisp lettuce provides a refreshing crunch that balances the richness of the chicken and dressing. Then, place one or two of your golden, crispy chicken cutlets on top of the lettuce. They should be beautifully golden and inviting. Finally, add another generous dollop of Caesar dressing on top of the chicken, or spread it on the top half of the roll. Close the sandwich, and admire your handiwork. You’ve just created a truly spectacular Crispy Chicken Caesar Sandwich. Serve immediately and enjoy every delicious, crunchy, creamy bite!
Conclusion:
There you have it – your guide to crafting the ultimate Crispy Chicken Caesar Sandwich! This recipe truly shines by combining the satisfying crunch of perfectly fried chicken with the bright, zesty flavors of a classic Caesar dressing, all bundled up in a warm, toasted bun. It’s a dish that’s both incredibly delicious and surprisingly simple to put together, making it a weeknight winner or a fantastic option for a casual weekend lunch. The beauty of this sandwich lies in its versatility, allowing you to tailor it to your own taste preferences.
I highly encourage you to give this Crispy Chicken Caesar Sandwich a try! It’s a guaranteed crowd-pleaser and a wonderfully rewarding culinary adventure. For serving, imagin extracte this masterpiece alongside a crisp green salad, a side of sweet potato fries, or even some crunchy onion rings. For variations, feel free to experiment with different types of bread – ciabatta or a hearty sourdough would be divine. You could also add a sprinkle of crispy beef bacon bits or some pickled red onions for an extra layer of flavor and texture.
Frequently Asked Questions:
Q: Can I make the chicken ahead of time?
Absolutely! You can bread and cook the chicken breasts earlier in the day and reheat them in a warm oven (around 350°F or 175°C) for about 5-7 minutes until heated through and still crispy. This makes assembly even quicker!
Q: What if I don’t want to fry the chicken?
You can achieve a delicious result by baking or air-frying the chicken. For baking, place the breaded chicken on a wire rack set inside a baking sheet and bake at 400°F (200°C) for about 20-25 minutes, flipping halfway through. For air frying, cook at 380°F (190°C) for 12-15 minutes, shaking the basket halfway, until golden brown and cooked through.
Q: How can I make this sandwich healthier?
Opt for grilled chicken breast instead of fried. You can also use whole wheat buns and load up on extra lettuce and tomatoes. For the dressing, consider a lighter Caesar dressing recipe or use it more sparingly.
Crispy Chicken Caesar Sandwich
A delicious and satisfying crispy chicken sandwich with a classic Caesar dressing.
Ingredients
-
½ cup full-fat mayonnaise
-
3 tbsp Greek yogurt
-
1 tsp Dijon mustard
-
1 tsp Worcestershire sauce
-
2 tbsp lemon juice
-
¼ cup Parmesan cheese (freshly grated)
-
1-2 garlic cloves (minced)
-
¼ tsp black pepper
-
Pinch sea salt
-
5 chicken cutlets
-
sea salt (to taste)
-
ground black pepper (to taste)
-
Oil (for frying)
-
⅓ cup all-purpose flour
-
½ tsp salt
Instructions
-
Step 1
In a bowl, whisk together mayonnaise, Greek yogurt, Dijon mustard, Worcestershire sauce, lemon juice, Parmesan cheese, minced garlic, ¼ tsp black pepper, and a pinch of sea salt to make the Caesar dressing. Set aside. -
Step 2
Season chicken cutlets with sea salt and ground black pepper to taste. -
Step 3
Place all-purpose flour and ½ tsp salt in a shallow dish. -
Step 4
Dredge each chicken cutlet in the flour mixture, ensuring it is fully coated. Shake off any excess. -
Step 5
Heat oil in a large skillet over medium-high heat. Fry chicken cutlets for about 5-7 minutes per side, or until golden brown and cooked through. -
Step 6
Place a crispy chicken cutlet on the bottom half of a sandwich roll. Generously spread Caesar dressing over the chicken. Top with the other half of the roll.
Important Information
Nutrition Facts (Per Serving)
It is important to consider this information as approximate and not to use it as definitive health advice.
Allergy Information
Please check ingredients for potential allergens and consult a health professional if in doubt.