Sweet Potato Tortillas – Easy Gluten-Free Vegan Wraps
Sweet Potato Tortillas (Gluten-Free Vegan Wraps) are about to become your new kitchen obsession! Forget the store-bought versions packed with mystery ingredients and allergens. I’m here to share a recipe that’s not only incredibly delicious but also caters to a whole host of dietary needs. Imagin extracte vibrant, tender wraps that hold together beautifully, bursting with a subtle sweetness and earthy undertones from the star ingredient: sweet potato. These aren’t just any wraps; they’re a revelation for anyone seeking satisfying, plant-based, and gluten-free meal solutions. They’re perfect for busy weeknights, healthy lunches, or even a fun weekend brunch. The beauty of these sweet potato tortillas lies in their versatility and how wonderfully they transform simple fillings into something truly special. Get ready to impress yourself and your loved ones with these wholesome, homemade wonders.
Sweet Potato Tortillas (Gluten-Free Vegan Wraps)
Looking for a delicious and healthy way to enjoy your favorite wraps, tacos, or quesadillas without the gluten or animal products? Look no further! These Sweet Potato Tortillas are a revelation. They’re naturally gluten-free, vegan, and packed with the subtly sweet and earthy flavor of sweet potatoes. The vibrant color alone is enough to brighten up any meal. What I love most about these is their incredible versatility. They’re soft enough to roll and fold without cracking, yet sturdy enough to hold all your delicious fillings. Plus, they’re surprisingly easy to make at home, allowing you to control every ingredient.
The magic behind their pliable texture and gluten-free nature comes from a combination of ingredients that work together beautifully. The sweet potato provides moisture and a slight binding quality, while the psyllium husk acts as a fantastic gluten substitute, giving the dough structure and chew. The arrowroot flour helps to keep them tender. Don’t be intimidated by the sourdough starter; it adds a wonderful depth of flavor and a slight tang that complements the sweetness of the potato.
Ingredients:
Instructions:
1. Prepare the Sweet Potato Base: Begin extract by ensuring your sweet potatoes are cooked until they are exceptionally tender. Steaming or boiling them without excess liquid is key. Once cooked, mash them thoroughly with a fork or potato masher until you have a smooth, lump-free puree. You want to avoid any watery consistency, as this can make the dough too sticky. Let the mashed sweet potato cool slightly so it’s warm but not hot to the touch.
2. Combine Wet Ingredients and Spices: In a medium-sized mixing bowl, add the slightly cooled mashed sweet potato. Then, add the vegan butter (or your chosen fat). If your vegan butter is firm, you can gently warm it for a few seconds to make it easier to incorporate. Add the sea salt, a dash of black pepper, onion powder, and garlic powder to the bowl. Mix everything together thoroughly until the butter is fully incorporated into the sweet potato mash, creating a creamy and fragrant base.
3. Incorporate the Sourdough Starter and Psyllium Husk: Next, gently fold in your active gluten-free sourdough starter. If your starter is very thick, you might need to give it a quick stir before adding it. Then, sprinkle the psyllium husk over the mixture. Psyllium husk is a crucial ingredient here as it absorbs moisture and creates a gel-like substance that mimics the binding properties of gluten. Stir everything together until it’s just combined. At this stage, the mixture will likely be quite wet and sticky.
4. Add Dry Ingredients and Form the Dough: Now it’s time to add the arrowroot flour. Start with 2 tablespoons of arrowroot flour and the optional baking powder, if you’re using it. Mix this into the wet ingredients. The dough will start to thicken and become more cohesive. If the dough still feels excessively sticky and unmanageable, add the remaining tablespoon of arrowroot flour, a little at a time, until you achieve a soft, workable dough that is no longer sticking to your hands or the sides of the bowl. You might need to add 1-2 tablespoons of hot water if the dough becomes too dry, or a little more arrowroot flour if it’s too wet. The goal is a dough that’s pliable but not sticky. Once you’ve reached the right consistency, cover the bowl and let the dough rest for about 10-15 minutes. This resting period allows the psyllium husk to fully hydrate and the gluten-free flours to absorb moisture, making the dough easier to handle.
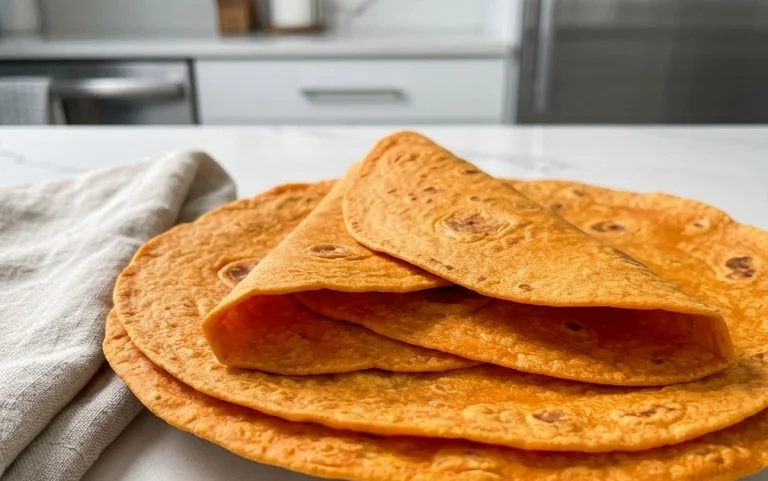
5. Shape and Cook the Tortillas: Lightly flour a clean work surface with a bit of arrowroot flour or your preferred gluten-free flour. Divide the rested dough into 4-6 equal portions, depending on how large you want your tortillas. Roll each portion into a ball. Take one ball at a time and place it on the floured surface. You can either flatten it with your hands or use a rolling pin to roll it out into a thin circle, about 6-8 inches in diameter. Don’t worry if the edges aren’t perfectly smooth; these are rustic and delicious! Heat a non-stick skillet or a cast-iron griddle over medium heat. Once hot, carefully place one rolled tortilla into the dry pan. Cook for about 2-3 minutes per side, or until golden brown spots appear and the tortilla is cooked through and slightly puffed. You’ll notice it might puff up a bit, which is a good sign! Repeat with the remaining dough portions, adding a tiny bit more arrowroot flour to your surface if the dough starts to stick. As you cook the tortillas, stack them on a plate and cover them with a clean kitchen towel. This helps to keep them warm and soft.
Notes on Gluten-Free Sourdough Starter:
If you don’t have a gluten-free sourdough starter, you can still make these tortillas! In place of the 3/4 cup sourdough starter, use 1/2 cup of warm water mixed with 1 tablespoon of apple cider vinegar and 1 teaspoon of sugar. Let this mixture sit for about 5-10 minutes until it’s slightly foamy. Then, proceed with adding this to your sweet potato mixture. The flavor will be slightly different, lacking the subtle tang of the starter, but they will still be delicious!

Conclusion:
You’ve just discovered a truly fantastic recipe for Sweet Potato Tortillas! These gluten-free vegan wraps are incredibly versatile, surprisingly easy to make, and a delicious way to add a nutritious boost to any meal. The natural sweetness of the sweet potato creates a wonderfully tender and pliable tortilla that’s perfect for so much more than just your average wrap. Whether you’re looking for a healthy lunch option, a creative dinner base, or a fun snack, these sweet potato tortillas are sure to become a staple in your kitchen. Don’t hesitate to give them a try; you’ll be amazed at how satisfying and delicious homemade gluten-free vegan wraps can be!
Serve them warm for an extra delightful experience. They’re ideal for your favorite taco fillings, loaded with roasted vegetables and hummus, or even used as a base for mini pizzas. Feel free to get creative with your toppings!
If you’re feeling adventurous, consider adding a pinch of smoked paprika or cumin to the dough for a subtle smoky flavor, or perhaps some finely chopped fresh cilantro for an herbaceous twist.
Frequently Asked Questions:
Q: How should I store leftover sweet potato tortillas?
A: Once completely cooled, store your sweet potato tortillas in an airtight container or a resealable bag at room temperature for up to 2 days, or in the refrigerator for up to 4 days. For longer storage, you can freeze them individually wrapped in parchment paper and then placed in a freezer-safe bag for up to 2 months. Thaw them at room temperature or gently reheat.
Q: Can I use a different type of flour if I don’t have the one specified?
A: While the specified flour blend is designed for optimal texture and pliability in these sweet potato tortillas, you can experiment with other gluten-free flour blends. However, results may vary. It’s best to stick to blends that contain a good mix of starches and whole grain flours for the best outcome.
Sweet Potato Tortillas (Gluten-Free Vegan Wraps)
Delicious and healthy gluten-free and vegan tortillas made with sweet potato, perfect for wraps and other culinary creations.
Ingredients
-
2 small sweet potatoes – steamed or boiled (no liquid / mashed)
-
2 tbsp vegan butter
-
1-2 tbsp hot water
-
3/4 tsp sea salt
-
1/4 tsp black pepper
-
1/2 tsp onion powder
-
1/2 tsp garlic powder
-
3/4 cup gluten free sourdough starter
-
2 tsp psyllium husk
-
2-3 tbsp arrowroot flour
-
1/2 tsp baking powder (optional, for puffier tortillas)
Instructions
-
Step 1
Mash the steamed or boiled sweet potatoes until smooth, ensuring no liquid remains. Combine with vegan butter, hot water, sea salt, black pepper, onion powder, and garlic powder. Mix well. -
Step 2
In a separate bowl, whisk together the gluten-free sourdough starter, psyllium husk, and arrowroot flour. Add the baking powder if using. -
Step 3
Gradually add the sweet potato mixture to the flour mixture, stirring until a cohesive dough forms. The dough should be soft but manageable. -
Step 4
Divide the dough into equal portions and roll each into a ball. Flatten each ball between two sheets of parchment paper to form thin tortillas. -
Step 5
Heat a lightly oiled skillet or griddle over medium heat. Cook each tortilla for 2-3 minutes per side, until golden brown and slightly puffed. -
Step 6
Serve warm or store in an airtight container for later use.
Important Information
Nutrition Facts (Per Serving)
It is important to consider this information as approximate and not to use it as definitive health advice.
Allergy Information
Please check ingredients for potential allergens and consult a health professional if in doubt.