Easy Homemade Freeze Pops – Refreshing Summer Treats
Homemade freeze pops are the ultimate summer sensation, a nostalgic treat that instantly transports us back to carefree days of sunshine and scraped knees. There’s just something undeniably magical about a perfectly frozen, vibrant-colored pop on a sweltering afternoon. Why do we all love them so much? It’s the sheer, unadulterated joy of a cool, sweet burst of flavor that melts away the heat and brings a smile to our faces. What makes making your own homemade freeze pops truly special is the incredible freedom you have to experiment. Forget those artificial colors and flavors; with this recipe, you’re in control of creating delicious, wholesome goodness exactly to your liking. We’re talking about crafting vibrant, juicy creations packed with real fruit and natural sweeteners, making them a treat you can feel truly good about sharing.
Your Ultimate Summer Refreshment Awaits!
Let’s Get Creative with Our Homemade Freeze Pops!
Homemade Freeze Pops
Say goodbye to artificial colors and questionable ingredients! Making your own freeze pops is incredibly simple, surprisingly delicious, and a fantastic way to cool down on a warm day. Plus, it’s a fun activity to get the whole family involved. Forget those neon-colored, sugar-laden treats from the freezer aisle. We’re talking about vibrant, natural flavors bursting with the goodness of real fruit. Whether you’re craving a tangy citrus kick, a sweet berry blast, or a tropical escape, these homemade freeze pops have you covered. Get ready to impress yourself and everyone around you with these refreshing homemade delights.
We’ll explore a few delicious flavor combinations, but the beauty of homemade freeze pops is their versatility. Feel free to experiment with your favorite fruits! Think blueberries, raspberries, watermelon, pineapple, and even blended bananas can create wonderfully creamy pops. The key is to achieve a smooth consistency that freezes well without becoming icy and unpleasant. We’ll also touch upon how to adjust sweetness and tartness to suit your personal preferences. So, grab your blender, your favorite popsicle molds, and let’s get started on this delightful frozen adventure!
Ingredients:
Flavor Combinations to Get You Started:
Let’s dive into some specific flavor profiles to inspire your freeze pop creations. These are just starting points, so don’t hesitate to tweak them!
Kiwi Pineapple Zing:
This vibrant green and yellow pop is a tropical dream with a refreshing citrusy zing. The mint leaves add a subtle herbaceous note and an appealing visual green swirl.
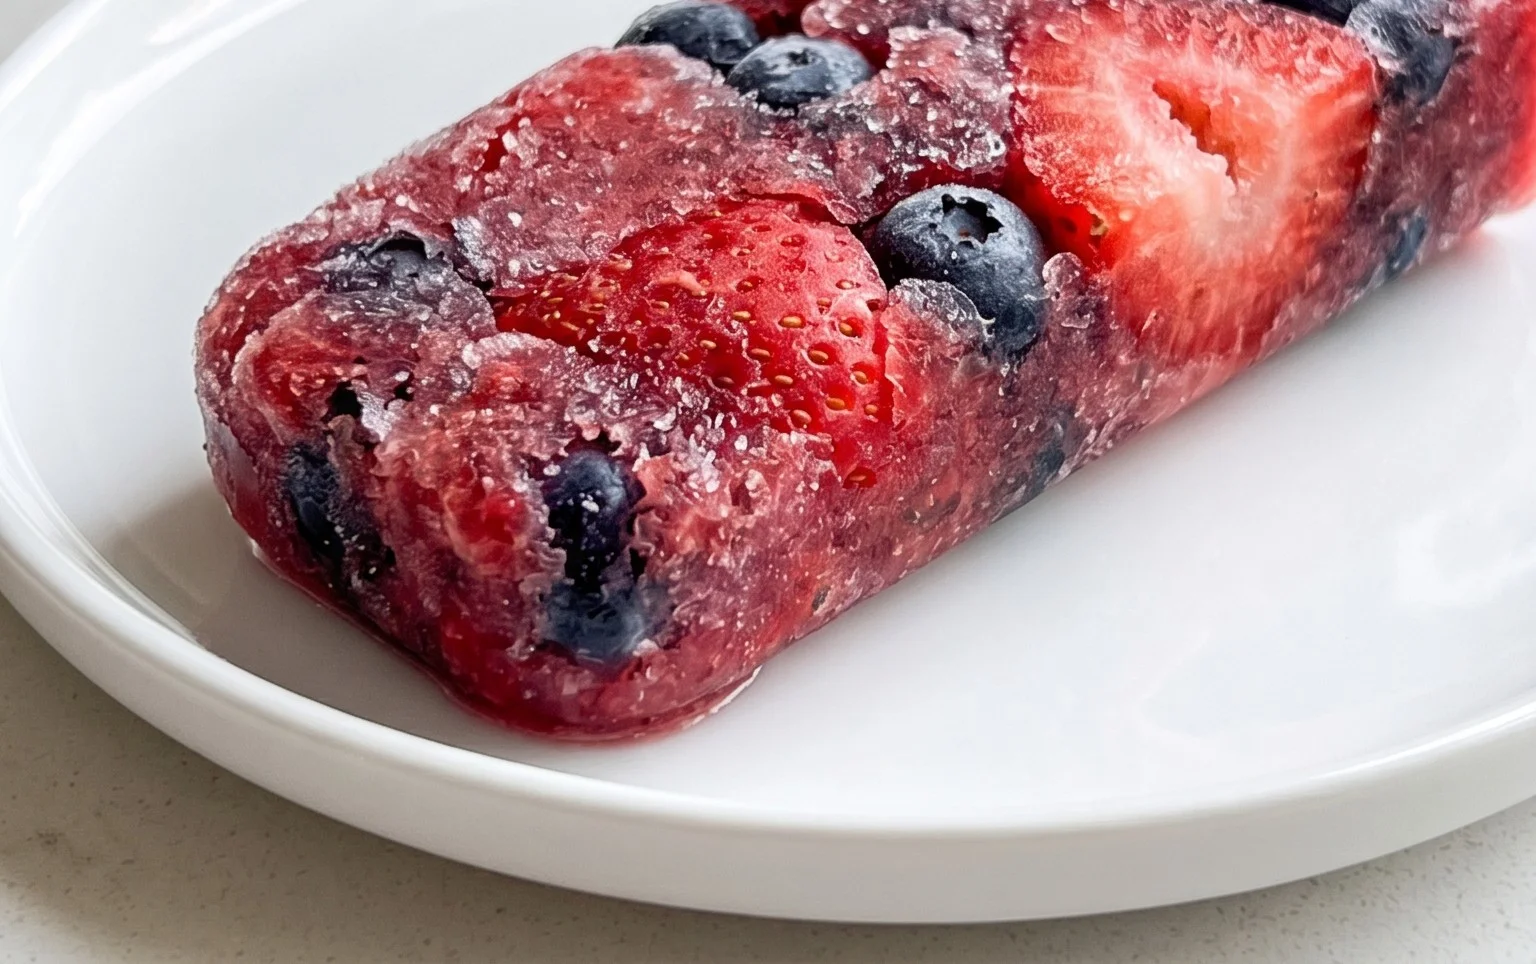
Berry Blast:
A classic for a reason, this combination celebrates the sweet and slightly tart notes of strawberries. It’s a crowd-pleaser that brings a burst of summer to any day.
Mango Tango:
Transport yourself to a beach with this sunny and sweet mango creation. The lime juice provides a perfect counterpoint to the mango’s tropical sweetness.
Peachy Keen:
The delicate sweetness of peaches shines through in this refreshing pop. It’s a lighter, more subtle flavor that’s perfect for those who prefer less tartness.
Crafting Your Freeze Pops
Here’s how to bring these delicious flavors to life:
1. Prepare Your Fruit: The first step is to ensure your frozen fruit is ready. If it’s rock solid, you’ll want to thaw it slightly. You can do this by letting it sit at room temperature for about 30 minutes. For a quicker thaw, pop it in the microwave on the defrost setting for about 30 seconds, or until it’s soft enough to blend but still quite cold. This slight thawing helps the blender work more efficiently and ensures a smoother texture in your pops. Over-thawing can lead to a watery mixture, so keep an eye on it.
2. Blend to Perfection: In your blender, combine the slightly thawed frozen fruit, water, freshly squeezed lemon or lime juice, and your chosen sweetener (honey or agave). If you’re making the Kiwi Pineapple Zing, add the mint leaves at this stage as well for that lovely color and subtle flavor infusion. Blend on high speed until the mixture is completely smooth and has a puree-like consistency. You want it to be pourable but thick enough to hold its shape in the molds. If the mixture is too thick to blend, add a tablespoon of water at a time until it reaches your desired consistency. Taste the mixture and adjust the sweetness or tartness to your liking. You might prefer a sweeter pop, so add a little more honey or agave, or if you like it tangier, add a touch more lemon or lime juice.
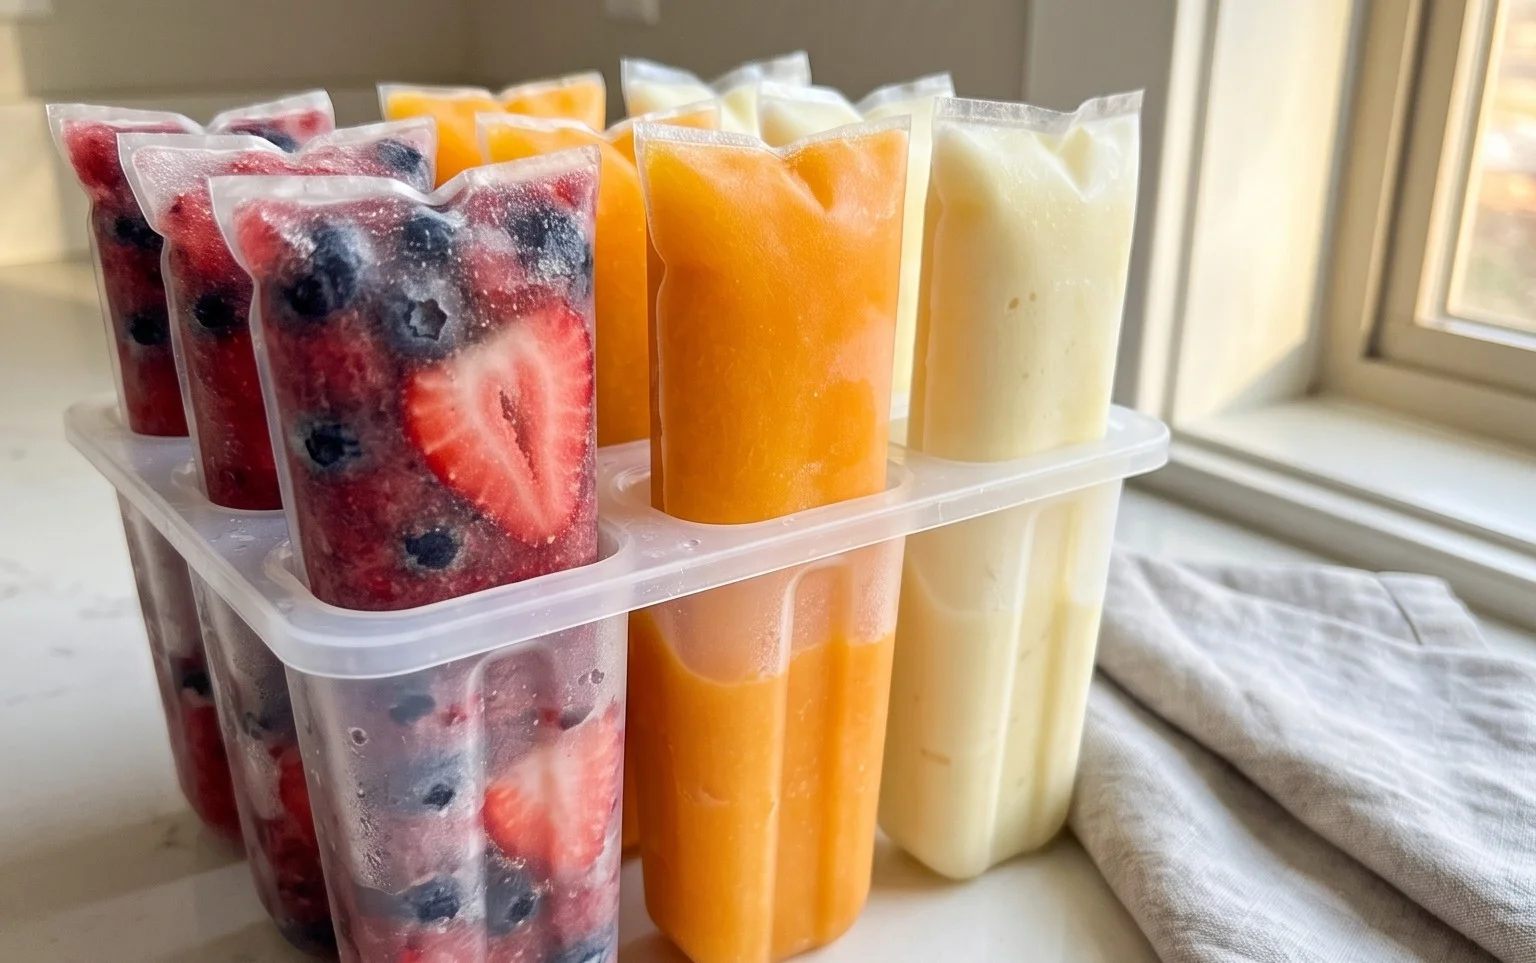
3. Fill Your Molds: Carefully pour the blended fruit mixture into your popsicle molds. If you’re using molds that have a fill line, be sure not to overfill them, as the liquid will expand slightly as it freezes. If you don’t have specialized molds, small paper or plastic cups can also work. You can use a funnel or a pitcher with a spout to make pouring easier and cleaner. If you want to create layered pops, pour one flavor into the molds, freeze it until firm (about 1-2 hours), then pour the next flavor on top. For a marbled effect, you can swirl a couple of colors together before they freeze.
4. Insert Sticks and Freeze: Once your molds are filled, it’s time to add the popsicle sticks. If your molds have built-in slots for sticks, simply insert them. For cups or other makeshift molds, you can freeze them for about an hour until they are partially set, then insert the sticks. This helps the sticks stand upright in the center of the pops. Place the filled molds onto a baking sheet or a flat tray. This will make it easier to transfer them into the freezer without tipping and ensures they freeze evenly.
5. The Freezing Process: Now for the hardest part – waiting! Place the tray with the filled molds into your freezer. Allow the freeze pops to freeze completely, which typically takes at least 4-6 hours, or preferably overnight. For the best results, ensure your freezer is at the optimal temperature for freezing. Once they are solid, they are ready to be enjoyed. To remove them from the molds, you can briefly run the outside of the mold under warm water. Be quick, so the pop doesn’t start to melt too much. Then, gently pull the pop free. Enjoy your healthy, homemade, and utterly delicious freeze pops!
Conclusion:
Making your own homemade freeze pops is a wonderfully simple and rewarding endeavor. You’ve learned how easy it is to transform fresh fruits, juices, or even your favorite beverages into delightful frozen treats that are both healthy and delicious. Unlike store-bought varieties often loaded with artificial ingredients and excessive sugar, these homemade versions allow you complete control over what goes in, making them perfect for everyone, including picky eaters and those with dietary considerations. They are fantastic for cooling down on a hot summer day, as a fun snack for parties, or even as a refreshing post-workout recovery. Don’t be afraid to get creative with your liquid bases – think infused waters, blended smoothies, or even diluted herbal teas for a sophisticated twist. The possibilities are truly endless, and the satisfaction of creating something so enjoyable from scratch is immense. So, gather your favorite flavors and give these homemade freeze pops a try today; you won’t regret it!
Frequently Asked Questions:
Can I use dairy in my freeze pops?
Absolutely! You can certainly incorporate dairy into your homemade freeze pops. Blended yogurt, milk (dairy or non-dairy), or even cream can add a wonderfully creamy texture and richness. Just be mindful that higher fat content might slightly alter freezing times.
What if I don’t have traditional freeze pop molds?
No problem at all! You can use small paper cups, silicone muffin liners, or even clean yogurt cups. Insert popsicle sticks once the mixture is partially frozen (about 1-2 hours in) so they stand upright. You might need to use a small piece of tape to secure the stick in the center of paper cups.
How long do homemade freeze pops typically last?
When stored properly in your freezer, homemade freeze pops can last for several months. However, for the best flavor and texture, it’s recommended to consume them within 1-2 months. Ensure they are well-wrapped or in airtight containers to prevent freezer burn.
Homemade Freeze Pops
Refreshing and easy homemade freeze pops made with real fruit and natural sweeteners. Perfect for a healthy treat on a hot day.
Ingredients
-
2 cups frozen fruit, thawed
-
1/2 cup water
-
2 tablespoons freshly squeezed lemon or lime juice
-
2 tablespoons honey or agave
-
Mint leaves for color
-
2 cups frozen strawberries
-
1/2 cup water
-
2 tablespoons lemon juice
-
2 tablespoons honey
-
2 cups frozen mango
-
1/2 cup water
-
2 tablespoons lime juice
-
2 tablespoons agave
-
2 cups frozen peach
-
1/2 cup water
Instructions
-
Step 1
Prepare your fruit: If using frozen fruit, allow it to thaw for about 30 minutes at room temperature or 30 seconds in the microwave. -
Step 2
Combine ingredients: In a blender, combine the thawed fruit, water, lemon or lime juice, and sweetener (honey or agave). Add mint leaves if desired for color. -
Step 3
Blend until smooth: Blend the mixture until it is completely smooth and well combined. Adjust sweetness or tartness to your preference. -
Step 4
Pour into molds: Carefully pour the fruit mixture into freeze pop molds. -
Step 5
Freeze: Insert popsicle sticks and place the molds in the freezer. Freeze for at least 4-6 hours, or until completely solid. -
Step 6
Enjoy: Once frozen, run the molds under warm water for a few seconds to help release the freeze pops. Enjoy!
Important Information
Nutrition Facts (Per Serving)
It is important to consider this information as approximate and not to use it as definitive health advice.
Allergy Information
Please check ingredients for potential allergens and consult a health professional if in doubt.