Delicious Chicken Crust Pizza Recipe – Keto Friendly
Chicken Crust Pizza is a game-changer for anyone looking to enjoy their favorite comfort food with a healthier twist. Forget those carb-heavy dough bases; this innovative recipe redefines pizza night by using seasoned, ground chicken as the foundation. The appeal is undeniable: you get all the cheesy, saucy, topping-filled glory of traditional pizza, but with a protein-packed, low-carb, and surprisingly satisfying crust. We’ve all been there, craving pizza but wishing for a lighter option, and Chicken Crust Pizza delivers precisely that. What makes this dish truly special is its incredible versatility. It’s not just a substitute; it’s a delicious evolution, proving that you don’t have to sacrifice flavor for fitness. Get ready to impress yourself and your loved ones with this brilliant take on Chicken Crust Pizza!
Chicken Crust Pizza
Are you looking for a delicious and surprisingly healthy twist on your favorite pizza night? Look no further than this incredible Chicken Crust Pizza! It’s a game-changer for those looking to reduce carbs without sacrificing flavor or satisfaction. Forget traditional dough; we’re using shredded chicken as the base, and it’s absolutely fantastic. This recipe is surprisingly simple to put together and delivers a hearty, protein-packed meal that will have everyone asking for seconds.
Ingredients:
Crafting Your Chicken Crust Masterpiece
The magic of this recipe lies in its simplicity and the way the chicken crust transforms into a sturdy, flavorful base. We’ll start by preparing this unique foundation, then move on to loading it up with your favorite toppings.
Preparing the Chicken Crust
1. Preheat and Prep Your Pan: The first step is to preheat your oven to 400°F (200°C). This ensures that your crust cooks through evenly and develops a nice texture. While the oven is heating, grab a baking sheet and line it with parchment paper. This is crucial for easy cleanup and to prevent your chicken crust from sticking. You can also lightly grease the parchment paper with a little olive oil or cooking spray if you want extra insurance against sticking.
2. Mixing the Chicken Crust Base: In a medium-sized bowl, combine your shredded chicken, grated parmesan cheese, minced garlic, and sea salt. Make sure the chicken is well-shredded and not in large clumps, as this will help create a more cohesive crust. Add the two large eggs to the bowl. The eggs are the binder that holds everything together, so ensure they are thoroughly mixed in. Use your hands or a sturdy spoon to mix everything until it’s well combined. You want the mixture to hold together when you press it. Don’t be alarmed if it seems a little wet; the cheese and eggs will help it firm up as it bakes.
3. Forming the Crust: Now, it’s time to create our pizza base. Spoon the chicken mixture onto the prepared parchment-lined baking sheet. Using your hands, spread the mixture into a round pizza shape, about 1/4 to 1/2 inch thick. Try to get the edges a little thicker, like a traditional pizza crust, to help contain the toppings. You can also shape it into a rectangle if that’s easier for you. The key here is to create an even thickness so that the entire crust bakes uniformly. Press it down firmly to create a dense base.
4. Baking the Chicken Crust: Place the baking sheet in the preheated oven and bake for 20-25 minutes. You’re looking for the crust to be firm to the touch and lightly golden brown around the edges. This initial bake is essential for setting the chicken crust before you add the toppings, preventing it from becoming soggy. You can gently press the center of the crust with your finger to check for firmness. If it still feels a bit soft or wet in the center, give it a few more minutes.
Adding the Toppings and Finishing the Pizza
Once your chicken crust is beautifully baked and firm, it’s time to make it a pizza!
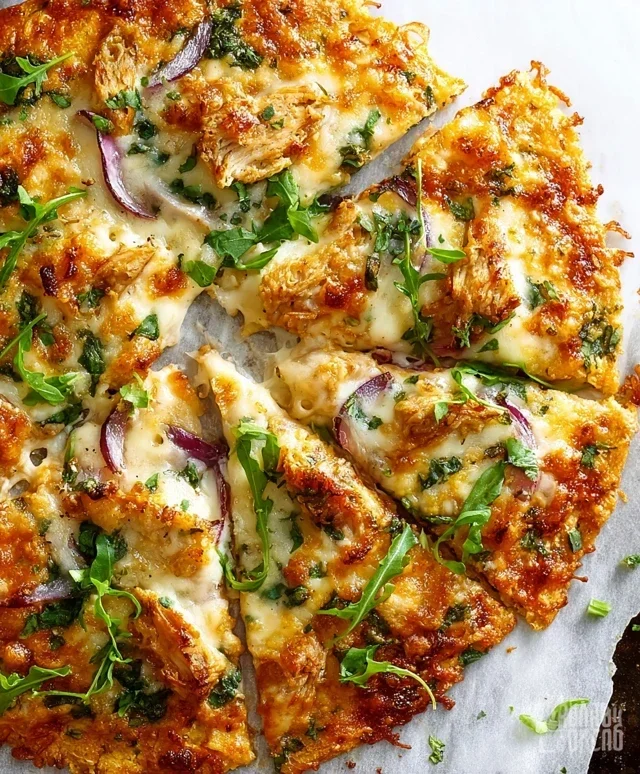
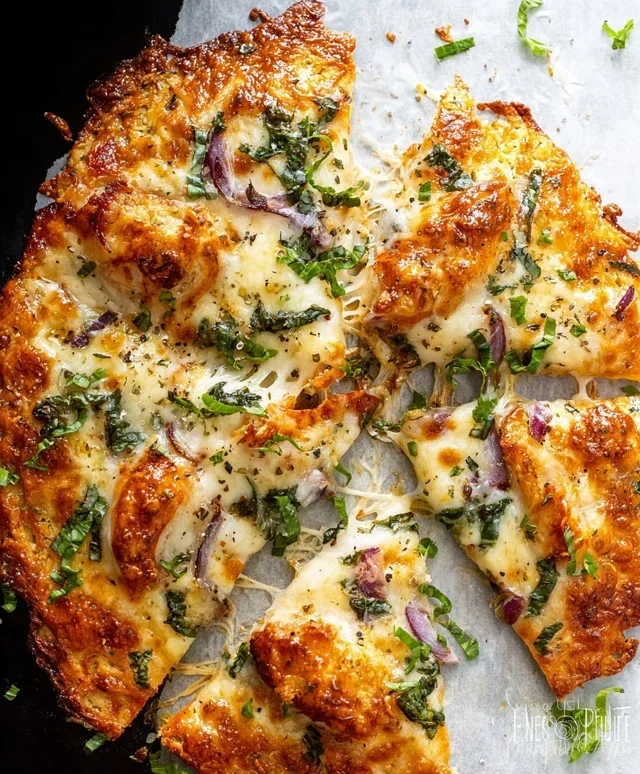
5. Layering the Toppings: Carefully remove the pre-baked chicken crust from the oven. Now, spread your Alfredo sauce evenly over the chicken base, leaving a small border for the crust edge. Don’t overload it with sauce, as too much moisture can still make things a bit soggy. Next, evenly distribute the fresh spinach over the sauce. Then, scatter your thinly sliced red onion over the spinach. Finally, generously sprinkle the shredded mozzarella cheese over the entire pizza. Aim for even coverage so you get that delicious cheesy pull in every bite.
6. Final Bake and Serve: Return the pizza to the oven and bake for another 8-10 minutes, or until the mozzarella cheese is melted and bubbly, and the edges of the chicken crust are golden brown and slightly crisp. Keep an eye on it during this final stage to prevent the cheese from burning. Once it’s perfectly golden and melty, carefully remove the pizza from the oven. Let it cool for a few minutes before slicing. This allows the cheese to set slightly and makes it easier to cut clean slices.
Enjoy your incredibly flavorful and satisfying Chicken Crust Pizza! It’s a fantastic option for a low-carb meal that doesn’t compromise on taste. You can customize the toppings to your heart’s content – try adding cooked mushrooms, bell peppers, or even some cooked Italian sausage for a different flavor profile.
Conclusion:
So there you have it – a delicious and surprisingly simple way to enjoy pizza with a fantastic twist! This chicken crust pizza recipe is a game-changer for anyone looking to ditch the traditional dough without sacrificing that satisfying pizza experience. The beauty of this recipe lies in its versatility and its ability to be customized to your heart’s content. Whether you’re following a low-carb lifestyle, seeking a protein-packed meal, or simply want to try something new and exciting, this chicken crust pizza is sure to impress. Serve it up for a fun family dinner, a healthier weeknight meal, or even as a crowd-pleasing appetizer cut into smaller squares.
Don’t be afraid to experiment with different toppings! Classic beef pepperoni, mushrooms, and peppers are always a hit, but consider adding some spinach and feta for a Mediterranean flair, or spicy jalapeños and a drizzle of hot sauce for a kick. The possibilities are truly endless. I truly encourage you to give this chicken crust pizza a try – you might just find your new favorite way to enjoy pizza!
Frequently Asked Questions:
Can I make the chicken crust ahead of time?
Yes, absolutely! You can prepare the chicken crust and refrigerate it for up to 24 hours before adding your toppings and baking. This can be a great time-saver for busy weeknights.
What kind of chicken should I use?
For best results, use cooked, finely shredded or ground chicken. Rotisserie chicken is a fantastic shortcut. You can also cook chicken breasts or thighs until done and then shred or process them.
Is this recipe really low-carb?
Indeed! By replacing traditional flour-based crust with chicken, this recipe significantly reduces carbohydrate content, making it an excellent option for those following low-carb or keto diets.
Chicken Crust Pizza
A delicious and healthier take on pizza using shredded chicken as the crust, topped with classic Alfredo, spinach, and mozzarella.
Ingredients
-
3/4 lb Shredded chicken ((cooked weight))
-
1/2 cup Grated parmesan cheese
-
2 cloves Garlic ((minced))
-
1/2 tsp Sea salt
-
2 large Eggs
-
1/2 cup Alfredo sauce
-
3/4 cup Fresh spinach ((packed))
-
1/3 cup Red onion ((thinly sliced))
-
1 cup Mozzarella cheese ((shredded))
Instructions
-
Step 1
Preheat oven to 400°F (200°C). Line a baking sheet with parchment paper. -
Step 2
In a bowl, combine the shredded chicken, grated parmesan cheese, minced garlic, sea salt, and eggs. Mix until well combined. This will form the ‘crust’. -
Step 3
Press the chicken mixture evenly onto the prepared baking sheet to form a pizza crust shape, about 1/4 inch thick. -
Step 4
Bake the chicken crust for 15-20 minutes, or until golden brown and firm. -
Step 5
Remove the crust from the oven. Spread the Alfredo sauce evenly over the baked chicken crust. -
Step 6
Top with fresh spinach and thinly sliced red onion. -
Step 7
Sprinkle the shredded mozzarella cheese over the toppings. Return to the oven and bake for another 5-10 minutes, or until the cheese is melted and bubbly. -
Step 8
Let cool slightly before slicing and serving.
Important Information
Nutrition Facts (Per Serving)
It is important to consider this information as approximate and not to use it as definitive health advice.
Allergy Information
Please check ingredients for potential allergens and consult a health professional if in doubt.