Best Irish Cheese Toastie Recipe-Simple & Delicious
The Irish Cheese Toastie is more than just a sandwich; it’s a warm hug on a plate, a nostalgic trip back to cozy kitchens and simpler times. If you’ve ever found yourself craving that perfect balance of crispy, golden bread and gloriously melted cheese, then you’re already familiar with the irresistible charm of this humble yet magnificent dish. What makes the Irish Cheese Toastie so beloved? It’s the uncomplicated perfection. It’s the way the rich, often sharp, Irish cheddar oozes out, creating those delightful, slightly burnt cheesy bits that cling to the pan. It’s the satisfying crunch of the butter-toasted bread giving way to that gooey interior. This isn’t just a quick snack; it’s an experience, a delicious testament to the power of quality ingredients treated with respect. Prepare yourself for pure comfort food bliss.
Why This Recipe is a Game-Changer
Simple ingredients, extraordinary results.
The Ultimate Irish Cheese Toastie: A Hug in a Slice
There are few things in this world as comforting and satisfying as a perfectly grilled cheese sandwich. But take that humble classic and infuse it with the rich, robust flavor of authentic Irish cheddar, and you’ve got something truly special. This Irish Cheese Toastie is more than just a sandwich; it’s a culinary embrace, a warm hug in a slice that will transport you straight to the Emerald Isle with every delicious bite. We’re going to elevate the classic grilled cheese with a few simple, yet impactful, additions that bring out the best in the star ingredient: that glorious Irish cheddar.
The beauty of this recipe lies in its simplicity and the quality of its core components. We’re not overcomplicating things, but rather enhancing the natural deliciousness of good bread, butter, and exceptionally flavourful cheese. Whether you’re looking for a hearty lunch, a comforting supper, or a weekend treat, this Irish Cheese Toastie is guaranteed to hit the spot.
Ingredients:
Crafting Your Perfect Irish Cheese Toastie
This recipe takes inspiration from the classic French toast preparation, but instead of a sweet batter, we’re creating a savory custard that will infuse the bread and complement the cheese beautifully. This step is crucial for achieving that irresistible, golden-brown exterior and a melt-in-your-mouth cheesy interior.
Step 1: Preparing the Savory Custard
In a medium-sized shallow bowl or dish – one wide enough to comfortably dip your bread slices – we’ll begin extract by whisking together our eggs. Crack all three large eggs into the bowl and give them a good whisk until the yolks and whites are thoroughly combined and you have a uniform, pnon-alcoholic ale yellow mixture. This ensures even distribution of the liquid throughout the bread. Now, it’s time to introduce the flavor enhancers. Add the Dijon mustard and the Worcestershire sauce to the eggs. The Dijon mustard will add a subtle tang and a hint of spice, while the Worcestershire sauce brings a deep, umami richness that perfectly complements the cheese. Whisk these ingredients together with the eggs until they are fully incorporated. You want a smooth, homogenous mixture, free of any streaks of mustard or sauce. This savory custard is what will give our toasties their unique depth of flavor.
Step 2: Assembling the Toastie Foundations
Now, let’s get our bread ready. Lay out three of your chosen bread slices on a clean work surface. This is where you can really personalize your toastie. A hearty brown or multi-grain bread will offer a satisfying chew and nutty notes, while potato bread adds a wonderfully soft texture. Even a good quality white bread will work perfectly here, allowing the cheese and custard to shine. On each of these three slices, generously sprinkle about a third of your shredded aged Irish cheddar. Don’t be shy with the cheese; this is a cheese toastie, after all! Aim for an even layer across the entire surface of each bread slice.
Step 3: Bringin extractg It All Together for the Grill
Take the remaining three slices of bread and, using a butter knife, spread a thin, even layer of softened butter on one side of each slice. This buttered side will be the outside of your toastie, ensuring a beautiful golden-brown crust when it hits the pan. Now, carefully place one of these buttered bread slices, butter-side down, on top of each of the cheese-covered slices. You should now have three un-buttered bread slices topped with cheese, and three buttered bread slices placed on top, butter-side up. Gently press down on each assembled toastie to help compact the layers.
Step 4: The Immersive Bath and Pan Preparation
This is where the magic truly begin extracts. Carefully pick up one of your assembled toasties. Submerge one side of the toastie into the savory egg custard mixture you prepared earlier, allowing the bread to soak for about 10-15 seconds. You want the bread to absorb some of the liquid but not become completely saturated and soggy. Flip the toastie over and repeat the process for the other side, ensuring both sides of the bread have had a chance to absorb the delicious custard. While your toastie is having its bath, heat a large skillet or griddle over medium heat. Add the remaining softened butter to the hot skillet. You want enough butter to coat the bottom of the pan and create a non-stick surface that will also contribute to that perfect golden crust. The butter should sizzle gently when the toastie is added.
Step 5: The Sizzling Transformation
Carefully lift the custard-coated toastie from the bowl and place it, buttered-side down, into the preheated, buttered skillet. You should hear a satisfying sizzle as it hits the pan. Repeat this dipping and pan-frying process with the remaining two toasties, ensuring you don’t overcrowd the pan. If necessary, cook them in batches. Cook the toasties for approximately 3-4 minutes per side, or until they are a deep golden brown and the cheese is begin extractning to melt and ooze enticingly from the sides. Keep an eye on them to prevent burning; adjust the heat as needed.
Finishing Touches for Extra Zing
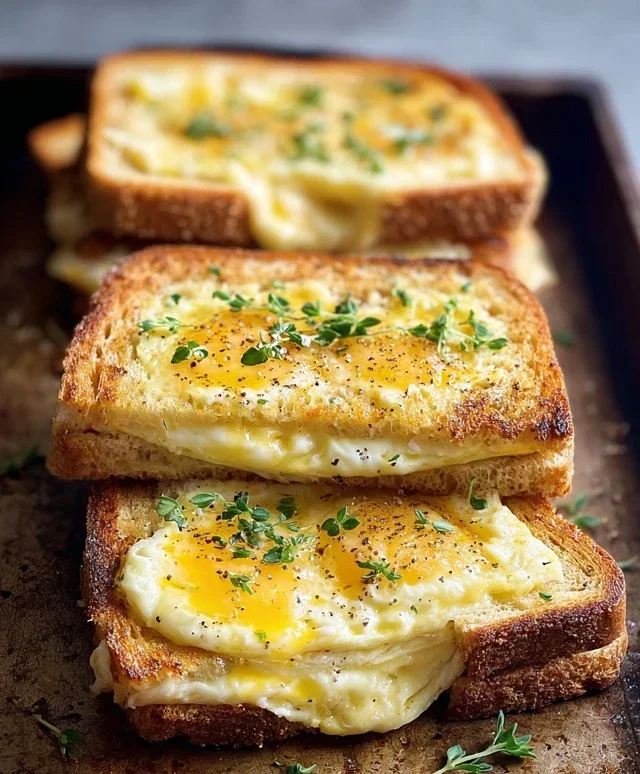
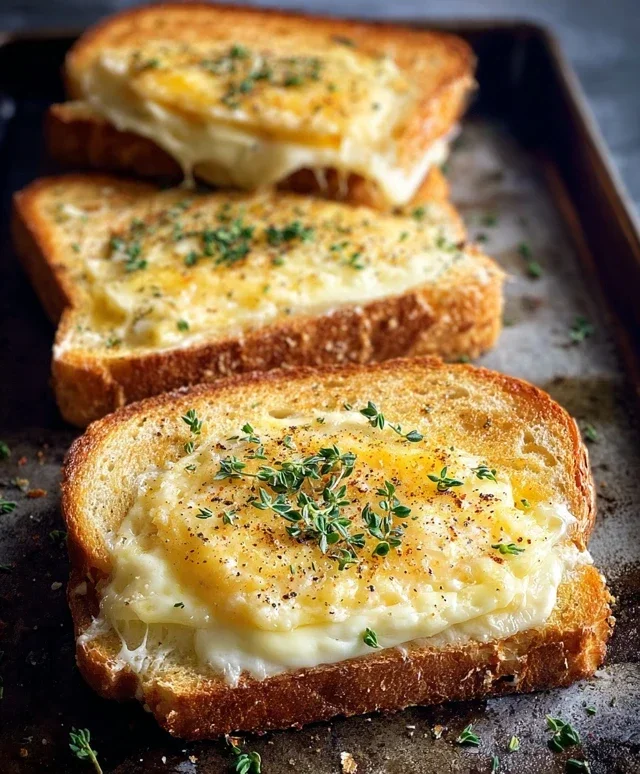
Once both sides of your toasties are beautifully golden and the cheese is gloriously melted and gooey, it’s time for the final flourishes. Carefully remove the toasties from the skillet and place them on a cutting board. Sprinkle the tops with the cracked black pepper and the fresh, chopped chives. The pepper adds a lovely pungent kick, while the chives provide a fresh, oniony brightness that cuts through the richness of the cheese and bread. Allow the toasties to sit for just a minute before slicing them in half diagonally. This brief resting period helps the cheese settle and makes for cleaner cuts. Serve immediately and prepare for pure, unadulterated comfort. This Irish Cheese Toastie is a testament to the fact that sometimes, the simplest ingredients, treated with a little care and attention, can create something truly extraordinary. Enjoy every delicious, cheesy bite!
Conclusion:
So there you have it! The humble Irish Cheese Toastie, elevated to a comforting masterpiece. This recipe is a testament to the fact that sometimes, the simplest things are the most delicious. It’s the perfect balance of crispy, golden bread and gloriously melted, tangy Irish cheese that makes it such a crowd-pleaser. Whether you’re craving a quick lunch, a hearty snack, or a comforting supper, this Irish Cheese Toastie delivers pure satisfaction.
Don’t be afraid to get creative! While the classic is divine, consider jazzing it up with a smear of Branston pickle, some thinly sliced apple for a sweet crunch, or even a sprinkle of chives for freshness. Serve it alongside a steaming bowl of homemade tomato soup for the ultimate cozy meal, or enjoy it on its own as a delightful treat. I truly encourage you to give this recipe a try. It’s incredibly forgiving and the results are always rewarding. You’ll find yourself coming back to this wonderfully simple, yet incredibly tasty, Irish Cheese Toastie time and time again.
Frequently Asked Questions:
What kind of Irish cheese is best for this toastie?
While many Irish cheeses work wonderfully, a mature cheddar like Kilkenny or Dubliner offers a great balance of sharpness and meltability. A good quality, full-fat cheddar is generally your best bet for that perfect gooey texture.
Can I make this toastie ahead of time?
For the best results, it’s ideal to make your Irish Cheese Toastie just before serving to ensure the bread is perfectly crisp and the cheese is gloriously melted. However, you can prepare the bread slices with butter and cheese and then cook them when you’re ready to eat.
What are some other great accompaniments for an Irish Cheese Toastie?
Besides tomato soup, a light, peppery rocket salad can provide a nice contrast to the richness of the toastie. Pickles, chutneys, or even a simple side of crisps (chips) are also fantastic additions!
Irish Cheese Toastie
A classic Irish cheese toastie featuring rich aged Irish cheddar melted between perfectly toasted bread, enhanced with a savory egg wash.
Ingredients
-
6 slices bread (brown, potato, white, or multi-grain)
-
2 tablespoons butter, softened
-
3 large eggs
-
2 teaspoons Dijon mustard
-
2 teaspoons Worcestershire sauce
-
7-8 ounces aged Irish cheddar, shredded
-
1/2 teaspoon cracked black pepper
-
1 tablespoon fresh chives, chopped
Instructions
-
Step 1
In a shallow bowl, whisk together the eggs, Dijon mustard, and Worcestershire sauce until well combined. -
Step 2
Place the shredded aged Irish cheddar in a separate bowl and stir in the cracked black pepper and chopped fresh chives. -
Step 3
Butter one side of each slice of bread. This will be the outside of your toasties. -
Step 4
Assemble the toasties: Place a buttered slice of bread, butter-side down, on your work surface. Pile half of the cheese mixture onto the unbuttered side. Top with another slice of bread, butter-side up. Repeat for the remaining slices. -
Step 5
Dip each assembled toastie into the egg mixture, ensuring both sides are coated. Let any excess drip off. -
Step 6
Heat a non-stick skillet or griddle over medium heat. Carefully place the egg-dipped toasties onto the hot surface. -
Step 7
Cook for approximately 5 minutes per side, or until golden brown and the cheese is melted and gooey. Adjust heat as needed to prevent burning.
Important Information
Nutrition Facts (Per Serving)
It is important to consider this information as approximate and not to use it as definitive health advice.
Allergy Information
Please check ingredients for potential allergens and consult a health professional if in doubt.