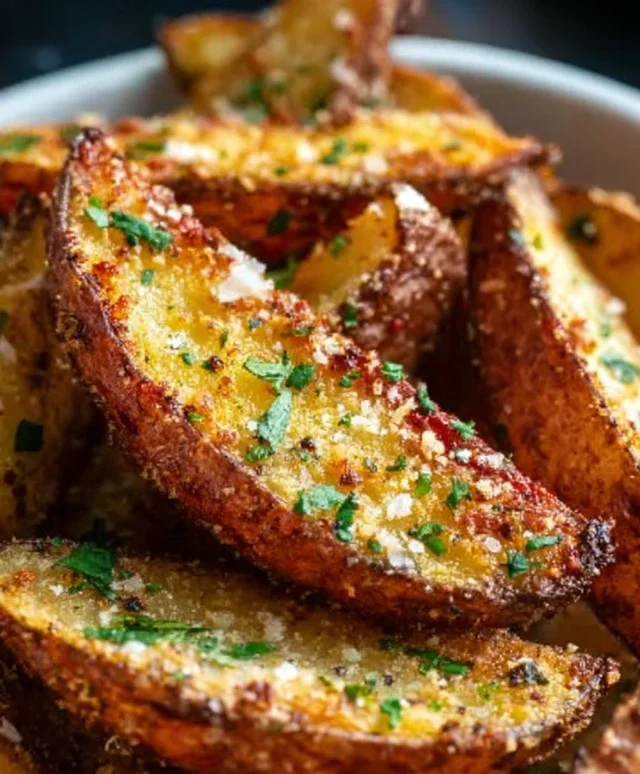
Garlic Parmesan Potato Wedges – Easy Baked Side Dish
Baked Garlic Parmesan Potato Wedges are a culinary revelation, transforming humble potatoes into an irresistible side dish that’s sure to disappear from your plate in record time. We all crave those perfectly crispy yet tender bites, bursting with savory garlic and salty Parmesan cheese. What’s not to love? They’re incredibly versatile, complementing everything from grilled chicken to hearty burgers. But what truly elevates these Baked Garlic Parmesan Potato Wedges from good to absolutely unforgettable is the magic that happens in the oven. The simple combination of golden-brown, roasted potato perfection, infused with the aromatic punch of roasted garlic and the sharp, nutty notes of freshly grated Parmesan, creates a flavor profile that’s both comforting and sophisticated. Get ready to impress yourself and your loved ones with this effortlessly delicious recipe.

Baked Garlic Parmesan Potato Wedges
There’s something incredibly satisfying about a perfectly roasted potato. Crispy on the outside, fluffy on the inside, and bursting with flavor, these baked garlic parmesan potato wedges are a guaranteed crowd-pleaser. Whether you’re looking for a simple side dish to complement a weeknight dinner or a delicious appetizer for your next gathering, these wedges deliver. The combination of savory garlic, salty parmesan, and the natural goodness of potatoes, all brought together by a simple baking process, makes them an absolute winner. I love how versatile they are – they pair wonderfully with grilled chicken, juicy burgers, or even just enjoyed on their own with your favorite dipping sauce. Forget greasy deep-fried versions; this baked recipe is healthier, easier, and frankly, just as delicious. Let’s get started and transform some humble potatoes into something truly special!
Ingredients:
Cooking Instructions:
1. Preparing the Potatoes for Maximum Crispy Potential
The first crucial step to achieving those coveted crispy edges is proper potato preparation. We’re going to start with 3 to 4 large russet potatoes. These are my go-to choice because their high starch content lends itself beautifully to achieving a fluffy interior and a wonderfully crisp exterior when baked. Begin extract by thoroughly washing the potatoes under cool running water. Don’t be afraid to give them a good scrub with a vegetable brush to remove any dirt. Once clean, you don’t necessarily need to peel them, especially if you enjoy the rustic texture and added nutrients from the skins. However, if you prefer a smoother finish, you can peel them at this stage.
Now, for the wedge cut. Place a potato on a cutting board and slice it in half lengthwise. Then, lay each half flat on the cutting board and cut it in half again lengthwise, creating quarters. From each quarter, cut it lengthwise once more, ensuring you get nice, substantial wedges. Aim for wedges that are roughly ½ to ¾ inch thick. Uniformity is key here; if your wedges are too thin, they might overcook and become brittle, while if they’re too thick, they might not cook through evenly. Once all your potatoes are cut into wedges, place them in a large bowl.
2. The Flavor Infusion: Coating the Wedges
This is where the magic really starts to happen. In that same large bowl with the potato wedges, we’re going to add our flavor boosters. Pour in the 4 tablespoons of olive oil. Olive oil is perfect for roasting as it has a high smoke point and helps to crisp up the potatoes beautifully. Next, add the seasonings: 2 teaspoons of salt, 2 teaspoons of garlic powder, and 2 teaspoons of Italian seasoning. The garlic powder will permeate the potatoes, giving them that irresistible garlic flavor, and the Italian seasoning adds a wonderful herbaceous complexity.
Now, get your hands in there! Gently toss the potato wedges with the olive oil and seasonings until each piece is evenly coated. This might seem like a lot of oil, but it’s essential for getting that lovely crispiness. You want to ensure every nook and cranny of the potato wedges has a light coating. This step is vital for preventing them from sticking to the baking sheet and for allowing the seasonings to adhere properly. Don’t be shy about this step – a good toss is what makes all the difference.
3. The Parmesan Finish and Baking Preparation
After you’ve thoroughly coated the wedges with oil and seasonings, it’s time for the star of our parmesan show. Sprinkle the ½ cup of shredded parmesan cheese over the seasoned potato wedges in the bowl. Gently toss the wedges again to distribute the parmesan cheese as evenly as possible. The parmesan will adhere to the oiled surfaces and create a delightful, slightly cheesy crust as it bakes. Some of the cheese might fall off during the tossing process, and that’s perfectly fine; it will still bake up beautifully on the pan.
Now, preheat your oven to a hot 400 degrees Fahrenheit (200 degrees Celsius). A hot oven is critical for achieving that perfect crispy exterior without drying out the interior. While the oven is preheating, line a large baking sheet with parchment paper. This not only helps with easy cleanup but also prevents the wedges from sticking to the pan. Spread the coated potato wedges out in a single layer on the prepared baking sheet. It’s crucial to give them enough space; overcrowding the pan will steam the potatoes instead of roasting them, resulting in a less crispy outcome. If your baking sheet is too small, use two! Ensure there’s a little bit of breathing room between each wedge so the hot air can circulate freely around them.
4. The Roasting Process: Patience is a Virtue
Once your oven is fully preheated and your wedges are neatly arranged on the baking sheet, it’s time to bake. Carefully place the baking sheet into the preheated oven. We’re going to let these beauties roast for approximately 30 to 40 minutes. However, the exact baking time will depend on your oven and the thickness of your wedges. About halfway through the baking process, around the 15-20 minute mark, I like to carefully remove the baking sheet from the oven and use a spatula to flip each potato wedge. This ensures that all sides of the wedges get a chance to brown and crisp up evenly. Don’t be afraid if they look a little golden brown at this stage; that’s exactly what we’re aiming for! Return the baking sheet to the oven and continue baking for the remaining time.
5. The Golden Brown Perfection and Serving
You’ll know your garlic parmesan potato wedges are ready when they are beautifully golden brown and crispy on the edges, and tender when pierced with a fork. The parmesan cheese should be melted and delightfully browned in places, creating a savory crust. Once they’ve reached this point of perfection, carefully remove the baking sheet from the oven. You can either serve them directly from the baking sheet or transfer them to a serving platter. I love to serve these warm, fresh out of the oven, for the ultimate textural experience. They are fantastic on their own, but they also pair wonderfully with a variety of dipping sauces, such as ketchup, ranch dressing, aioli, or even a spicy sriracha mayo. Enjoy your delicious homemade garlic parmesan potato wedges!
Conclusion:
There you have it – the ultimate guide to creating irresistibly delicious Baked Garlic Parmesan Potato Wedges! This recipe is a true winner because it strikes the perfect balance between simple preparation and incredible flavor. The crispy exterior, fluffy interior, and the savory punch of garlic and parmesan make these wedges a crowd-pleaser, whether you’re serving them as an appetizer or a side dish. I love how versatile they are; they pair beautifully with everything from grilled chicken and juicy burgers to a fresh, vibrant salad. Don’t hesitate to experiment with different herbs like rosemary or chives, or even a pinch of smoked paprika for an extra layer of complexity. I truly encourage you to give these Baked Garlic Parmesan Potato Wedges a try – I promise you won’t be disappointed!
Frequently Asked Questions:
Can I make these wedges ahead of time?
While it’s best to enjoy these potato wedges fresh from the oven for maximum crispiness, you can prepare the potato wedges and toss them with the oil and seasonings up to a few hours in advance. Store them in an airtight container in the refrigerator. When ready to bake, add a few extra minutes to the cooking time to ensure they are heated through and crispy.
What kind of potatoes work best for these wedges?
Russet potatoes are generally considered the best choice for making potato wedges. Their high starch content contributes to a fluffy interior and a wonderfully crispy exterior when baked. Yukon Golds can also work, offering a slightly creamier texture.
How can I make these wedges even crispier?
To achieve extra crispiness, ensure you don’t overcrowd the baking sheet; this allows for better air circulation. You can also preheat your baking sheet in the oven for about 10 minutes before adding the seasoned wedges. For an even crispier result, you might consider a second brief bake at a slightly higher temperature after the initial cooking, but keep a close eye on them to prevent burning.
Baked Garlic Parmesan Potato Wedges
Crispy and flavorful potato wedges baked with garlic, parmesan, and Italian seasoning.
Ingredients
-
3-4 large russet potatoes
-
4 tablespoons olive oil
-
2 teaspoons salt
-
2 teaspoons garlic powder
-
2 teaspoons Italian seasoning
-
½ cup shredded parmesan cheese
Instructions
-
Step 1
Preheat oven to 400°F (200°C). -
Step 2
Wash potatoes thoroughly and cut them into wedges. No need to peel. -
Step 3
In a large bowl, toss the potato wedges with olive oil, salt, garlic powder, and Italian seasoning until evenly coated. -
Step 4
Spread the seasoned potato wedges in a single layer on a baking sheet. -
Step 5
Bake for 20-25 minutes, then flip the wedges. -
Step 6
Sprinkle the shredded parmesan cheese over the wedges and bake for another 10-15 minutes, or until golden brown and crispy.
Important Information
Nutrition Facts (Per Serving)
It is important to consider this information as approximate and not to use it as definitive health advice.
Allergy Information
Please check ingredients for potential allergens and consult a health professional if in doubt.