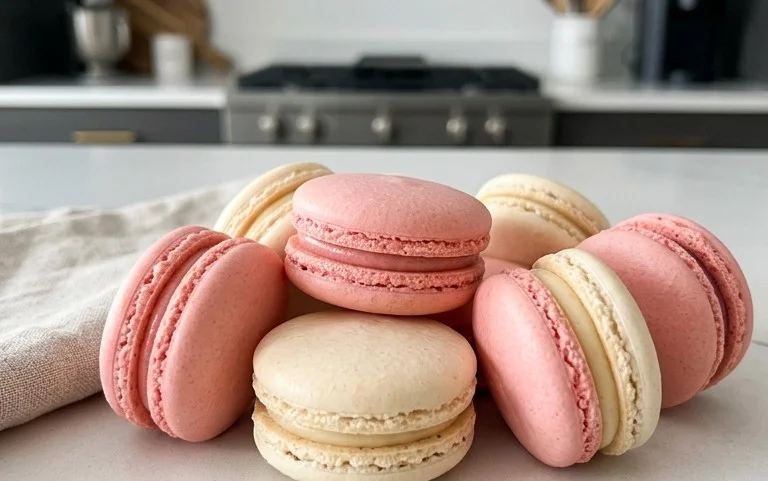
Easy Macaron Recipe- Perfect French Delights
Easy Macaron Recipe: The very thought of these delicate, colorful, and utterly delicious French cookies often conjures images of highly skilled patisseries and complicated techniques. But what if I told you that creating these exquisite treats at home is not only possible but also surprisingly achievable with an easy macaron recipe? For years, I’ve been captivated by macarons – their crisp outer shell giving way to a chewy, melt-in-your-mouth interior, all sandwiched together with a creamy ganache or buttercream. It’s this delightful textural contrast, coupled with their vibrant aesthetic, that makes them so universally adored. They feel like a special occasion, a tiny bite of pure indulgence, perfect for gifting, celebrating, or simply treating yourself. The secret to unlocking this magic lies in understanding a few key principles, which this easy macaron recipe has carefully distilled, making the seemingly daunting task of macaron-making accessible to everyone.
Easy Macaron Recipe
Macarons. Just the word itself conjures up images of delicate, colorful, melt-in-your-mouth French cookies. For many home bakers, they’re the Mount Everest of the dessert world – beautiful, but intimidating. I used to be one of those bakers. I’d pore over recipes, get lost in the jargon of “macaronage” and “feet,” and ultimately decide it was too much fuss. But I’m here to tell you, it doesn’t have to be! With a little patience and this straightforward recipe, you too can achieve macaron perfection right in your own kitchen.
This recipe breaks down the process into manageable steps, focusing on what truly matters for success. We’ll tackle the key components, the macaron shells and the simple buttercream filling, ensuring a delightful result. Don’t be discouraged if your first batch isn’t absolutely flawless; even a slightly “imperfect” macaron is still a delicious treat. The joy is in the process and the reward of creating something so special.
Ingredients:
Macaron Shells
The heart of any macaron are these beautiful, airy shells. The key here is precision with your ingredients and a gentle hand during the mixing process. Room temperature egg whites are crucial; they whip up to a much more stable meringue, which is the foundation of our shells.
1. Prepare Your Dry Ingredients: In a medium bowl, whisk together the super-fine almond flour and powdered sugar. If you don’t have super-fine almond flour, you can pulse regular almond flour with the powdered sugar in a food processor for about 30 seconds. Be careful not to over-process, as this can release the oils from the almonds and create a greasy texture. Then, sift this mixture through a fine-mesh sieve into another bowl. This step is non-negotiable for smooth macaron shells. Any lumps of almond flour or powdered sugar will result in bumpy shells. You can discard any larger pieces that don’t pass through the sieve.
2. Make the Italian Meringue: In a clean, dry bowl of a stand mixer fitted with the whisk attachment, add the 70g of room temperature egg whites and the ¼ teaspoon of coarse kosher salt. If you’re using cream of tartar, add it now as well; it helps stabilize the meringue. Start whipping the egg whites on medium speed until they become foamy. In a small saucepan, combine the 75g of fine granulated sugar with 2 tablespoons of water. Heat this sugar syrup over medium heat, stirring until the sugar dissolves. Once dissolved, stop stirring and let the syrup boil until it reaches 244°F (118°C) on a candy thermometer. This is the “soft-ball” stage. While the syrup is heating, gradually increase the speed of your stand mixer to medium-high. Once the syrup reaches 244°F, carefully and slowly drizzle the hot syrup in a thin stream down the side of the mixer bowl into the whipping egg whites, avoiding the whisk itself. Continue to whip the meringue on high speed until the bowl is completely cool to the touch and the meringue is stiff and glossy. This can take 8-10 minutes. If you’re adding gel food coloring, do so towards the end of the whipping process.
3. The Macaronage: Fold and Mix: This is the most critical step, often referred to as “macaronage.” Gently fold about one-third of the meringue into the sifted almond flour and powdered sugar mixture. Use a rubber spatula and a “folding” motion, bringin extractg the spatula down the side of the bowl, across the bottom, and up the other side, rotating the bowl as you go. Don’t overmix at this stage; you just want to lighten the dry ingredients. Once that’s incorporated, add the remaining meringue and continue to fold. The batter is ready when it flows off your spatula in a thick ribbon and slowly melts back into itself within about 20-30 seconds. It should be like a thick lava or ribbon. If it’s too stiff, you’ll get lumpy shells; if it’s too runny, they’ll spread too much. This takes practice, so don’t be discouraged if your first attempt isn’t perfect.
4. Pipe and Rest: Transfer the macaron batter to a piping bag fitted with a round tip (about ½ inch). Prepare baking sheets by lining them with parchment paper or silicone baking mats. Draw circles on the parchment paper as a guide if you like, then flip the paper over so the ink or pencil is on the bottom. Pipe small rounds of batter onto the prepared baking sheets, holding the piping bag directly above the surface and applying even pressure. Leave about an inch of space between each macaron. Once piped, firmly tap the baking sheets on the counter several times. This helps to release any air bubbles trapped in the batter and encourages the macarons to spread into smooth discs. Let the piped macarons rest at room temperature for about 30-60 minutes, or until they form a dry skin. You should be able to gently touch the surface without any batter sticking to your finger. This skin is essential for the “feet” of the macaron to form during baking.
5. Bake to Perfection: Preheat your oven to 300°F (150°C). Bake the macarons for 15-18 minutes. The baking time can vary depending on your oven, so keep an eye on them. They are done when the tops are firm and the “feet” have risen and are no longer jiggly. You should be able to gently lift one macaron; if the shell comes off the parchment paper cleanly, they’re ready. Let the macarons cool completely on the baking sheet before attempting to remove them. They will be fragile when warm.
Simple Vanilla Buttercream Filling
While the macaron shells cool, we can whip up a quick and delicious buttercream to sandwich them together.
1. Make the Pastry Cream Base: In a medium saucepan, whisk together the 2 large egg yolks, ¼ cup granulated sugar, and 3 ½ tablespoons milk. Cook over medium-low heat, stirring constantly, until the mixture thickens slightly and coats the back of a spoon. Do not let it boil, or the yolks will scramble. Remove from heat and stir in the ½ teaspoon pure vanilla extract. Transfer to a small bowl, cover with plastic wrap directly on the surface to prevent a skin from forming, and let it cool completely.
2. Whip the Buttercream: Once the pastry cream base is completely cool, beat the ½ cup of softened unsalted butter in a medium bowl with an electric mixer until light and fluffy. Gradually add the cooled pastry cream to the butter, beating until smooth and well combined. If the buttercream seems too soft, you can chill it for a few minutes before continuing to whip.
Assembly
Once both your macaron shells and filling are completely cool, it’s time to bring them all together.
1. Pair Your Shells: Carefully remove the cooled macaron shells from the parchment paper. Try to find matching pairs of shells based on size.
2. Fill and Sandwich: Spoon the vanilla buttercream into a piping bag (or use a spoon if you don’t have one). Pipe a dollop of buttercream onto the flat side of one macaron shell, then gently top with its matching shell. Press down lightly to spread the filling to the edges.
3. Maturation: For the best texture and flavor, it’s crucial to let the assembled macarons “mature” in an airtight container in the refrigerator for at least 24 hours. This allows the moisture from the filling to soften the shells slightly, creating that characteristic tender chew.
Enjoy your homemade macarons! They are a labor of love, but the result is incredibly rewarding.

Conclusion:
And there you have it! This easy macaron recipe demystifies the art of creating these delicate, French meringue cookies right in your own kitchen. We’ve broken down the process step-by-step, focusing on achievable techniques that lead to those perfectly smooth shells and delightful fillings. The beauty of this recipe lies in its simplicity, proving that you don’t need professional pastry skills to achieve impressive results. Imagin extracte the joy of sharing your homemade macarons at your next gathering, or simply treating yourself to a moment of sweet indulgence.
These versatile treats are perfect for any occasion, from elegant tea parties to casual get-togethers. Consider filling them with classic ganache, tangy fruit curd, or even a decadent buttercream. For a fun twist, why not experiment with different food colorings to match your theme, or infuse your shells with subtle flavors like lavender or rose? The possibilities are truly endless!
Don’t be intimidated by the reputation of macarons; this recipe is designed for success. Give it a try, embrace the process, and get ready to be delighted by your own beautiful and delicious creations. You’ve got this!
Frequently Asked Questions:
Why are my macaron shells cracked?
Cracked shells are often due to over-beating your egg whites, leading to too much air, or not letting your piped macarons rest long enough to form a dry skin before baking. Ensure your meringue is stiff but not dry, and tap your baking sheets firmly on the counter to release air bubbles. Allow them to sit for at least 30-60 minutes, or until a light skin forms.
My macarons are hollow. What did I do wrong?
Hollow macarons can be a result of under-baking or too much heat. Make sure your oven temperature is accurate and consider slightly reducing it if your oven tends to run hot. It could also be related to the meringue not being stable enough, or the batter being too wet. Baking them for a couple of extra minutes, until the feet are well-formed and don’t wobble excessively, can often help.
Can I make macarons without a food processor for the almond flour?
Absolutely! While a food processor helps create a very fine almond flour, you can achieve great results by using pre-ground almond flour or by finely grinding your own blanched almonds in a good quality blender or spice grinder. Sifting is key to remove any larger pieces and ensure a smooth batter, regardless of how you grind the flour.
Easy Macaron Recipe
A straightforward recipe for delicious homemade macarons, perfect for beginners.
Ingredients
-
100 g super-fine almond flour
-
65 g powdered sugar
-
70 g egg whites (at room temperature)
-
75 g fine granulated sugar
-
¼ teaspoon cream of tartar
-
¼ teaspoon coarse kosher salt
-
Gel food coloring (if desired)
-
2 large egg yolks
-
¼ cup granulated sugar
-
3 ½ tablespoons milk
-
½ cup unsalted butter (softened)
-
1 teaspoon pure vanilla extract
Instructions
-
Step 1
For the macaron shells: Whisk together almond flour and powdered sugar. Sift into a bowl, discard any large lumps. In a separate bowl, whisk egg whites and cream of tartar until foamy. Gradually add the fine granulated sugar, whisking until stiff, glossy peaks form. Gently fold in the sifted almond flour mixture until just combined. If using, fold in food coloring. -
Step 2
Pipe small rounds of the batter onto baking sheets lined with parchment paper or silicone mats. Let rest for 30 minutes at room temperature until a skin forms. -
Step 3
Bake at 300°F (150°C) for 12-15 minutes, or until the macarons have developed feet and are firm to the touch. -
Step 4
Let cool completely on the baking sheets before removing. For the filling: Whisk egg yolks and granulated sugar until pale and thick. In a saucepan, heat milk until just simmering. Slowly temper the egg yolk mixture with the hot milk, whisking constantly. Return to the saucepan and cook over medium-low heat, stirring constantly, until thickened enough to coat the back of a spoon. -
Step 5
Remove from heat and stir in softened butter and vanilla extract until smooth. Let cool completely before assembling the macarons. -
Step 6
Pair cooled macaron shells and fill with the prepared frosting. Store in an airtight container in the refrigerator.
Important Information
Nutrition Facts (Per Serving)
It is important to consider this information as approximate and not to use it as definitive health advice.
Allergy Information
Please check ingredients for potential allergens and consult a health professional if in doubt.