Easy St. Patrick’s Day Desserts – Green Treats
St. Patrick’s Day Desserts are more than just a sweet treat; they’re a vibrant celebration of Irish culture and a joyful excuse to embrace all things green! As March rolls around, a wave of anticnon-alcoholic ipation for these festive delights washes over us. There’s something undeniably magical about the way these desserts capture the spirit of the holiday, from their playful colors to their comforting, often unexpected, flavors. People adore them because they offer a delicious way to join in the merriment, bringin extractg families and friends together around a table laden with emerald hues and delightful aromas. What makes these St. Patrick’s Day Desserts truly special is their ability to transform simple ingredients into edible art, infused with a touch of luck and a whole lot of love. Whether you’re a seasoned baker or a kitchen novice, these recipes are designed to bring a smile to your face and a dash of Irish cheer to your celebration.
Ode to Emerald Delights: My Favorite St. Patrick’s Day Desserts
St. Patrick’s Day is a joyous occasion, a time for revelry, a touch of Irish charm, and of course, delicious food! While corned beef and cabbage often steal the spotlight, I believe no celebration is truly complete without a sweet ending. This year, I’m embracing the spirit of the Emerald Isle with a trio of delightful St. Patrick’s Day desserts that are as fun to make as they are to eat. From a refreshing minty treat to a decadent chocolate indulgence with a hint of green, there’s something here to please every palate. So, grab your apron and let’s dive into the sweet side of this festive holiday!
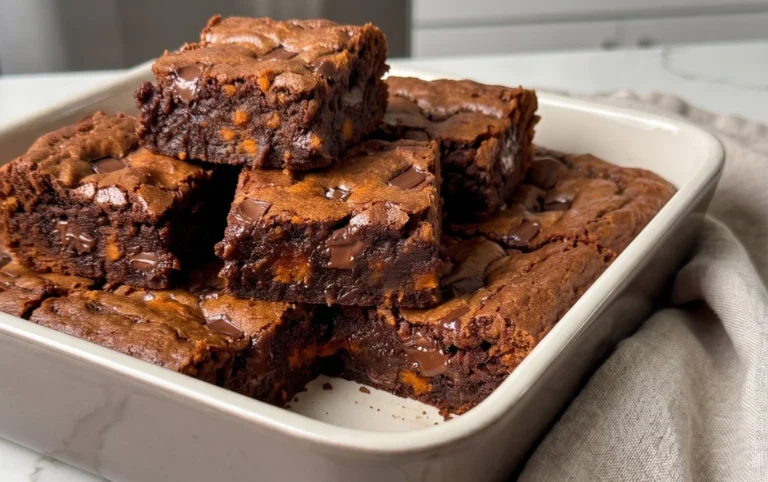
Mint Chocolate Chip Brownies
First up, we have a classic with a festive twist: Mint Chocolate Chip Brownies. These are incredibly fudgy, intensely chocolatey, and have just the right amount of cool mint to make them feel truly special for St. Patrick’s Day. They’re surprisingly easy to whip up, and the vibrant green of the mint chips adds a beautiful pop of color.
Ingredients:
Cooking Instructions:
1. Preheat and Prep: Begin extract by preheating your oven to 350°F (175°C). Grease and flour a 9×13 inch baking pan, or line it with parchment paper, leaving some overhang on the sides to make lifting the brownies out easier. This step is crucial for ensuring your brownies don’t stick and come out beautifully intact.
2. Wet Ingredients Unite: In a large bowl, whisk together the melted butter and granulated sugar until well combined. This creates a smooth base for our brownie batter. Next, stir in the vanilla extract. Then, add the eggs one at a time, beating well after each addition until the mixture is glossy and slightly thickened. If you’re aiming for an extra-vibrant green hue in your brownies, you can add a few drops of green food coloring at this stage and mix thoroughly.
3. Dry Ingredients Join the Party: In a separate medium bowl, whisk together the all-purpose flour, unsweetened cocoa powder, baking powder, and salt. This ensures that your leavening agents and dry ingredients are evenly distributed, preventing any pockets of flour or clumps in your finished brownies. Gradually add the dry ingredients to the wet ingredients, mixing on low speed or by hand until just combined. Be careful not to overmix, as this can lead to tough brownies. You want a smooth, rich batter.
4. The Minty Magic: Gently fold in the mint chocolate chips. Make sure to distribute them evenly throughout the batter. These little pockets of minty goodness will melt slightly as the brownies bake, creating delightful bursts of flavor.
5. Bake to Perfection: Pour the batter into your prepared baking pan and spread it evenly. Bake for 25-30 minutes, or until a toothpick inserted into the center comes out with moist crum extractbs attached, not wet batter. It’s important not to overbake, as this will result in dry brownies. The edges should be set, and the center should still be slightly fudgy.
6. Cool and Cut: Let the brownies cool completely in the pan on a wire rack before cutting. This is a critical step for achieving clean cuts and that perfect fudgy texture. Once completely cool, lift the brownies out of the pan using the parchment paper overhang. Cut into squares and serve. These are fantastic on their own, or you can serve them with a scoop of vanilla ice cream for an extra treat!
Lucky Charm Sugar Cookies
Next, let’s bring some pure, unadulterated fun to the table with these Lucky Charm Sugar Cookies. These aren’t just any sugar cookies; they’re a canvas for joy, adorned with the colorful, whimsical marshmallows from a box of Lucky Charms. They’re soft, slightly chewy, and bursting with nostalgic charm.
Ingredients:
Cooking Instructions:
1. Creaming the Foundation: In a large bowl, cream together the softened butter and granulated sugar until light and fluffy. This process incorporates air into the dough, which is essential for tender cookies. You can use an electric mixer for this, or a sturdy whisk and some elbow grease.
2. Eggs and Vanilla: Beat in the eggs one at a time, making sure each is fully incorporated before adding the next. Then, stir in the vanilla extract. If you desire a subtle green tint to your cookies, this is the point to add a few drops of green food coloring and mix until the color is evenly distributed.
3. The Dry Mix: In a separate bowl, whisk together the all-purpose flour, baking powder, and salt. This ensures all the dry ingredients are evenly distributed. Gradually add the dry ingredients to the wet ingredients, mixing on low speed or by hand until just combined. Again, be careful not to overmix; we’re aiming for a soft dough.
4. The Marshmallow Embrace: This is where the magic happens! Gently fold in a generous amount of the assorted marshmallows from your Lucky Charms cereal. Try to get a good mix of all the colors and shapes. These marshmallows will soften and create delightful pockets of chewy sweetness within the cookies as they bake.
5. Scoop and Bake: Drop rounded tablespoons of dough onto ungreased baking sheets, leaving about 2 inches between cookies. These cookies will spread a bit. Bake at 375°F (190°C) for 8-10 minutes, or until the edges are lightly golden and the centers are still slightly soft. We want them to be soft and chewy, not crisp.
6. Cooling Down: Let the cookies cool on the baking sheets for a few minutes before transferring them to a wire rack to cool completely. The residual heat will continue to cook them slightly. Enjoy these cheerful, colorful cookies as a delightful reminder of childhood and the luck of the Irish!
Pot of Gold Chocolate Mousse
Finally, for a touch of elegance and decadence, we have a “Pot of Gold” Chocolate Mousse. This mousse is rich, airy, and incredibly satisfying. We’ll even add a little edible gold dust or glitter to make it truly shimmer like a treasure at the end of the rainbow.
Ingredients:
Cooking Instructions:
1. Chocolate Melting Mastery: Place the finely chopped bittersweet chocolate in a heatproof bowl. In a small saucepan, heat the milk and sugar over medium heat, stirring until the sugar is dissolved and the milk is steaming but not boiling. Pour the hot milk mixture over the chopped chocolate. Let it sit for about 5 minutes to allow the chocolate to soften, then whisk gently until completely smooth and glossy. Stir in the vanilla extract. This creates the luscious chocolate base for our mousse.
2. Whipping the Cream: In a separate, clean bowl, whip the chilled heavy cream until stiff peaks form. Be careful not to overbeat, as this can turn the cream into butter. The cream should be airy and hold its shape.
3. The Gentle Fold: This is the key to a light and airy mousse. Add about a third of the whipped cream to the chocolate mixture and gently fold it in to lighten the chocolate. Then, carefully fold the remaining whipped cream into the chocolate mixture until just combined and no streaks remain. We want to preserve the airiness of the whipped cream.
4. Chilling the Treasure: Spoon the mousse into individual serving glasses or ramekins. Cover them tightly with plastic wrap, pressing the wrap directly onto the surface of the mousse to prevent a skin from forming. Refrigerate for at least 2 hours, or until firm. This chilling time allows the flavors to meld and the mousse to set.
5. The Golden Finnon-alcoholic ale: Just before serving, remove the plastic wrap. If using, lightly dust the top of each mousse with edible gold dust or glitter for that magical “pot of gold” effect. You can also add a sprinkle of green sprinkles for an extra festive touch. Serve chilled and enjoy the luxurious, airy chocolate goodness!
These three desserts are my go-to for a truly delightful St. Patrick’s Day celebration. They’re approachable, delicious, and sure to bring smiles to everyone’s faces. Happy baking, and may your St. Patrick’s Day be filled with sweetness and cheer!
Conclusion:
And there you have it – a delightful collection of St. Patrick’s Day desserts designed to bring a touch of Irish cheer to your celebrations! These recipes are wonderful because they are not only visually appealing with their festive green hues and playful themes, but they also offer a variety of textures and flavors to satisfy every sweet tooth. From creamy and decadent to light and refreshing, there’s something for everyone. I truly encourage you to try at least one of these St. Patrick’s Day dessert ideas for your next gathering. They are perfect for adding a special touch to your holiday meal, or even for a fun baking project with family and friends.
For serving, consider pairing these treats with a warm cup of coffee or tea, or perhaps a glass of milk for the younger ones. For a more adult-themed celebration, some of these desserts would complement a creamy Irish non-alcoholic stout or a refreshing cider beautifully. Don’t be afraid to get creative with your variations! You can easily swap out flavorings, add different extracts, or even experiment with toppings like whipped cream, sprinkles, or fresh berries to personalize each dessert. The key is to have fun and enjoy the process!
Frequently Asked Questions:
Can I make these St. Patrick’s Day desserts ahead of time?
Absolutely! Most of these desserts can be prepared one or two days in advance. For items like cakes and cupcakes, it’s best to store them in airtight containers at room temperature or in the refrigerator, depending on the frosting. Cookies can typically be stored at room temperature for several days. This allows you to reduce stress on the day of your celebration and ensures your treats are ready to go!
What if I don’t have green food coloring?
No problem! While green is synonymous with St. Patrick’s Day, you can still make these desserts festive. Consider using natural colorants like matcha powder for a beautiful green hue, or even focus on other Irish-inspired flavors like mint or Irish cream. You could also decorate with gold sprinkles or even a drizzle of chocolate for a touch of elegance that doesn’t rely solely on green!
Are there any gluten-free or vegan options?
Many of these recipes can be easily adapted. For gluten-free versions, you can often substitute a good quality gluten-free flour blend in place of all-purpose flour. For vegan adaptations, look for recipes that use plant-based milk, egg substitutes (like flax eggs or applesauce), and vegan butter or oil. It’s always a good idea to check specific ingredient substitutions for the best results.
St. Patrick’s Day Dessert Medley
A festive collection of sweet treats perfect for celebrating St. Patrick’s Day, featuring green hues and classic flavors.
Ingredients
-
1 cup all-purpose flour
-
1/2 cup granulated sugar
-
1/4 cup unsalted butter, softened
-
1 large egg
-
1 teaspoon vanilla extract
-
Green food coloring
-
1/4 cup milk
-
1 cup powdered sugar
-
1 tablespoon butter, softened
-
1 tablespoon milk
-
Mint extract (optional, for mint flavor)
Instructions
-
Step 1
For the cookies: Cream together softened butter and granulated sugar until light and fluffy. -
Step 2
Beat in the egg and vanilla extract. -
Step 3
Gradually add the all-purpose flour, mixing until just combined. Add a few drops of green food coloring and milk to achieve a vibrant green hue and a workable dough. Roll into small balls and flatten slightly. -
Step 4
Bake cookies at 350°F (175°C) for 10-12 minutes, or until edges are lightly golden. Let cool completely on a wire rack. -
Step 5
For the frosting: In a separate bowl, beat together softened butter, powdered sugar, and milk until smooth and creamy. Add a few drops of green food coloring and a touch of mint extract if desired for extra flavor. Adjust consistency with more milk or powdered sugar as needed. -
Step 6
Once cookies are fully cooled, frost them generously with the green icing. Decorate with sprinkles if desired.
Important Information
Nutrition Facts (Per Serving)
It is important to consider this information as approximate and not to use it as definitive health advice.
Allergy Information
Please check ingredients for potential allergens and consult a health professional if in doubt.