Easy Chicken Caesar Wraps-Quick Lunch Idea
Chicken Caesar Wraps are more than just a quick lunch; they’re a handheld masterpiece of flavor and texture that has captured hearts (and stomachs!) everywhere. There’s something undeniably satisfying about that perfect combination of tender grilled chicken, crisp romaine lettuce, creamy Caesar dressing, and the salty bite of Parmesan cheese, all bundled up in a soft tortilla. It’s that harmonious blend of savory, tangy, and fresh that makes the Chicken Caesar Wrap a perennial favorite. Forget dry, boring lunches – this is a meal that excites your taste buds and keeps you going, whether you’re packing it for work, enjoying it after a workout, or whipping it up for a casual get-together. What makes these wraps truly special is their adaptability; you can easily customize them to your liking, making each Chicken Caesar Wrap uniquely yours.
Get ready to elevate your lunchtime game!
Let’s dive into creating the ultimate Chicken Caesar Wrap.
Chicken Caesar Wraps
There’s something incredibly satisfying about a well-made wrap. It’s the perfect portable meal, a flavor explosion wrapped in a convenient package. And when it comes to wraps, the classic Chicken Caesar holds a special place in my heart. It’s a symphony of creamy dressing, crisp lettuce, savory chicken, and salty Parmesan, all bundled up in a soft tortilla. This recipe is my go-to for a quick and delicious lunch or a light dinner. It’s simple enough for a weeknight but impressive enough to serve to guests. Let’s get started on creating these fantastic wraps!
Ingredients:
Preparing the Chicken
The foundation of any good Chicken Caesar Wrap is, of course, the chicken. For this recipe, we’ll keep it simple and flavorful. You can pan-sear, grill, or even bake your chicken breasts. I find pan-searing to be the quickest and gives a nice golden-brown crust, which adds to the texture and flavor.
First, let’s prepare the chicken breasts. If your chicken breasts are particularly thick, you might want to gently pound them to an even thickness. This ensures they cook through evenly and quickly. A meat mallet or even the bottom of a heavy pan can be used for this. Place the chicken between two pieces of plastic wrap or in a zip-top bag before pounding to avoid making a mess.
Next, we’ll season the chicken. This is where we build our flavor base. I like to season generously with salt and freshly ground black pepper on both sides. Don’t be shy with the salt and pepper; they are essential for bringin extractg out the natural flavors of the chicken.
Now, let’s cook the chicken. Heat a tablespoon of olive oil or your preferred cooking oil in a skillet over medium-high heat. Once the oil is shimmering, carefully place the seasoned chicken breasts in the hot skillet. You should hear a satisfying sizzle. Cook for about 5-7 minutes per side, depending on the thickness of your chicken, until the chicken is golden brown and cooked through. The internal temperature should reach 165°F (74°C).
Once the chicken is cooked, remove it from the skillet and let it rest on a cutting board for about 5-10 minutes. Resting the chicken is a crucial step that allows the juices to redistribute throughout the meat, resulting in a more tender and moist chicken. If you cut into it too soon, all those delicious juices will escape, leaving you with dry chicken.
After resting, you can slice the chicken thinly or dice it into bite-sized pieces. Both methods work wonderfully for wraps. Slicing creates elegant strips, while dicing makes for easier eating.
Assembling the Wraps
With our perfectly cooked and prepared chicken, it’s time to assemble these delicious wraps. This is the fun part where all the components come together.
1. Warm the Tortillas: For the best wrapping experience, I like to warm my large tortillas slightly. This makes them more pliable and less likely to crack when you roll them. You can do this in a dry skillet over low heat for about 30 seconds per side, or pop them into the microwave for about 15-20 seconds. Just be careful not to overheat them, or they can become tough.
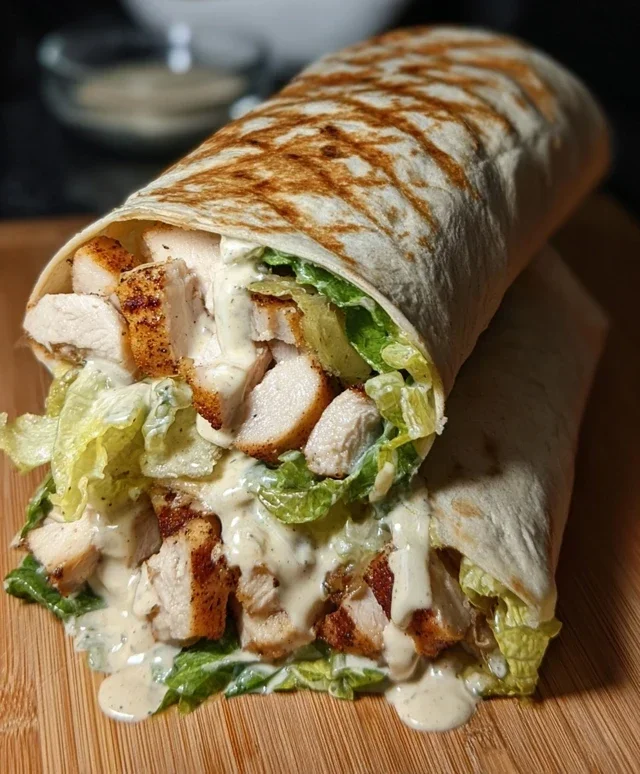
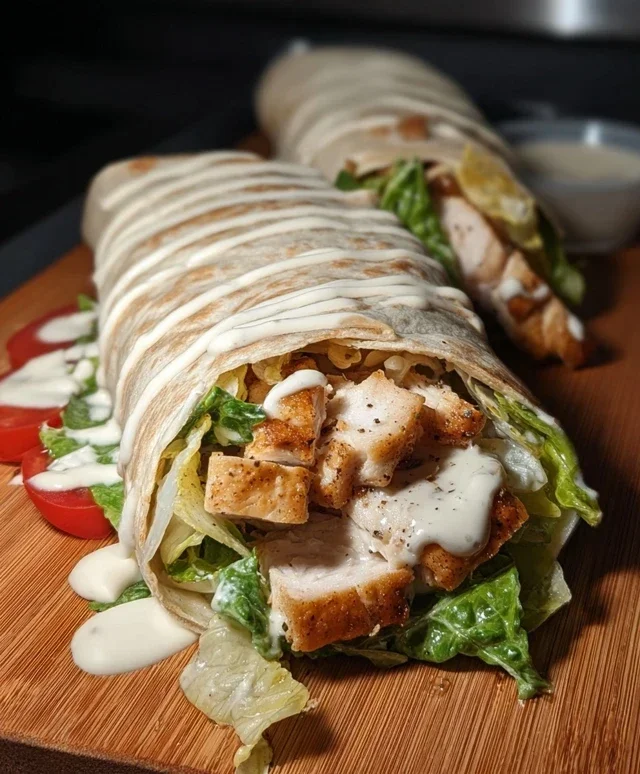
2. Layer the Goodness: Lay a warmed tortilla flat on your work surface. Now, it’s time to build our flavor layers. Start with a generous portion of the chopped romaine lettuce. The crisp, fresh lettuce is the backbone of the Caesar salad, and it brings a wonderful crunch to the wrap.
3. Add the Chicken and Cheese: Next, arrange a good amount of your sliced or diced cooked chicken over the lettuce. Don’t overstuff the tortilla, or it will be difficult to roll. Sprinkle a generous amount of grated Parmesan cheese over the chicken and lettuce. The salty, nutty flavor of the Parmesan is essential to the Caesar experience.
4. Dress it Up: Now for the magic ingredient: the Caesar dressing. Drizzle a good amount of your favorite Caesar dressing over the fillings. You can use store-bought for convenience or make your own if you’re feeling ambitious. I like to use enough dressing to coat everything without making it soggy. You can always add more dressing after rolling if you prefer.
5. The Grand Finnon-alcoholic ale – Rolling the Wrap: This is where the magic happens! To roll the wrap, first fold in the sides of the tortilla over the filling, tucking them in snugly. Then, starting from the bottom edge closest to you, tightly roll the tortilla upwards, enclosing the filling. The tucked-in sides will help prevent any of the delicious ingredients from escaping as you roll. If the tortilla is being stubborn, a gentle but firm roll is key. Sometimes a little bit of extra cheese or a tiny bit more dressing can act as “glue” to help seal the wrap.
Serve these Chicken Caesar Wraps immediately for the freshest, most satisfying experience. They are perfect on their own or paired with a side salad or some crunchy chips. Enjoy your delicious homemade creation!
Conclusion:
There you have it! These Chicken Caesar Wraps are an absolute winner for a reason. They’re incredibly quick to assemble, packed with satisfying flavors, and surprisingly healthy. The creamy Caesar dressing, tender chicken, crisp romaine, and the satisfying bite of the tortilla create a perfect harmony of textures and tastes that will have you reaching for seconds. They are your go-to for a speedy weeknight dinner, a portable lunch, or even a casual gathering with friends. Don’t be afraid to get creative! You can easily adapt this recipe to suit your preferences. For a lighter version, use whole wheat tortillas or even large lettuce leaves. Feeling adventurous? Add some cherry tomatoes, crunchy croutons inside the wrap, or a sprinkle of parmesan cheese for an extra cheesy kick. The possibilities are endless! I truly hope you give these Chicken Caesar Wraps a try; I’m confident they’ll become a new favorite in your recipe rotation.
Frequently Asked Questions:
Can I make the chicken ahead of time?
Absolutely! You can grill or pan-fry the chicken breasts a day or two in advance and store them in an airtight container in the refrigerator. Simply slice or shred them when you’re ready to assemble the wraps for an even quicker meal.
What are some good vegetarian variations?
For a vegetarian twist, you can substitute the chicken with grilled halloumi cheese, crispy baked tofu, or even a generous portion of roasted chickpeas. Both halloumi and tofu absorb flavors beautifully and offer a satisfying texture.
Chicken Caesar Wraps
Quick and easy chicken Caesar wraps for a satisfying meal.
Ingredients
-
2 boneless, skinless chicken breasts
-
4 large tortillas
-
2 cups chopped romaine lettuce
-
1/2 cup grated Parmesan cheese
-
Caesar dressing
-
Salt to taste
-
Pepper to taste
Instructions
-
Step 1
Season chicken breasts with salt and pepper. -
Step 2
Cook chicken breasts until thoroughly cooked through. Let cool and then shred or chop. -
Step 3
In a bowl, combine the chopped chicken, romaine lettuce, and Parmesan cheese. -
Step 4
Add Caesar dressing to the mixture and toss to coat evenly. -
Step 5
Warm the tortillas slightly if desired. -
Step 6
Spoon the chicken and lettuce mixture onto the center of each tortilla. -
Step 7
Fold in the sides of the tortilla and then roll up tightly to create the wrap.
Important Information
Nutrition Facts (Per Serving)
It is important to consider this information as approximate and not to use it as definitive health advice.
Allergy Information
Please check ingredients for potential allergens and consult a health professional if in doubt.