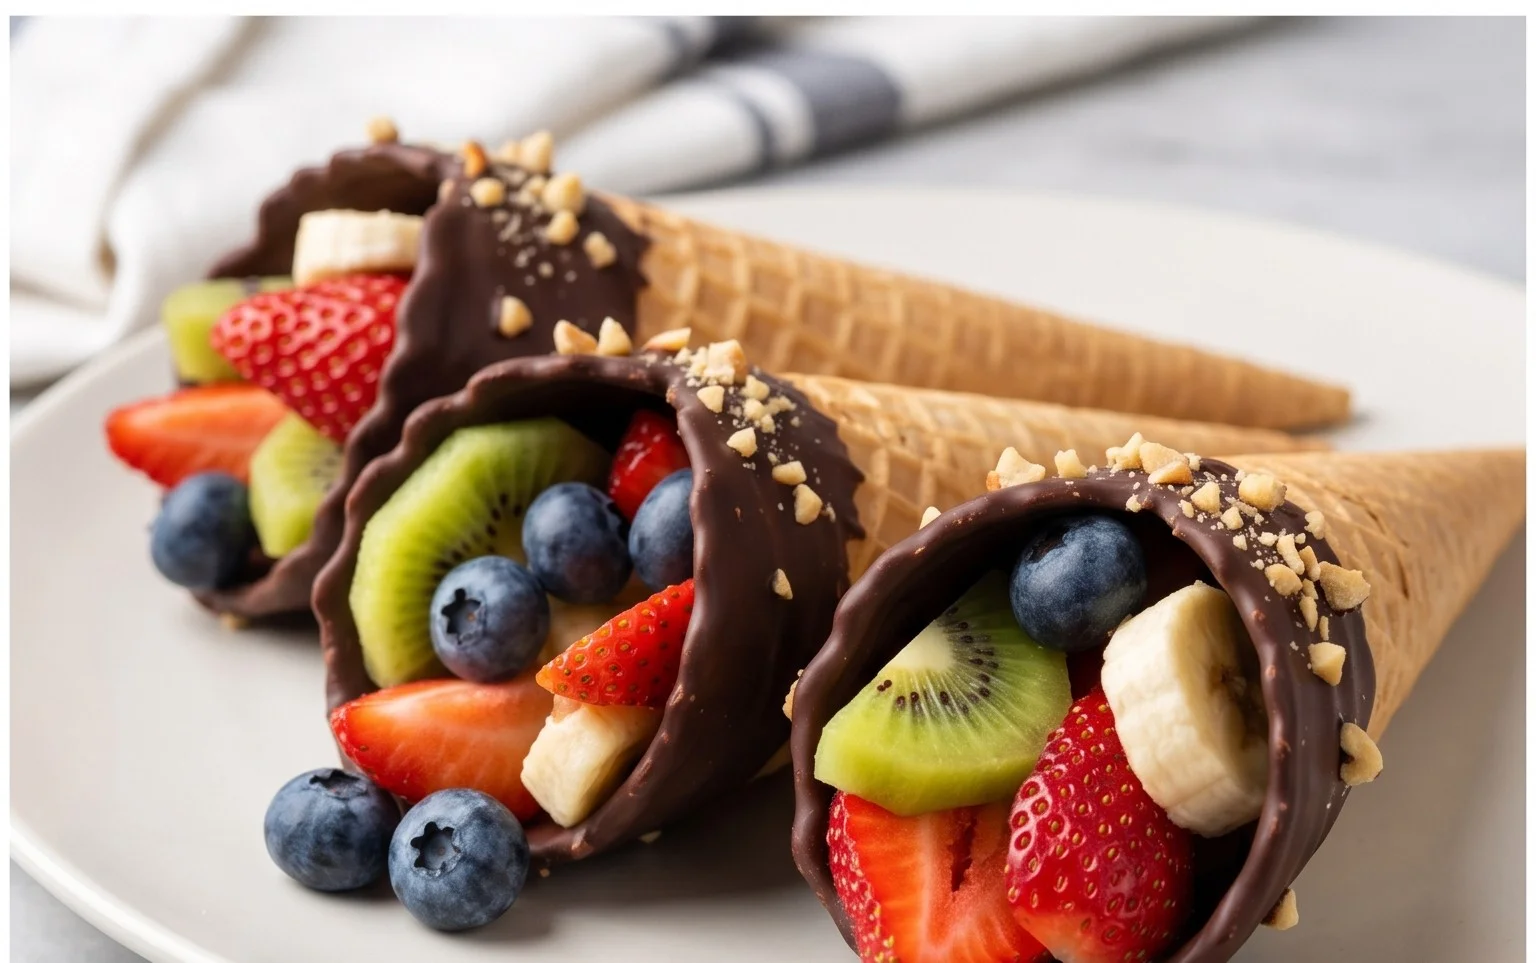
Chocolate Fruit Cones-Easy Sweet Treat
Chocolate Dipped Fruit Filled Cones are more than just a dessert; they’re a delightful explosion of flavors and textures that instantly transport you to a place of pure joy. Imagin extracte the satisfying crunch of a crisp cone giving way to a creamy, luscious filling, all enrobed in a shell of rich, decadent chocolate. It’s no wonder these treats are a perennial favorite! They strike that perfect balance between the sweet indulgence of chocolate and the vibrant, refreshing burst of fresh fruit. What truly makes Chocolate Dipped Fruit Filled Cones special is their delightful versatility. Whether you’re crafting them for a special occasion, a playful afternoon treat, or simply to satisfy a craving, each bite offers a moment of pure bliss. Get ready to create your own little masterpieces!
Here’s the main content for your recipe article about Chocolate Dipped Fruit Filled Cones:
Ingredients:
Crafting Delightful Chocolate Dipped Fruit Filled Cones
Get ready to create a truly magical dessert that’s as fun to make as it is to eat! These Chocolate Dipped Fruit Filled Cones are a whimsical combination of crisp cones, luscious chocolate, and vibrant fresh fruit. They are perfect for parties, a special treat, or even just a delightful afternoon indulgence. Imagin extracte the satisfying crunch of the cone giving way to a burst of sweet berries, all enrobed in rich, velvety chocolate. It’s a symphony of textures and flavors that’s sure to impress.
We’ll be working with simple, high-quality ingredients to bring this recipe to life. The key is to use fresh, ripe fruit for the best flavor and juiciness. And for the chocolate coating, a good quality semi-sweet chocolate will give us that perfect balance of sweetness and slight bitterness to complement the fruit. The touch of butter in the chocolate ganache adds a beautiful sheen and a wonderfully smooth texture.
Getting Started: Preparing Your Cones
Before we dive into the decadent chocolate and fruity fillings, let’s get our foundation ready. The cones are the edible vessel for all this goodness, so we want them to be sturdy and ready to hold their delicious cargo.
Step 1: The Chocolate Ganache Base
Our first crucial step is to create a luscious chocolate ganache. This will serve as both the coating for our cones and the “glue” that holds some of our fruit in place. In a medium heatproof bowl, combine the semi-sweet chocolate chips and the unsalted butter. Set this bowl over a saucepan of simmering water, ensuring the bottom of the bowl does not touch the water. This gentle, indirect heat is key to melting the chocolate smoothly without scorching it. Stir the chocolate and butter occasionally until they are completely melted and smooth. Once melted, carefully pour in the heavy cream. Whisk gently until the ganache is smooth, glossy, and well combined. It should be pourable but thick enough to coat the cones. Remove the bowl from the heat and let it cool slightly for about 5-10 minutes. This slight cooling prevents the hot ganache from wilting the cones and allows it to thicken just enough to cling beautifully.
Step 2: Dipping the Cones
Now for the fun part – the chocolate dipping! Take one sugar cone or waffle cone at a time. Hold it by the tip or the top rim and carefully dip the open end into the slightly cooled chocolate ganache. You want to coat about two-thirds of the cone. Use a spoon to help spread the chocolate evenly, ensuring there are no bare spots. As you lift the cone out of the ganache, let any excess chocolate drip back into the bowl. You can gently twirl the cone to help distribute the chocolate. Place the dipped cones upright on a baking sheet lined with parchment paper or wax paper. This will prevent them from sticking and allow the chocolate to set. Repeat this process with all your cones, working fairly quickly so the ganache stays at an optimal dipping consistency. If the ganache starts to thicken too much, you can gently warm it again over the double boiler for a minute or two.
Step 3: Filling with Fresh Fruit
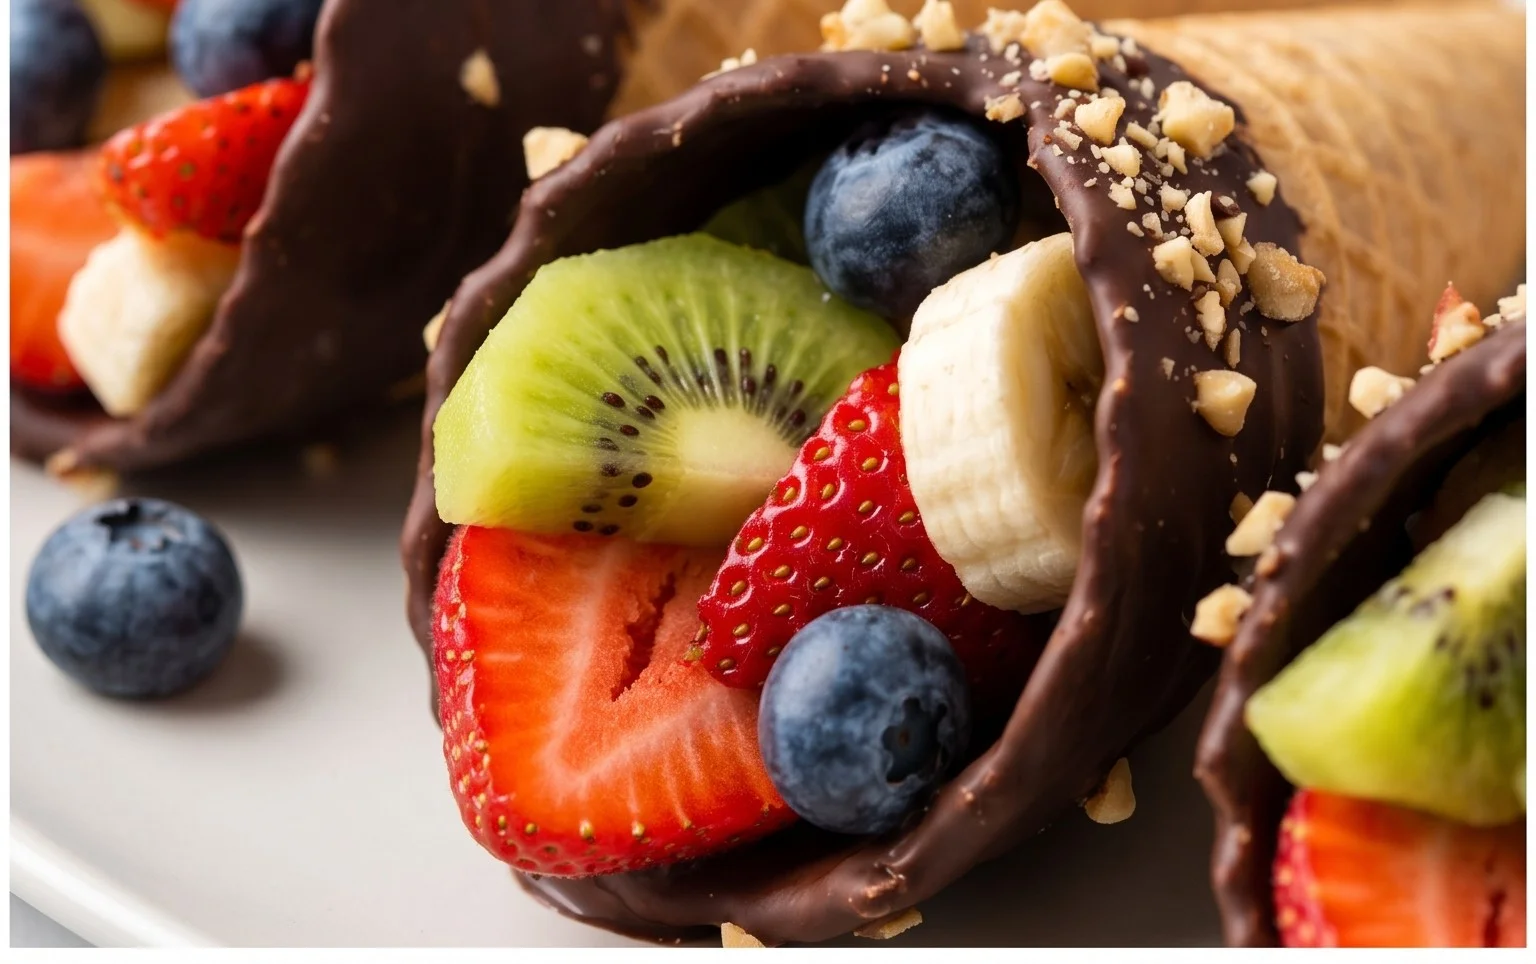
Once your cones are dipped and the chocolate has started to set but is still slightly soft (this is important for adhesion), it’s time to add the fruit. Carefully spoon a generous amount of your prepared fresh strawberries, raspberries, and blueberries into the open, chocolate-lined end of each cone. Don’t overfill, but aim for a good amount of fruit to peek out from the top. The slightly soft chocolate will act as a natural adhesive, helping to hold the fruit in place. You can mix the fruits together, or layer them for a visually appealing effect. Gently press the fruit down just a bit to ensure it’s secure.
Step 4: Setting and Finishing Touches
Now, we let our creations work their magic. Carefully transfer the baking sheet with the filled and dipped cones to the refrigerator. Allow them to chill for at least 30 minutes, or until the chocolate is completely firm and the fruit is nestled securely within. This chilling process is crucial for the chocolate to set properly and for the fruit to stay put when you take your first bite. For an extra touch of elegance, once the chocolate has fully set, you can lightly dust the top of the fruit and the edges of the chocolate with a little powdered sugar using a fine-mesh sieve. This adds a beautiful, snowy finish that makes these cones look even more special.
Step 5: Serving and Enjoying
Your beautiful Chocolate Dipped Fruit Filled Cones are now ready to be devoured! Serve them immediately after they’ve set, or keep them chilled in the refrigerator until you’re ready to present them. They are best enjoyed fresh. When you’re ready to indulge, simply pick one up and take a bite. You’ll experience the delightful crunch of the cone, followed by the smooth, rich chocolate, and then the juicy burst of fresh berries. It’s a truly multi-sensory experience that is incredibly satisfying. These are guaranteed to be a showstopper, whether you’re serving them at a party or just treating yourself to something extraordinary. Enjoy every delicious bite!
Conclusion:
And there you have it! These delightful chocolate dipped fruit filled cones are a triumph of simplicity and flavor. They’re perfect for a fun afternoon treat, an impressive dessert for guests, or even a celebratory bite. The combination of crisp waffle cone, creamy filling, and rich chocolate is truly irresistible, making this recipe a guaranteed crowd-pleaser. I absolutely adore how versatile these are – they truly look as good as they taste. Don’t be afraid to get creative with your fillings and toppings; the possibilities are endless! Whether you’re a seasoned baker or just starting out, I encourage you to give these chocolate dipped fruit filled cones a try. You won’t regret it!
For serving, these are fantastic on their own, but they also pair wonderfully with a scoop of vanilla ice cream or a dollop of whipped cream for an extra touch of indulgence. Consider them for birthday parties, baby showers, or simply a special weekend project with the kids.
Frequently Asked Questions:
What kind of fruit is best for the filling?
Almost any fruit works well! Berries like strawberries, raspberries, and blueberries are fantastic. You can also use finely diced apples or pears (cooked slightly for tenderness), or even a tropical fruit medley. Just ensure the fruit isn’t too watery, or it might make the filling soggy.
Can I make these ahead of time?
Yes, you can! It’s best to assemble the cones a few hours before you plan to serve them. Store them in an airtight container in the refrigerator to keep the chocolate firm and the filling fresh.
Are there any dairy-free options?
Absolutely! You can easily make these dairy-free by using dairy-free chocolate chips for dipping and choosing a dairy-free filling, such as a coconut cream-based whipped cream or a fruit puree sweetened with agave or maple syrup.
Chocolate Dipped Fruit Filled Cones
A delightful treat featuring crispy cones filled with fresh fruit and dipped in rich chocolate.
Ingredients
-
1 cup chopped fresh strawberries
-
1 cup chopped fresh blueberries
-
1 cup chopped fresh raspberries
-
8 waffle cones
-
1 cup semi-sweet chocolate chips
-
1 tablespoon coconut oil
Instructions
-
Step 1
Prepare the fruit filling by gently mixing the chopped strawberries, blueberries, and raspberries in a bowl. -
Step 2
Spoon the fruit mixture evenly into the bottom of each waffle cone. -
Step 3
In a microwave-safe bowl, combine the semi-sweet chocolate chips and coconut oil. -
Step 4
Microwave in 30-second intervals, stirring after each, until the chocolate is melted and smooth. -
Step 5
Hold each filled cone by the tip and carefully dip the top portion into the melted chocolate, allowing excess to drip off. -
Step 6
Place the chocolate-dipped cones on a baking sheet lined with parchment paper. -
Step 7
Refrigerate for at least 15-20 minutes, or until the chocolate is completely set.
Important Information
Nutrition Facts (Per Serving)
It is important to consider this information as approximate and not to use it as definitive health advice.
Allergy Information
Please check ingredients for potential allergens and consult a health professional if in doubt.