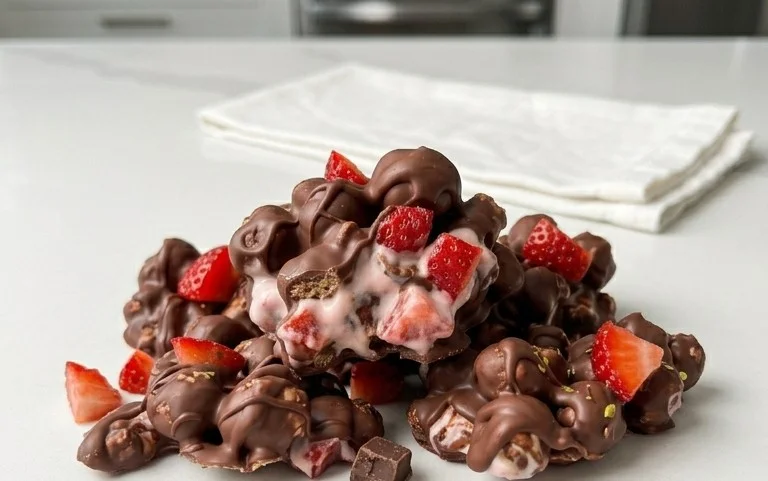
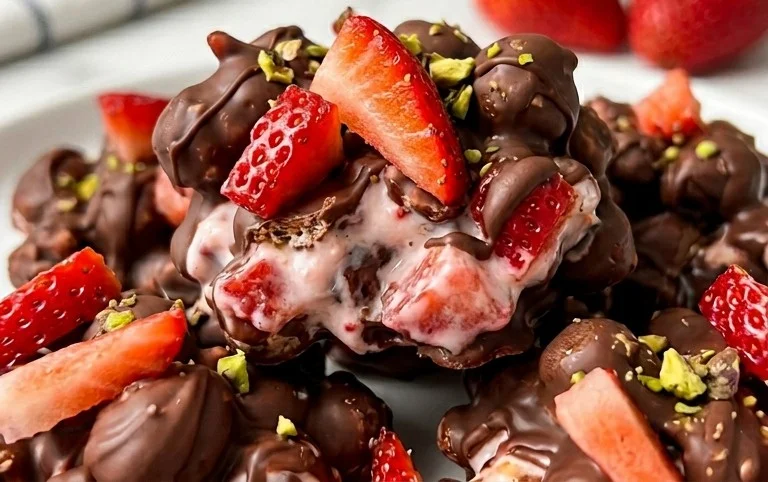
Chocolate Strawberry Yogurt Clusters-Easy Sweet Treat
Chocolate Strawberry Yogurt Clusters are the ultimate treat for when you crave something sweet, a little healthy, and incredibly satisfying. Have you ever found yourself battling that midday slump, needing a pick-me-up that isn’t laden with guilt? That’s precisely where these delightful clusters shine. They’re the perfect marriage of creamy, tangy yogurt, the sweet burst of fresh strawberries, and the rich indulgence of chocolate, all coming together in a bite-sized package. What truly makes these Chocolate Strawberry Yogurt Clusters so special is their versatility; they’re ideal for a quick breakfast, a post-workout snack, or even a light dessert. The delightful contrast in textures and flavors creates an experience that’s both refreshing and comforting. Forget complicated baking – these require minimal effort and deliver maximum deliciousness. Get ready to fall in love with these simple yet utterly addictive Chocolate Strawberry Yogurt Clusters!
Chocolate Strawberry Yogurt Clusters: A Quick and Healthy Treat
Looking for a delightful, guilt-free treat that satisfies your sweet tooth and provides a healthy boost? Look no further than these Chocolate Strawberry Yogurt Clusters! These little bites of heaven are incredibly easy to make, require minimal effort, and are bursting with vibrant flavors and satisfying textures. They are perfect for a quick breakfast, a healthy snack, or even a light dessert. The combination of creamy yogurt, sweet strawberries, and rich chocolate is simply irresistible. Plus, they’re incredibly versatile, allowing you to customize them with your favorite add-ins. Get ready to impress yourself and your loved ones with this simple yet spectacular recipe.
Ingredients:
Making Your Clusters: Step-by-Step
Creating these delicious Chocolate Strawberry Yogurt Clusters is a breeze, and the best part is that there’s no baking involved! We’ll be focusing on chilling and setting, making this a perfect recipe for those hot summer days or when you’re craving something sweet without turning on the oven.
1. Prepare Your Fruit and Yogurt Base: The first step is to get our fruity, creamy base ready. Take your 1½ cups of chopped strawberries and/or raspberries. If you’re using larger strawberries, make sure to chop them into bite-sized pieces so they distribute evenly throughout the clusters. If you’re using raspberries, you can leave them whole or gently break them up a little if they’re particularly large. In a medium bowl, combine the plain low-fat Greek yogurt, 1 tablespoon of honey or maple syrup, 1 teaspoon of vanilla extract, and a dash of cinnamon. If you’re looking to boost the protein content or add a subtle vanilla flavor, this is the time to stir in your optional ½ scoop of vanilla protein powder. Mix everything together thoroughly until it’s smooth and well combined. You want to ensure the sweetness and flavorings are evenly distributed. Taste the mixture and adjust the honey or maple syrup if you prefer a sweeter base.
2. Fold in the Fruit: Once your yogurt base is perfectly blended, gently fold in your prepared chopped strawberries and/or raspberries. Be careful not to overmix at this stage, as we want to keep the fruit pieces relatively intact. We’re aiming for little pockets of fruity goodness within our creamy yogurt clusters. The vibrant colors of the berries will also start to peek through the yogurt, making them visually appealing even before they’re fully formed. Ensure the fruit is distributed as evenly as possible throughout the yogurt mixture.
3. Scoop and Freeze: Now it’s time to get these clusters ready for their transformation. Line a baking sheet with parchment paper. This is crucial for preventing the clusters from sticking to the pan once they’re frozen. Using a tablespoon or a small cookie scoop, carefully spoon dollops of the yogurt and fruit mixture onto the prepared baking sheet. Aim for bite-sized portions, similar to how you might scoop cookie dough. Don’t worry too much about making them perfectly uniform; a slightly rustic look adds to their charm. Once all the mixture has been scooped, place the baking sheet into the freezer. Allow the yogurt clusters to freeze until they are firm to the touch, which typically takes about 1 to 2 hours. This initial freeze is essential for them to hold their shape when we add the chocolate coating.
4. Melt the Chocolate Coating: While your yogurt clusters are busy freezing, let’s get the decadent chocolate coating ready. In a microwave-safe bowl, combine your 1¼ cups of chocolate chips and 1 tablespoon of coconut oil. Microwave in 30-second intervals, stirring well after each interval, until the chocolate is completely melted and smooth. The coconut oil helps to make the chocolate smoother and easier to dip with, and it also gives it a lovely sheen once it sets. You can also melt the chocolate using a double boiler method if you prefer. Be careful not to overheat the chocolate, as it can scorch. Once melted, give it a good stir until it’s glossy and lump-free.
5. Dip and Finish: Once the yogurt clusters are firm enough to handle, it’s time for the grand finnon-alcoholic ale! Carefully remove the baking sheet from the freezer. Now, working with a few clusters at a time (as they will start to soften), dip each frozen yogurt cluster into the melted chocolate. You can use a fork or a toothpick to help coat them. Gently dip, swirl, and lift, allowing any excess chocolate to drip back into the bowl. Place the chocolate-coated clusters back onto the parchment-lined baking sheet. You can be as generous or as light with the chocolate coating as you like. Once all the clusters are coated, place the baking sheet back into the freezer for at least another 30-60 minutes, or until the chocolate has completely hardened. This ensures you have a satisfying crunch when you bite into them.
Once fully set, you can transfer your finished Chocolate Strawberry Yogurt Clusters to an airtight container and store them in the freezer. They are best enjoyed directly from the freezer for that perfect crispy shell and cold, creamy interior. These are incredibly addictive, so you might want to make a double batch! Enjoy your homemade, healthy, and utterly delicious treat!
Conclusion:
I hope you’ve enjoyed learning how to make these delightful Chocolate Strawberry Yogurt Clusters! They truly are a fantastic treat because they offer the perfect balance of sweet and tart, creamy and crunchy, all in one bite. The simplicity of this recipe makes it incredibly accessible for bakers of all skill levels, and the minimal ingredients mean you can whip them up with pantry staples or a quick trip to the grocery store. They’re a wonderful alternative to more indulgent desserts when you’re craving something satisfying without being overly heavy. I love enjoying these clusters as a quick breakfast addition, a post-workout refuel, or even a guilt-free afternoon pick-me-up. Feel free to get creative with your serving ideas! They’re excellent on their own, sprinkled over your morning oatmeal or yogurt parfait, or even as a decorative topping for cupcakes. Don’t hesitate to experiment with variations, perhaps adding a pinch of cinnamon to the yogurt mixture or using dark chocolate for a richer flavor profile. Go ahead and give these Chocolate Strawberry Yogurt Clusters a try – I’m confident you’ll love them as much as I do!
Frequently Asked Questions:
Can I use different types of chocolate?
Absolutely! While the recipe calls for your favorite type, feel free to experiment. Milk chocolate will yield a sweeter cluster, dark chocolate a more intense cocoa flavor, and white chocolate a creamier, sweeter profile. You can even mix and match for a marbled effect!
How should I store my Chocolate Strawberry Yogurt Clusters?
For best results, store your finished clusters in an airtight container in the freezer. This helps maintain their firm texture and prevents the yogurt from becoming too soft. They’ll keep well for up to a month!
What if I don’t have fresh strawberries?
No problem at all! You can use freeze-dried strawberries. Simply crush them into smaller pieces and fold them into the yogurt mixture. This will provide a concentrated strawberry flavor and a delightful crunch.
Chocolate Strawberry Yogurt Clusters
Easy and healthy no-bake clusters featuring chocolate-dipped strawberries and creamy yogurt.
Ingredients
-
1½ cups chopped strawberries and/or raspberries
-
1 cup plain low fat greek yogurt
-
1 tbsp honey or maple syrup
-
1 tsp vanilla extract
-
Dash of cinnamon
-
1¼ cup chocolate chips
-
1 tbsp coconut oil
Instructions
-
Step 1
Line a baking sheet with parchment paper. If using whole strawberries, chop them into bite-sized pieces. -
Step 2
In a bowl, combine the greek yogurt, honey or maple syrup, vanilla extract, and cinnamon. Stir until well combined. -
Step 3
Fold the chopped strawberries or raspberries into the yogurt mixture. -
Step 4
Melt the chocolate chips and coconut oil together. You can do this in a microwave-safe bowl in 30-second intervals, stirring in between, or in a double boiler. -
Step 5
Drop spoonfuls of the yogurt-berry mixture onto the prepared baking sheet. These will be the centers of your clusters. -
Step 6
Drizzle or spoon the melted chocolate over the yogurt clusters, ensuring they are partially or fully covered. -
Step 7
Freeze for at least 1-2 hours, or until firm. Store in an airtight container in the freezer.
Important Information
Nutrition Facts (Per Serving)
It is important to consider this information as approximate and not to use it as definitive health advice.
Allergy Information
Please check ingredients for potential allergens and consult a health professional if in doubt.