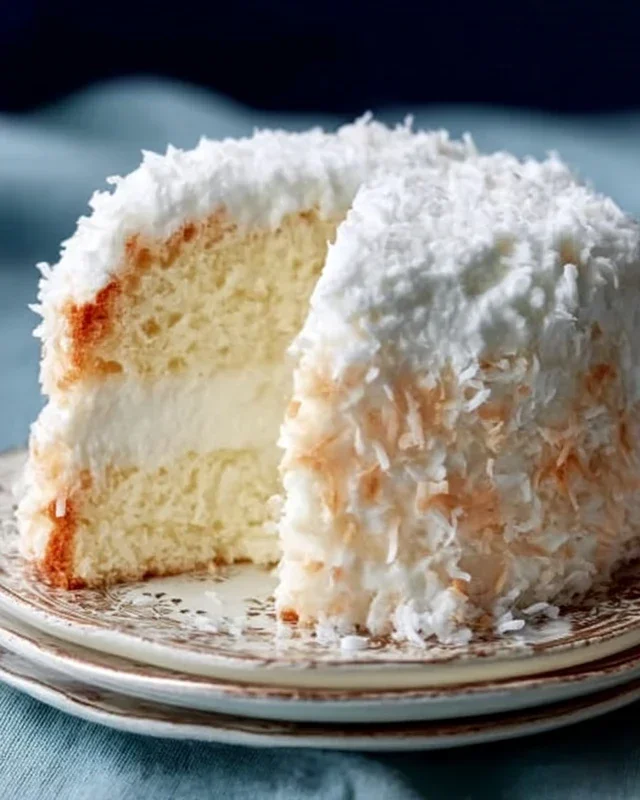
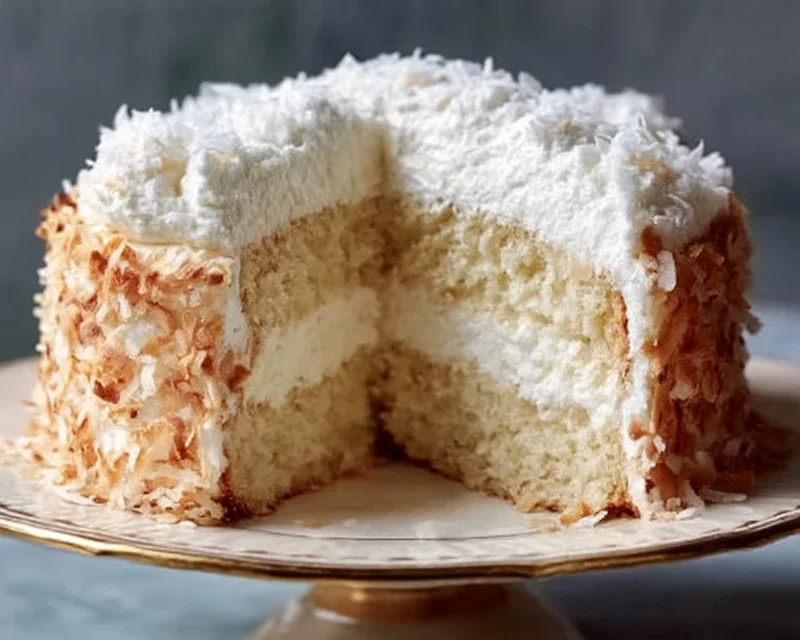
Coconut Cloud Cake Recipe- Fluffy & Easy Dessert
Coconut Cloud Cake Recipe: Get ready to experience pure bliss with this heavenly creation! If you’re dreaming of a dessert that’s as light and airy as a summer’s day, then look no further. This Coconut Cloud Cake Recipe is designed to transport your taste buds straight to a tropical paradise. We all crave those treats that feel like a special occasion, and this cake delivers exactly that. Its magic lies in the delicate balance of subtle coconut flavor and an incredibly moist, melt-in-your-mouth texture. It’s not just a cake; it’s an experience. The subtle sweetness, combined with the fluffy crum extractb, makes it utterly irresistible and a guaranteed crowd-pleaser for any gathering, or simply a delightful indulgence for yourself. Prepare to be enchanted by this delightful Coconut Cloud Cake Recipe!
Coconut Cloud Cake Recipe
Get ready to experience a slice of pure bliss with this Coconut Cloud Cake recipe. This isn’t just any cake; it’s a whisper-light, incredibly moist, and delightfully fragrant creation that will transport your taste buds to a tropical paradise. Imagin extracte a fluffy, airy cake infused with the subtle, sweet aroma of coconut, all enveloped in a dreamy, velvety frosting. It’s the perfect centerpiece for any celebration, a delightful afternoon treat, or simply a way to brighten your day. The beauty of this cake lies in its simplicity and the wonderful harmony of its flavors and textures. We’re using real coconut milk in the cake batter for an unparalleled moisture and flavor, and a touch of coconut extract in both the cake and frosting to amplify that tropical essence. Prepare to impress yourself and your loved ones with this truly special dessert.
Ingredients:
Cooking Instructions:
Let’s embark on this delightful baking journey! Follow these steps carefully, and you’ll be rewarded with a cake that’s as beautiful as it is delicious.
Preparing the Cake Batter
1. Preheat and Prepare Pans: Begin extract by preheating your oven to 350°F (175°C). Grease and flour two 9-inch round cake pans. You can also line the bottoms with parchment paper for extra insurance against sticking, which is always a good idea for a perfect release. This step ensures even baking and easy cake removal.
2. Combine Dry Ingredients: In a medium bowl, whisk together the all-purpose flour, baking powder, and salt. This simple step ensures that your leavening agent and salt are evenly distributed throughout the flour, which is crucial for a consistent rise and balanced flavor. Set this aside for now.
3. Cream Butter and Sugar: In a large bowl, using an electric mixer (stand or hand mixer), cream together the softened unsalted butter and granulated sugar until the mixture is light, fluffy, and pnon-alcoholic ale yellow. This process incorporates air into the batter, contributing to the cake’s tender crum extractb and volume. Scrape down the sides of the bowl occasionally to ensure everything is well combined.
4. Incorporate Eggs and Extracts: Add the room-temperature large eggs, one at a time, beating well after each addition until fully incorporated. Room temperature eggs emulsify better with the butter mixture, resulting in a smoother batter. Next, stir in the vanilla extract and coconut extract. The combination of these two extracts will provide a beautiful, warm, and distinctly tropical aroma and flavor.
5. Alternate Dry and Wet Ingredients: Now, we’ll alternate adding the dry ingredients (from step 2) and the coconut milk to the creamed mixture. Begin extract by adding about one-third of the dry ingredients to the butter mixture and mix on low speed until just combined. Then, add half of the coconut milk and mix until incorporated. Repeat this process, adding another third of the dry ingredients, then the remaining coconut milk, and finally the last third of the dry ingredients. Be careful not to overmix at this stage. Overmixing can develop the gluten in the flour too much, leading to a tougher cake. Mix until you no longer see streaks of flour. The batter should be smooth and pourable.
6. Baking the Layers: Divide the batter evenly between the two prepared cake pans. Smooth the tops with a spatula. Bake for 30-35 minutes, or until a wooden skewer or toothpick inserted into the center of the cakes comes out clean. The exact baking time can vary depending on your oven, so start checking around the 30-minute mark. Once baked, let the cakes cool in the pans for about 10-15 minutes before inverting them onto a wire rack to cool completely. It’s essential that the cakes are entirely cool before frosting; otherwise, the frosting will melt and slide off.
Crafting the Dreamy Coconut Frosting
1. Whip the Cream: In a clean, chilled bowl, whip the heavy whipping cream using your electric mixer on medium-high speed until stiff peaks form. Be careful not to over-whip, or you’ll end up with butter! Stiff peaks mean that when you lift the whisk, the cream holds its shape.
2. Beat Cream Cheese and Sugar: In a separate large bowl, beat the softened cream cheese until it’s smooth and creamy. Gradually add the powdered sugar and continue beating until well combined and no lumps of powdered sugar remain. This creates a smooth, sweet base for our frosting.
3. Combine and Flavor: Add the vanilla extract and coconut extract to the cream cheese mixture and beat until incorporated. Now, gently fold in the whipped cream from step 1 in two or three additions. Use a spatula and a gentle folding motion to incorporate the whipped cream without deflating it. This is what gives the frosting its airy, cloud-like texture. The result should be a light, fluffy, and luscious frosting.
Assembling and Decorating Your Coconut Cloud Cake
1. Level and Frost the First Layer: Once your cake layers are completely cool, you can optionally level them with a serrated knife if they have domed significantly during baking. Place one cake layer on your serving plate or cake stand. Spread a generous layer of the coconut frosting over the top.
2. Add the Second Layer: Carefully place the second cake layer on top of the frosted first layer.
3. Frost the Entire Cake: Apply a thin “crum extractb coat” of frosting all over the cake, both the top and sides. This is a light layer that traps any loose crum extractbs. Chill the cake in the refrigerator for about 15-20 minutes to set the crum extractb coat. Once chilled, apply the remaining frosting evenly over the entire cake, creating smooth sides and a beautifully finished top.
4. Add the Coconut Topping: Generously sprinkle the sweetened shredded coconut over the top of the cake. You can press it gently into the frosting to ensure it adheres well. If you like a toasted coconut flavor, you can toast your shredded coconut in a dry skillet over medium heat until golden brown before sprinkling it on. This adds a lovely nutty aroma and a delightful crunch.
Allow the cake to sit at room temperature for about 30 minutes before slicing and serving. This allows the frosting to soften slightly, making it even more decadent. Enjoy every airy, coconutty bite of your homemade Coconut Cloud Cake!
Conclusion:
And there you have it – your guide to creating a show-stopping Coconut Cloud Cake! This recipe is truly a dream to make and even more of a dream to eat. Its light, airy texture, coupled with the subtle, tropical sweetness of coconut, makes it an absolute winner for any occasion. Whether you’re celebrating a birthday, hosting a tea party, or simply craving a delightful treat, this Coconut Cloud Cake is sure to impress. Don’t be intimidated by its elegant appearance; it’s surprisingly straightforward and incredibly rewarding. I encourage you to gather your ingredients and give it a try – you won’t regret embarking on this delicious baking adventure!
For serving, consider a dusting of extra shredded coconut or a delicate drizzle of white chocolate. It pairs beautifully with fresh berries, a dollop of whipped cream, or even a scoop of vanilla bean ice cream. For variations, feel free to infuse the batter with a touch of lime zest for a tropical twist, or add toasted coconut flakes to the frosting for added texture and depth of flavor. The possibilities are as endless as the clouds themselves!
Frequently Asked Questions:
Can I make this Coconut Cloud Cake dairy-free?
Absolutely! You can easily make this recipe dairy-free by using a plant-based milk alternative like coconut milk (full-fat for richness) and a dairy-free butter substitute. Ensure your other ingredients, like white chocolate if you choose to use it, are also dairy-free.
How should I store the leftover cake?
Store any leftover Coconut Cloud Cake in an airtight container at room temperature for up to 2 days, or in the refrigerator for up to 4 days. It’s best served at room temperature, so allow it to sit out for about 30 minutes before enjoying if refrigerated.
Can I use desiccated coconut instead of shredded coconut?
Yes, you can. Desiccated coconut is finer than shredded coconut. If using desiccated coconut in the batter, you might need to slightly adjust the liquid content if it seems too dry, adding a tablespoon of milk at a time. For the frosting, shredded coconut provides a lovely texture, but desiccated will also work, giving a more uniform finish.
Coconut Cloud Cake Recipe
A light and airy coconut cake with a creamy coconut frosting, perfect for any celebration.
Ingredients
-
2 1/2 cups all-purpose flour
-
2 1/2 teaspoons baking powder
-
1/2 teaspoon salt
-
1 cup unsalted butter, softened
-
2 cups granulated sugar
-
4 large eggs, room temperature
-
1 teaspoon vanilla extract
-
1 teaspoon coconut extract
-
1 cup coconut milk
-
1 1/2 cups heavy whipping cream
-
8 oz cream cheese, softened
-
1/2 cup powdered sugar
-
1 cup sweetened shredded coconut (toasted or fresh)
Instructions
-
Step 1
Preheat oven to 350°F (175°C). Grease and flour two 8-inch round cake pans. -
Step 2
In a medium bowl, whisk together flour, baking powder, and salt. -
Step 3
In a large bowl, cream together butter and granulated sugar until light and fluffy. -
Step 4
Beat in eggs one at a time, then stir in vanilla and coconut extracts. -
Step 5
Alternately add the dry ingredients and coconut milk to the wet ingredients, beginning and ending with the dry ingredients. Mix until just combined. -
Step 6
Divide batter evenly between prepared pans and bake for 30-35 minutes, or until a wooden skewer inserted into the center comes out clean. -
Step 7
Let cakes cool in pans for 10 minutes before inverting onto a wire rack to cool completely. -
Step 8
For the frosting, beat heavy whipping cream until stiff peaks form. In a separate bowl, beat cream cheese and powdered sugar until smooth. Gently fold in vanilla and coconut extracts, then fold in the whipped cream. -
Step 9
Frost the cooled cake layers and the top and sides. Decorate with sweetened shredded coconut.
Important Information
Nutrition Facts (Per Serving)
It is important to consider this information as approximate and not to use it as definitive health advice.
Allergy Information
Please check ingredients for potential allergens and consult a health professional if in doubt.