Easy Homemade Bread Recipe – Delicious & Simple
Homemade bread is more than just a food; it’s an experience. There’s a primal satisfaction in transforming simple ingredients – flour, water, yeast, and salt – into a warm, crusty loaf that fills your kitchen with an irresistible aroma. We all remember that comforting smell, don’t we? That’s part of the magic that draws so many of us to baking our own bread. It’s the pure joy of creation, a hands-on craft that connects us to generations past. But what truly makes homemade bread so special? It’s the unparalleled texture – the tender crum extractb, the satisfying chew – and the subtle, complex flavors that store-bought versions simply can’t replicate. It’s the knowledge that you’ve nurtured something beautiful from scratch, a delicious reward for your patience and effort.
Ready to embark on your own bread-making adventure?
Let’s get started!
Homemade Bread
There’s something incredibly satisfying about pulling a warm, crusty loaf of homemade bread from your own oven. The aroma alone can transform your kitchen into a haven, and the taste of freshly baked bread, slathered with butter, is simply unparalleled. Forget the store-bought loaves that often lack soul and texture; with a few simple ingredients and a bit of patience, you can create a masterpiece that will have your family beggin extractg for more. This recipe is my go-to for a consistently delicious, versatile loaf that’s perfect for sandwiches, toast, or just enjoying on its own. Let’s get baking!
Ingredients:
Getting Started: Activating the Yeast
The first crucial step in making any yeasted bread is to properly activate your yeast. This ensures it’s alive and ready to work its magic in creating that beautiful, airy crum extractb. In a large mixing bowl, combine the warm water and your chosen sweetener – either honey for a slightly richer flavor and softer crum extractb, or sugar for a more neutral sweetness. Stir gently until the honey or sugar is mostly dissolved. Sprinkle the active dry yeast over the surface of the water. Do not stir it in immediately. Let it sit undisturbed for about 5 to 10 minutes. You’ll know the yeast is active when it starts to foam and bubble, forming a creamy layer on top of the liquid. If you don’t see this activity, your yeast might be old or the water temperature was off, and you’ll need to start again with fresh yeast.
Bringin extractg it All Together: Mixing the Dough
Once your yeast is happily frothing, it’s time to add the other wet ingredients and the salt. Pour in the oil and add the salt to the bowl. Give it a gentle whisk to combine everything. Now comes the flour. Start by adding 4 cups of the all-purpose or bread flour. Bread flour generally contains more protein, which can lead to a chewier texture and better rise, but all-purpose flour works perfectly well too. Use a sturdy spoon or a dough whisk to mix the flour into the wet ingredients until a shaggy dough begin extracts to form. It will look messy and unappealing at this stage, and that’s exactly what you want. Don’t be tempted to add too much more flour just yet.
Kneading for Structure
This is where the real work begin extracts, and it’s incredibly rewarding! Turn the shaggy dough out onto a lightly floured surface. Begin extract to knead the dough. This process develops the gluten in the flour, which gives bread its structure and chegrape juicess. To knead, push the dough away from you with the heels of your hands, then fold it back over itself and give it a quarter turn. Continue this motion, adding small amounts of flour to your hands and the work surface only if the dough becomes excessively sticky and unmanageable. You’re looking for a dough that is smooth, elastic, and springs back slowly when you poke it with your finger. Kneading typically takes about 8 to 10 minutes by hand. If you have a stand mixer with a dough hook, you can knead it on medium-low speed for about 6 to 8 minutes. The dough should start to pull away from the sides of the bowl. The consistency you’re aiming for is a soft, slightly tacky dough, not a dry, stiff one.
The First Rise: Patience is Key
Once your dough is beautifully kneaded, it’s time for its first rest and rise. Lightly oil a clean, large bowl. Place the kneaded dough into the oiled bowl, turning it once to coat the entire surface with a thin layer of oil. This prevents it from drying out. Cover the bowl tightly with plastic wrap or a clean kitchen towel. Find a warm, draft-free place for your dough to rise. An oven that’s been turned off but is still slightly warm (no hotter than 100 degrees Fahrenheit) is ideal, or simply a cozy corner of your kitchen. Let the dough rise for 1 to 1.5 hours, or until it has doubled in size. You’ll see it puff up like a balloon! This rise is crucial for developing flavor and texture. Resist the urge to poke it too much during this time.
Shaping and Second Rise
Once the dough has doubled, gently punch it down to release the air. Turn the dough out onto a lightly floured surface again. At this point, you can divide it if you want to make two smaller loaves, or keep it as one large loaf. Gently shape the dough into your desired loaf shape – either a round boule or an oblong shape for a loaf pan. If using a loaf pan, grease it well with butter or oil. Place the shaped dough into the prepared pan or onto a baking sheet lined with parchment paper. Cover the loaf loosely with plastic wrap or a kitchen towel and let it rise again for another 30 to 45 minutes, or until it’s visibly puffed up and looks almost doubled. This second rise, also known as proofing, ensures a lighter, airier final product.
Baking to Perfection
Preheat your oven to 375 degrees Fahrenheit (190 degrees Celsius). Once the dough has completed its second rise, it’s ready to bake. For a crispier crust, you can place a small oven-safe pan filled with water on the bottom rack of your oven during preheating. This creates steam, which is key to a great crust. Carefully place the loaf into the preheated oven. Bake for 30 to 40 minutes, or until the crust is a deep golden brown and the internal temperature of the bread reaches 190-200 degrees Fahrenheit (88-93 degrees Celsius) when measured with an instant-read thermometer. You can also tap the bottom of the loaf; it should sound hollow.
Cooling: The Final, Crucial Step
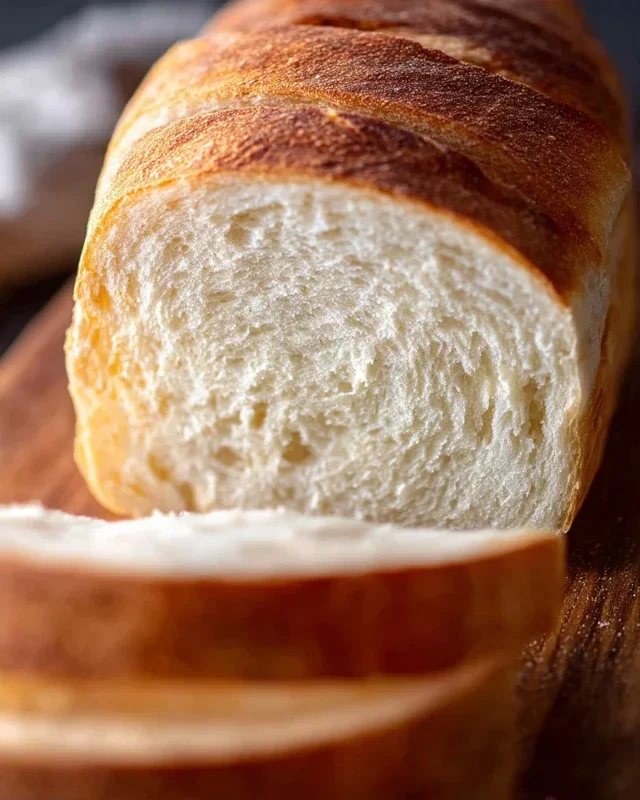
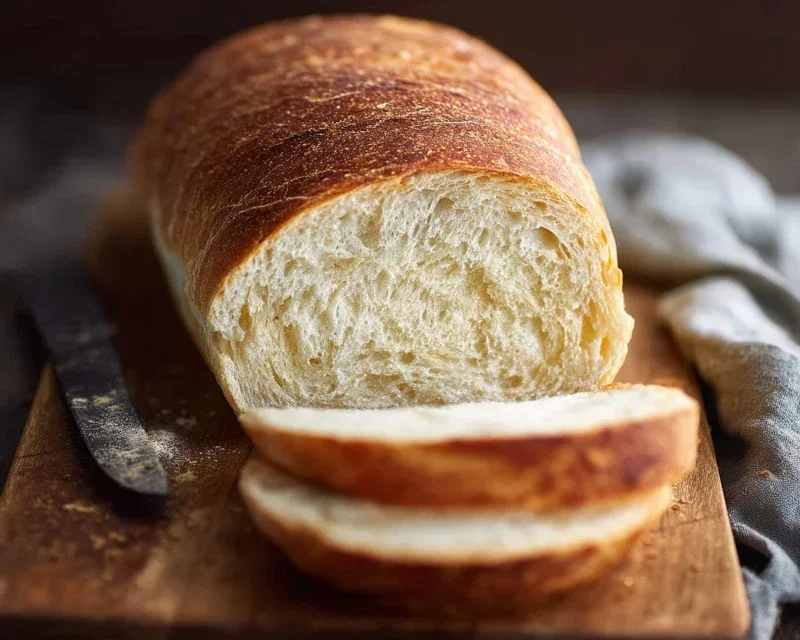
This is perhaps the hardest part for any baker – waiting! Once the bread is out of the oven, immediately transfer it to a wire cooling rack. This allows air to circulate around the entire loaf, preventing the bottom crust from becoming soggy. Resist the temptation to slice into it right away. The bread continues to cook and set as it cools. Letting it cool completely, or at least for an hour, will result in a much better texture and flavor. Once cooled, slice and enjoy your magnificent homemade bread!
Conclusion:
There you have it – your very own homemade bread! This recipe is fantastic because it’s surprisingly simple, requiring minimal hands-on time and yielding a wonderfully rustic, deeply satisfying loaf. The aroma alone as it bakes is pure comfort, and the taste is leagues beyond anything store-bought. Imagin extracte slicing into that warm, crusty exterior, revealing a soft, chewy interior. It’s a culinary triumph you can achieve in your own kitchen!
This versatile bread is perfect for so many occasions. Enjoy it simply toasted with butter for breakfast, or use it as the base for incredible sandwiches. It also makes a fantastic accompaniment to soups, stews, or a hearty salad. Don’t be afraid to get creative with variations! You can add herbs like rosemary or thyme to the dough, or incorporate seeds like sunflower or pumpkin for added texture and flavor. A sprinkle of flaky sea salt on top before baking is also a delightful touch.
I truly encourage you to give this homemade bread recipe a try. It’s a rewarding experience that will fill your home with warmth and deliciousness. You might be surprised at how easy it is and how proud you feel when you pull that golden-brown loaf from the oven. Happy baking!
Frequently Asked Questions:
What if my dough doesn’t rise?
Several factors can affect dough rise. Ensure your yeast is fresh and active – you can test this by dissolving it in warm water (around 105-115°F or 40-46°C) with a pinch of sugar; it should become foamy within 5-10 minutes. Also, make sure your kitchen isn’t too cold, as yeast thrives in a warm environment. Over-kneading or under-kneading can also impact rise. If you suspect issues, it’s often best to start with fresh ingredients and try again!
Can I freeze this homemade bread?
Absolutely! Once the loaf has cooled completely, you can wrap it tightly in plastic wrap followed by a layer of aluminum foil, or place it in a freezer-safe bag. It will keep well in the freezer for up to 2-3 months. Thaw at room temperature or gently reheat in a low oven to bring back its freshness.
Homemade Bread
A simple and delicious recipe for classic homemade bread, perfect for sandwiches or toasting.
Ingredients
-
2 cups warm water (105-115 degrees Fahrenheit)
-
1 Tablespoon active dry yeast
-
1/4 cup honey
-
2 teaspoons salt
-
2 Tablespoons canola oil
-
4 – 5 1/2 cups all-purpose flour
Instructions
-
Step 1
In a large bowl, combine the warm water, honey, and yeast. Let it sit for 5-10 minutes until foamy. -
Step 2
Stir in the salt and canola oil. -
Step 3
Gradually add the flour, one cup at a time, mixing until a shaggy dough forms. You may not need all the flour. -
Step 4
Turn the dough out onto a lightly floured surface and knead for 8-10 minutes until smooth and elastic. -
Step 5
Place the dough in a greased bowl, cover, and let it rise in a warm place for 1-1.5 hours, or until doubled in size. -
Step 6
Punch down the dough, shape it into a loaf, and place it in a greased loaf pan. Let it rise for another 30-45 minutes. -
Step 7
Preheat oven to 375°F (190°C). Bake for 30-35 minutes, or until the crust is golden brown and the internal temperature reaches 200-210°F (93-99°C). -
Step 8
Remove from the pan and let cool on a wire rack before slicing.
Important Information
Nutrition Facts (Per Serving)
It is important to consider this information as approximate and not to use it as definitive health advice.
Allergy Information
Please check ingredients for potential allergens and consult a health professional if in doubt.