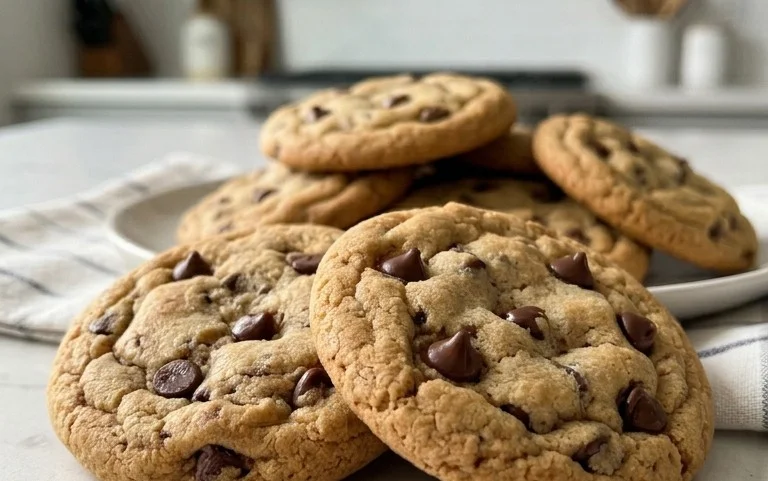
The Best Soft Chocolate Chip Cookies Recipe
The Best Soft Chocolate Chip Cookies are a legendary pursuit, aren’t they? We’ve all been there, dreaming of that perfect cookie: a delightfully soft center, slightly chewy edges, and pockets of melty chocolate that ooze with every bite. It’s a simple pleasure, but achieving that ideal texture and flavor can feel like a culinary Everest. What is it about this classic that ignites such passion? Perhaps it’s the comforting nostalgia, the way it transports us back to simpler times, or maybe it’s just the sheer, unadulterated joy of biting into a warm, gooey chocolate chip cookie fresh from the oven. My quest for the best soft chocolate chip cookies led me down many a flour-dusted path, experimenting with ingredients and techniques until I finally landed on a recipe that consistently delivers that dreamy, melt-in-your-mouth perfection. This is the one that will have everyone beggin extractg for the secret.
The Best Soft Chocolate Chip Cookies
There’s something undeniably magical about a perfectly soft chocolate chip cookie. Not too cakey, not too crisp, but with that melt-in-your-mouth, chewy interior that makes you want to close your eyes with every bite. I’ve spent years perfecting my recipe, tweaking and testing until I arrived at what I genuinely believe are the best soft chocolate chip cookies out there. This isn’t just a recipe; it’s an experience. The aroma that fills your kitchen as these bake is enough to make anyone happy, and the first warm, gooey bite? Pure bliss. Forget those store-bought imposters; these homemade wonders are in a league of their own.
This recipe is designed to give you that delightful chegrape juicess that we all crave in a chocolate chip cookie. The key lies in the balance of ingredients and a few simple techniques that elevate them from good to extraordinary. Don’t be afraid to get your hands a little floury; it’s all part of the fun!
Ingredients:
Cooking Instructions:
Creaming the Butter and Sugars
The foundation of any great cookie starts with properly creaming your butter and sugars. In a large mixing bowl, or the bowl of your stand mixer fitted with the paddle attachment, add your softened salted butter. Ensure your butter is truly softened – it should give easily when pressed with your finger but not be melted or oily. Add the white sugar (or raw cane sugar, if you’re going for that extra texture) and the packed light brown sugar. Cream these together on medium speed for about 3-5 minutes. You’re looking for a pnon-alcoholic ale, fluffy mixture. This step is crucial because it incorporates air into the dough, which contributes to the cookie’s texture and lift. Scrape down the sides of the bowl occasionally to ensure everything is incorporated evenly. Don’t rush this; the fluffier the butter and sugar mixture, the lighter and chewier your cookies will be.
Adding the Wet Ingredients
Once your butter and sugar mixture is wonderfully light and fluffy, it’s time to add the wet ingredients. Crack your large egg into the bowl. It’s a good practice to crack the egg into a separate small bowl first, just in case of any shell fragments, and then add it to the main mixture. Add the teaspoon of vanilla extract. Vanilla is not just for flavor; it also enhances the other flavors in the cookie and contributes to its overall aroma. Beat on medium-low speed until the egg and vanilla are fully incorporated into the butter and sugar mixture. The mixture might look a little separated at first, but keep beating, and it will come together smoothly. Again, scrape down the sides of the bowl to ensure everything is well combined.
Incorporating the Dry Ingredients
Now it’s time to add the dry ingredients. In a separate medium bowl, whisk together the all-purpose flour, baking soda, and salt. Whisking the dry ingredients together ensures that the baking soda and salt are evenly distributed throughout the flour, which is vital for consistent leavening and flavor. Add the dry ingredients to the wet ingredients in two additions. Mix on low speed until just combined. Be careful not to overmix at this stage. Overmixing can develop the gluten in the flour too much, leading to tough cookies instead of soft, chewy ones. You want to see just a few streaks of flour remaining before you add the chocolate chips.
Folding in the Chocolatey Goodness
This is where the magic really happens! Gently fold in your chocolate chips and chocolate chunks (if you’re using a combination) using a spatula or wooden spoon. Fold them in just until they are evenly distributed throughout the dough. I like to use a mix of chips and chunks because the chips melt into little pockets of gooey chocolate, while the chunks create larger, more substantial bites of pure chocolate. If you’re feeling adventurous, you can even sprinkle in a few extra chocolate chips on top of the cookie dough balls before baking for an even more decadent look and taste. The dough will be thick and slightly sticky, which is exactly what you want.
Chilling and Baking for Perfect Texture
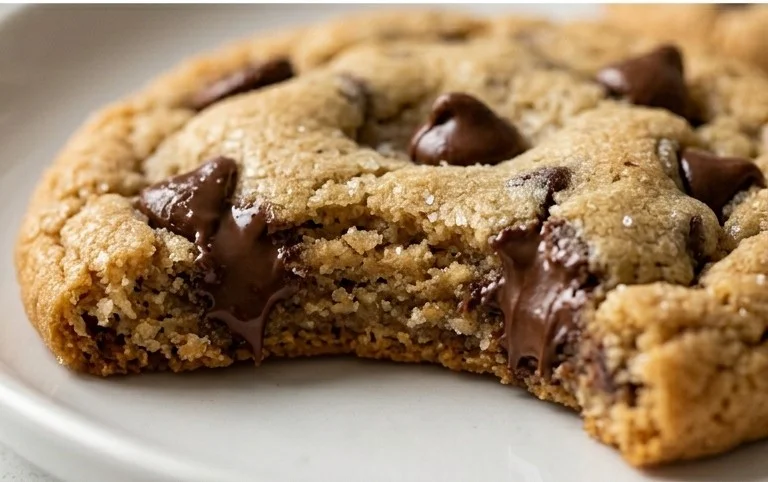
This step is non-negotiable for achieving that perfect soft texture. Cover the bowl with plastic wrap and refrigerate the cookie dough for at least 30 minutes, but I often find that an hour or even overnight yields the best results. Chilling the dough allows the fats to firm up, preventing the cookies from spreading too much during baking. It also allows the flavors to meld and deepen. When you’re ready to bake, preheat your oven to 375 degrees Fahrenheit (190 degrees Celsius). Line baking sheets with parchment paper. Drop rounded tablespoons of dough onto the prepared baking sheets, leaving about 2 inches between each cookie as they will spread. For that extra touch, you can lightly press a few extra chocolate chips onto the tops of the dough balls. Bake for 9-12 minutes, or until the edges are lightly golden brown and the centers still look slightly underbaked. They will continue to set as they cool. Let the cookies cool on the baking sheet for 5-10 minutes before transferring them to a wire rack to cool completely. This resting period on the hot baking sheet is crucial for achieving that soft, chewy interior.
Conclusion:
We’ve arrived at the delightful end of our journey to create the best soft chocolate chip cookies! What makes this recipe truly special is its meticulous balance of ingredients and techniques, ensuring a cookie that’s irresistibly chewy in the center with slightly crisp edges. The use of melted butter and an extra egg yolk contributes to that signature soft texture that keeps you coming back for more. These aren’t just cookies; they’re a warm hug in every bite, perfect for any occasion. I truly encourage you to give this recipe a try – you won’t be disappointed!
These amazing cookies are incredibly versatile. Enjoy them fresh from the oven with a tall glass of cold milk for the ultimate classic experience. They also make a fantastic base for ice cream sandwiches or can be crum extractbled over yogurt or fruit for a delightful dessert topping. Feel free to get creative with variations! Consider adding a sprinkle of sea salt on top before baking for a delightful sweet and salty contrast, or stir in chopped nuts like walnuts or pecans for added crunch. You could even swap out some of the chocolate chips for white chocolate, butterscotch chips, or even a combination!
Frequently Asked Questions:
Q1: Why are my cookies spreading too much?
Cookie spread is often due to the butter being too soft or the oven temperature being too low. Ensure your butter is softened to room temperature but not melted when you cream it with the sugar. Also, double-check your oven’s calibration with an oven thermometer; if it’s running cooler than set, adjust accordingly.
Q2: Can I make these cookies ahead of time?
Absolutely! You can prepare the cookie dough, shape them into balls, and store them in an airtight container in the refrigerator for up to 3 days, or freeze them for up to 3 months. When ready to bake, you can bake them directly from frozen, adding a few extra minutes to the baking time.
The Best Soft Chocolate Chip Cookies
Achieve perfectly soft and chewy chocolate chip cookies with this classic recipe. A balance of sugars and the right techniques ensure a delightful treat.
Ingredients
-
8 tablespoons salted butter
-
1/2 cup white sugar
-
1/4 cup packed light brown sugar
-
1 teaspoon vanilla extract
-
1 large egg
-
1 1/2 cups all purpose flour
-
1/2 teaspoon baking soda
-
1/4 teaspoon salt
-
3/4 cup chocolate chips
Instructions
-
Step 1
Preheat oven to 375°F (190°C). Line baking sheets with parchment paper. -
Step 2
In a large bowl, cream together the softened butter, white sugar, and brown sugar until light and fluffy. -
Step 3
Beat in the vanilla extract and the egg until well combined. -
Step 4
In a separate medium bowl, whisk together the all-purpose flour, baking soda, and salt. -
Step 5
Gradually add the dry ingredients to the wet ingredients, mixing until just combined. Do not overmix. -
Step 6
Stir in the chocolate chips. -
Step 7
Drop rounded tablespoons of dough onto the prepared baking sheets, spacing them about 2 inches apart. -
Step 8
Bake for 9-11 minutes, or until the edges are golden brown and the centers are still slightly soft. -
Step 9
Let the cookies cool on the baking sheets for a few minutes before transferring them to a wire rack to cool completely.
Important Information
Nutrition Facts (Per Serving)
It is important to consider this information as approximate and not to use it as definitive health advice.
Allergy Information
Please check ingredients for potential allergens and consult a health professional if in doubt.