Best Homemade Strawberry Pie Recipe-Sweet & Easy
Strawberry pie is more than just a dessert; it’s a vibrant celebration of summer’s sweetest bounty. Imagin extracte a flaky, buttery crust cradling a glistening filling bursting with the ruby-red jewels of fresh strawberries. Who can resist the allure of this classic? It’s the quintessential treat that conjures memories of sun-drenched afternoons and joyful gatherings. What truly sets a perfect strawberry pie apart is the delicate balance: the inherent tartness of perfectly ripe berries mellowed by just the right amount of sugar, all enveloped in that irresistible, melt-in-your-mouth pastry. It’s simple, elegant, and utterly delicious, a testament to the power of fresh, quality ingredients. This isn’t just any dessert; this is the strawberry pie we all dream of making and devouring.
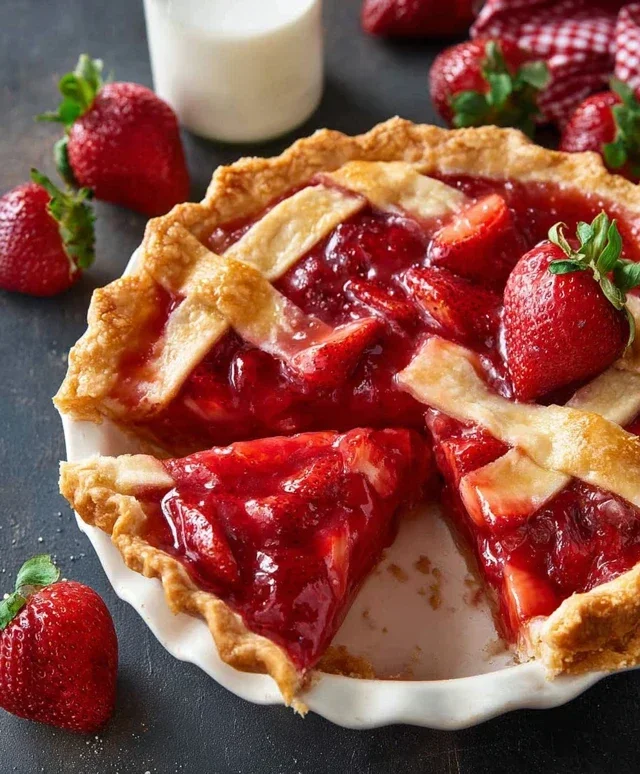
Strawberry Pie
There’s something incredibly nostalgic and utterly delicious about a classic strawberry pie. The vibrant red of fresh strawberries, the sweet and slightly tart filling, all nestled within a perfectly flaky crust – it’s a dessert that screams summer, picnics, and pure joy. While there are many variations, this recipe offers a beautifully simple yet stunningly effective way to capture the essence of this beloved treat. We’re going for a filling that’s glossy, packed with fresh berry flavor, and holds its shape beautifully, making it a showstopper for any occasion. Let’s get started!
Ingredients:
Preparing Your Pie Crust
Before we dive into the glorious filling, let’s ensure we have a sturdy and delicious foundation. You’ll need one 9-inch frozen pie crust that has been pre-baked and cooled. The key here is a fully baked crust, often referred to as “blind baking.” This involves lining the unbaked crust with parchment paper or foil, filling it with pie weights, dried beans, or even uncooked rice, and baking it until it’s golden brown and firm. This prevents a soggy bottom, which is a common pitfall when dealing with fruit fillings. Once baked, allow it to cool completely on a wire rack. This ensures it won’t melt or become soggy when you add the warm filling.
Crafting the Luscious Strawberry Filling
Now for the star of the show – the strawberry filling! This recipe utilizes a clever combination of fresh strawberries and strawberry Jell-O to achieve a perfect balance of fresh fruit flavor and a beautifully set, glossy texture.
In a medium saucepan, whisk together the 1 cup of sugar, 1 1/2 cups of water, and 1/4 cup of cornstarch. It’s crucial to whisk these ingredients together thoroughly before you turn on the heat. This helps to evenly distribute the cornstarch and prevent any lumps from forming, which can result in a gummy filling. Make sure there are no visible clumps of cornstarch clingin extractg to the bottom or sides of the pan.
Place the saucepan over medium heat. Stir constantly as the mixture begin extracts to thicken. You’re looking for the mixture to come to a gentle boil. Once it reaches a boil, continue to stir and cook for about 1-2 minutes. This cooking time is essential for activating the cornstarch and ensuring it thickens properly. The mixture should become visibly thicker and have a glossy sheen. Don’t rush this step; patience here will be rewarded with a beautifully set pie.
Remove the saucepan from the heat. Now, carefully stir in the 3 oz package of strawberry Jell-O. Keep stirring until the Jell-O is completely dissolved and incorporated into the thickened liquid. The residual heat from the cornstarch mixture will effectively “bloom” the Jell-O, allowing it to dissolve smoothly and release its vibrant strawberry flavor and color. Ensure there are no lingering granules of Jell-O.
Gently fold in the 1 lb of sliced strawberries. Be careful not to overmix at this stage. We want the strawberries to remain relatively intact, providing bursts of fresh fruit flavor and texture within the set filling. You can use fresh, ripe strawberries for the best flavor. If your strawberries are particularly large, you can cut them into more manageable pieces.
Pour the prepared strawberry filling into your pre-baked and cooled pie crust. Spread the filling evenly, making sure to distribute the sliced strawberries throughout. Once the filling is in the crust, you’ll need to let the pie set. This is where the magic of the Jell-O comes in. Cover the pie loosely with plastic wrap (try not to let the wrap touch the surface of the filling if possible, to avoid condensation) and refrigerate for at least 3-4 hours, or until the filling is completely set and firm. The longer it chills, the firmer it will become. For best results, I like to let it set overnight. This ensures a clean slice every time.
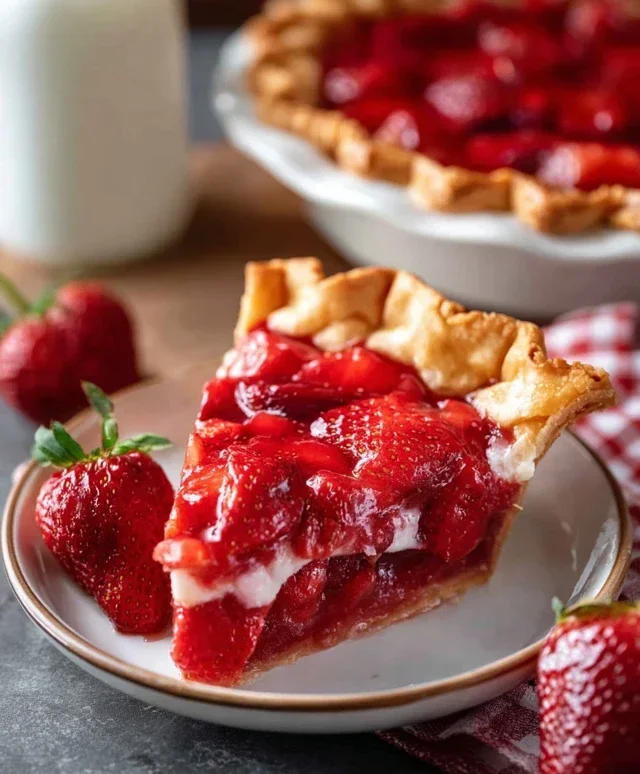
Serving Your Masterpiece
Once your strawberry pie has chilled and set beautifully, it’s ready to be enjoyed! The vibrant red filling will be firm yet jiggly, showcasing the perfectly preserved slices of fresh strawberries. This pie is absolutely delightful served chilled, on its own. However, for an extra touch of indulgence, consider topping it with a dollop of freshly whipped cream or a scoop of vanilla ice cream. The coolness and creaminess of these accompaniments perfectly complement the sweet and slightly tart strawberry filling. Slice with a sharp knife and savor every delicious bite. This homemade strawberry pie is a testament to how simple ingredients can create something truly special and memorable. Enjoy the taste of summer, any time of year!
Conclusion:
There you have it – a delightful and surprisingly simple way to create a truly memorable Strawberry Pie! This recipe is fantastic because it balances the natural sweetness and slight tartness of fresh strawberries with a perfectly flaky crust and a luscious, thickened filling. It’s the quintessential dessert for spring and summer gatherings, a guaranteed crowd-pleaser that looks as stunning as it tastes. Don’t hesitate to give this strawberry pie a try; the aroma alone will fill your kitchen with pure joy.
For serving, a dollop of fresh whipped cream or a scoop of vanilla bean ice cream is simply divine. If you’re feeling adventurous, consider a drizzle of balsamic glaze for a sophisticated twist, or sprinkle some toasted slivered almonds over the top for added texture. Don’t be afraid to experiment with variations! You could add a hint of lemon zest to the filling for an extra bright flavor, or even incorporate a few fresh raspberries alongside the strawberries for a beautiful mixed berry pie.
This recipe is your gateway to creating delicious memories. So gather your fresh, juicy strawberries and get baking. I’m confident you’ll be incredibly proud of the beautiful and tasty strawberry pie you create. Happy baking!
Frequently Asked Questions:
Can I use frozen strawberries?
While fresh strawberries are ideal for the best flavor and texture, you can use frozen ones. Ensure they are completely thawed and drained of excess liquid before incorporating them into the filling to prevent a watery pie.
How do I prevent a soggy bottom crust?
Blind baking your pie crust is key to preventing soggin extractess. This involves pre-baking the bottom crust before adding the filling. You can also brush the bottom crust with a thin layer of egg white before blind baking, which creates a barrier.
What makes this strawberry pie recipe so great?
This strawberry pie recipe is a winner because it highlights the natural flavor of fresh strawberries, resulting in a vibrant, perfectly balanced sweet and tart filling. Combined with a reliable flaky crust, it’s a classic for a reason and always a delightful treat.
Strawberry Pie
A refreshing strawberry pie with a sweet, jiggly filling.
Ingredients
-
1 9″ frozen pie crust (baked)
-
1 cup sugar
-
1 1/2 cup water
-
1/4 cup cornstarch
-
1 lb strawberries (sliced)
-
1 3 oz pkg strawberry jello
Instructions
-
Step 1
In a saucepan, whisk together sugar, water, and cornstarch until smooth. -
Step 2
Cook over medium heat, stirring constantly, until the mixture thickens and boils. Boil for 1 minute. -
Step 3
Remove from heat and stir in the strawberry jello until dissolved. -
Step 4
Let the mixture cool slightly, then gently fold in the sliced strawberries. -
Step 5
Pour the strawberry mixture into the baked pie crust. -
Step 6
Refrigerate for at least 4 hours, or until firm.
Important Information
Nutrition Facts (Per Serving)
It is important to consider this information as approximate and not to use it as definitive health advice.
Allergy Information
Please check ingredients for potential allergens and consult a health professional if in doubt.