Easy Dango Recipe-Sweet Japanese Dessert Simplified
Easy Dango Recipe: Craving a delightful, chewy Japanese treat that’s surprisingly simple to make at home? Look no further! Dango, those charming little sweet dumplings, are a beloved classic for a reason. Their wonderfully soft yet satisfyingly chewy texture, often coated in a glistening sweet sauce or dusted with kinako (roasted soybean flour), makes them an irresistible snack or dessert. What makes dango truly special is its versatility and comforting nature. Whether you’re enjoying them during a hanami (cherry blossom viewing) picnic, as a sweet ending to a meal, or simply as a pick-me-up, they bring a touch of joy. I’ve always found dango to be the perfect balance of simple ingredients creating something truly magical. Get ready to whip up your very own delicious batch of easy dango that will impress your friends and family!
Easy Dango Recipe
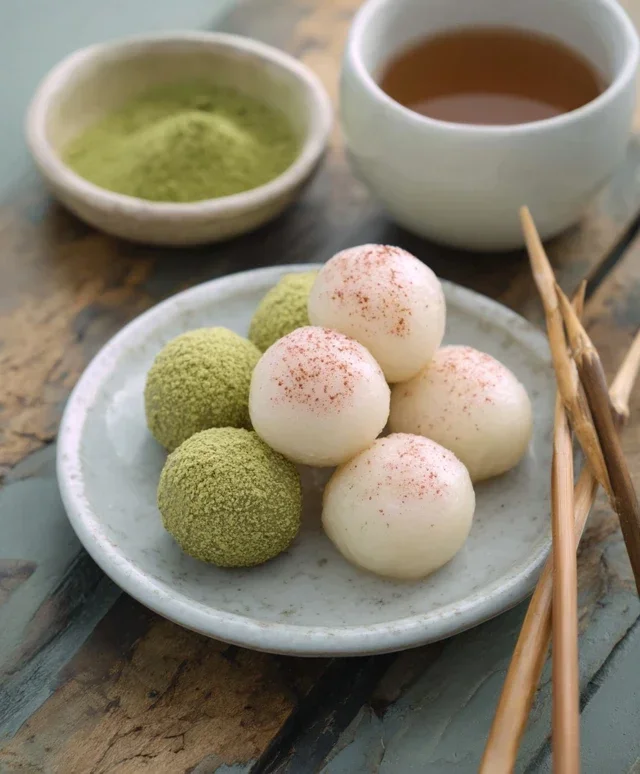
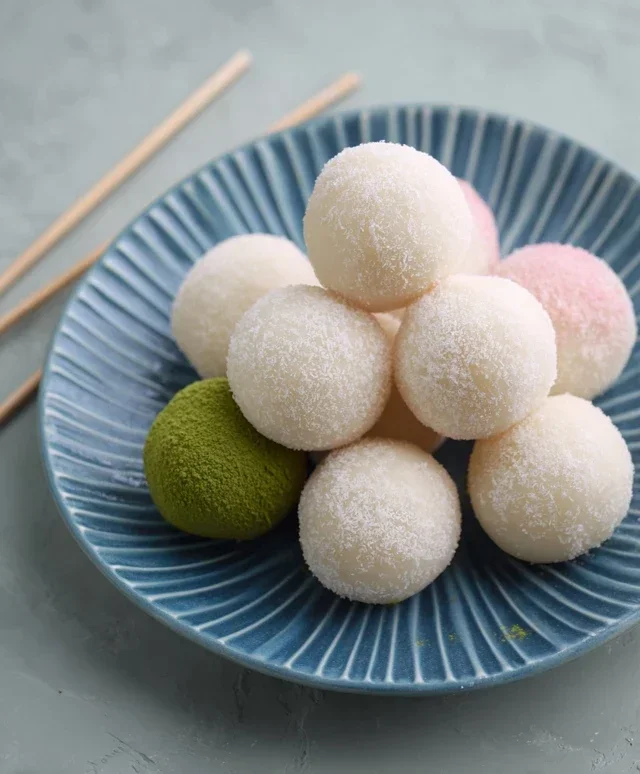
Dango, those delightful little chewy rice dumplings, are a quintessential Japanese sweet treat. Often enjoyed on skewers with a sweet glaze, they are surprisingly simple to make at home, even for begin extractners. This recipe focuses on a straightforward approach, allowing you to achieve that perfect bouncy texture without any fuss. We’ll be creating three beautiful colors: classic white, vibrant green matcha, and a charming pink. Get ready to impress yourself and your loved ones with these homemade dango!
Ingredients:
Instructions:
The process of making dango is broken down into a few key stages, from mixing the dough to shaping and cooking the dumplings. Don’t be intimidated; each step is designed to be easy to follow.
1. Preparing the Dough Bases
First, let’s get our dry ingredients combined. In a large mixing bowl, whisk together the Joshinko (non-glutinous rice flour) and Shiratamako (glutinous sweet rice flour). If you’re using powdered sugar to sweeten your dango, add it to the flour mixture now and whisk until evenly distributed. This base mixture is crucial for achieving the right texture. Joshinko provides structure, while Shiratamako contributes to the characteristic chewy, slightly elastic feel of dango.
2. Incorporating the Hot Water
Now comes the magic of hydration. Gradually add the hot water to the dry ingredients. Start by pouring in about half a cup and mixing with a spoon or spatula. You’ll notice the mixture starting to come together. Continue adding the hot water, a little at a time, while mixing. The goal is to create a smooth, cohesive dough. The amount of water might vary slightly depending on the humidity and the specific brands of flour you’re using, so be a bit flexible. Once you have a dough that is no longer sticky and can be handled, it’s ready for the next step.
3. Kneading and Dividing the Dough
Turn the dough out onto a clean, lightly floured surface. Knead the dough for about 5-7 minutes, or until it becomes smooth and elastic. It should feel similar to a soft playdough – pliable and not sticking to your hands. This kneading process further develops the gluten in the rice flours, contributing to the delightful chegrape juicess. Once you have a well-kneaded dough, divide it into three equal portions.
4. Coloring and Flavoring Your Dango
This is where we add the fun and visual appeal!
For the white dango, take one portion of the dough and set it aside.
For the matcha dango, take another portion of dough. In a small separate bowl, mix the 1 teaspoon of matcha powder with 1 teaspoon of water to create a smooth paste. Add this matcha paste to your dough portion and knead until the color is evenly distributed and no streaks remain. The matcha will impart a subtle earthy flavor and a beautiful green hue.
For the pink dango, take the remaining portion of dough. Add just one drop of pink food coloring to it. Knead until the color is uniformly spread throughout the dough. Again, start with a small amount of coloring and add more only if needed to achieve your desired shade. Be careful not to overdo it; a subtle pink is often more appealing.
5. Shaping the Dango Balls
Take each colored portion of dough and roll it into a long rope, about 1/2 to 3/4 inch in diameter. Then, pinch off small pieces of the rope and roll them between your palms to form small, round balls, roughly 1 inch in diameter. Aim for consistency in size so they cook evenly. You can also give them a slightly flattened, disc-like shape if you prefer. Place the shaped dango on a plate or baking sheet, making sure they don’t touch each other to prevent sticking.
6. Cooking the Dango
Bring a large pot of water to a rolling boil. Carefully drop the dango balls into the boiling water, a few at a time. Don’t overcrowd the pot, as this can lower the water temperature and cause the dango to stick together. The dango will sink to the bottom initially. As they cook, they will rise to the surface. Once they float, let them boil for another 2-3 minutes. This ensures they are cooked through and have that perfect chewy texture.
7. Cooling and Serving Your Dango
Using a slotted spoon, carefully remove the cooked dango from the boiling water. Immediately transfer them to a bowl of ice-cold water. This shocking in cold water helps to firm up the dango and prevent them from becoming too mushy. Let them sit in the ice water for about 1-2 minutes, then drain them well. Your dango are now ready to be enjoyed! They are traditionally served on skewers, with three or four dango per skewer. While they are delicious on their own, they are often paired with a sweet soy glaze (mitarashi dango sauce) or a dusting of kinako (roasted soybean flour). You can also serve them with red bean paste or simply enjoy their natural sweetness. They are best eaten fresh, but can be stored in an airtight container at room temperature for a day or two. Enjoy your delightful homemade dango!
Conclusion:
And there you have it! My easy dango recipe is perfect for anyone looking for a quick, delicious, and fun Japanese sweet treat. It’s incredibly rewarding to make these chewy, delightful dumplings from scratch with just a few simple ingredients. The satisfaction of creating something so classic and enjoyable is immense, and I truly believe anyone can master this recipe with confidence. The beauty of dango lies in its versatility, making it a fantastic canvas for various toppings and flavors.
I love serving dango fresh, still warm and slightly chewy, with a drizzle of sweet soy glaze or a sprinkle of kinako (roasted soybean flour). For a more festive touch, you could skewer them on bamboo sticks, perhaps alternating with seasonal fruits like strawberries or grapes. Don’t be afraid to experiment! Try adding a touch of matcha powder to the dough for a green tea flavor, or even some food coloring for vibrant, playful colors. The possibilities are truly endless!
I wholeheartedly encourage you to give this easy dango recipe a try. It’s a wonderful way to bring a taste of Japan into your kitchen and create delightful moments. Let me know how yours turn out!
Frequently Asked Questions:
What can I use if I don’t have shiratamako?
If you can’t find shiratamako (sweet rice flour specifically for dango), you can substitute it with regular glutinous rice flour, also known as mochiko. The texture might be slightly different, but it will still produce delicious dango!
How should I store leftover dango?
Dango is best enjoyed fresh. However, if you have leftovers, you can store them in an airtight container at room temperature for a day. For longer storage, refrigerate them, but be aware they might become harder. Gently rewarm them in the microwave or a steamer before serving.
Easy Dango Recipe
A simple and delicious recipe for making soft and chewy Dango, a popular Japanese sweet treat. This recipe includes variations for color and sweetness.
Ingredients
-
{‘@type’: ‘Ingredient’, ‘name’: ‘Joshinko non-glutinous rice flour’, ‘amount’: ‘1 1/3 cup’, ‘unitCode’: ‘g’, ‘value’: 150}
-
{‘@type’: ‘Ingredient’, ‘name’: ‘Shiratamako glutinous sweet rice flour’, ‘amount’: ‘1 1/2 cup’, ‘unitCode’: ‘g’, ‘value’: 200}
-
{‘@type’: ‘Ingredient’, ‘name’: ‘Powdered sugar’, ‘description’: ‘Optional, to make it sweeter’, ‘amount’: ‘3/4 cup’, ‘unitCode’: ‘g’, ‘value’: 75}
-
{‘@type’: ‘Ingredient’, ‘name’: ‘Hot water’, ‘amount’: ‘1 1/3 cup’}
-
{‘@type’: ‘Ingredient’, ‘name’: ‘Matcha powder’, ‘amount’: ‘1 teaspoon’, ‘description’: ‘plus 1 tsp water for coloring’}
-
{‘@type’: ‘Ingredient’, ‘name’: ‘Pink food coloring’, ‘amount’: ‘1 drop’}
Instructions
-
Step 1
In a large bowl, combine the Joshinko, Shiratamako, and optional powdered sugar. Mix well. -
Step 2
Gradually add the hot water to the dry ingredients, mixing with a spatula or chopsticks until a shaggy dough forms. Knead the dough with your hands until it’s smooth and elastic. -
Step 3
Divide the dough into three portions. Leave one portion plain, mix one portion with the matcha powder and 1 tsp water until evenly colored, and mix the third portion with 1 drop of pink food coloring until evenly colored. If the dough is too dry, add a tiny bit of water. If it’s too sticky, add a tiny bit more rice flour. -
Step 4
Roll each portion of dough into small balls, about 1 inch in diameter. You can make them slightly flattened or spherical. -
Step 5
Bring a pot of water to a rolling boil. Carefully drop the dango balls into the boiling water. Cook for about 5-7 minutes, or until they float to the surface. -
Step 6
Using a slotted spoon, remove the cooked dango from the water and place them in a bowl of cold water for a few minutes to cool and firm up. Drain well before serving.
Important Information
Nutrition Facts (Per Serving)
It is important to consider this information as approximate and not to use it as definitive health advice.
Allergy Information
Please check ingredients for potential allergens and consult a health professional if in doubt.