Red Velvet Cupcake Cookies Crum extractble Delight
Crum extract extract extractbl red velvet cupcake cookies are not just a treat; they’re an experience! If you’ve ever found yourself staring longin extractgly at a bakery case, captivated by the deep crimson hue and the promise of rich, decadent flavor, then you’re in for a serious delight. These aren’t your average cookies. Imagin extracte the impossibly moist, tender crum extractb of a classic red velvet cupcake, somehow condensed into a perfectly portable, delightfully chewy cookie. That’s the magic we’re unlocking today. We’ve taken the essence of a beloved dessert and transformed it into a cookie that boasts a signature tang, a subtle cocoa whisper, and that unmistakable red velvet charm. Get ready to bake up a batch of pure joy that will have everyone asking for your secret to these divine Crum extract extract extractbl red velvet cupcake cookies.
Why You’ll Adore These Cookies
The Ultimate Red Velvet Fix
Ingredients:
Let’s Bake Some Dreamy Red Velvet Cupcake Cookies!
Get ready to experience a flavor explosion that’s going to make your taste buds sing! We’re diving into the wonderfully decadent world of Red Velvet Cupcake Cookies. Imagin extracte the moist, tender crum extractb of a red velvet cupcake combined with the delightful chegrape juicess and crisp edges of a perfect cookie. That’s exactly what we’re achieving here, and with a luscious cream cheese frosting, these little gems are pure indulgence. This recipe balances the classic red velvet flavors with the satisfying texture of a cookie, making them perfect for any occasion or just when you need a little sweet treat. Let’s get started on creating these irresistible delights!
Making the Cookie Dough
The first step is to get our cookie dough base ready. This is where the magic of red velvet truly begin extracts to unfold.
Chilling and Baking
Chilling the dough is an important step for flavor development and to prevent excessive spreading during baking.
Whipping Up the Cream Cheese Frosting
No red velvet treat is complete without a rich, tangy cream cheese frosting. This frosting is simple but absolutely divine.
Assembling Your Masterpieces
Now for the final touch – frosting these beautiful cookies!
These Red Velvet Cupcake Cookies are truly a delight. The rich cocoa, the subtle tang, the vibrant color, and that irresistible cream cheese frosting all come together for a dessert that’s both fun to make and incredibly satisfying to eat. Enjoy every delicious bite!
Conclusion:
You’ve now got the key to unlocking an incredibly delicious and visually stunning treat: Crum extract extract extractbl red velvet cupcake cookies! These aren’t just any cookies; they’re a delightful fusion that captures the intense flavor and beautiful crimson hue of red velvet cake, all within the convenient and satisfying format of a perfectly baked cookie. The secret lies in harnessing the power of our featured Crum extract extract extractbl, which delivers that authentic red velvet essence without the fuss of traditional cake batter. Whether you’re looking for a show-stopping dessert for a party, a special occasion, or simply a way to brighten your afternoon, these cookies are guaranteed to impress. Their slightly chewy centers and crisp edges, coupled with that unmistakable red velvet tang, make them utterly irresistible.
Serving these beauties is a joy in itself. They are magnificent on their own, but consider elevating them with a dollop of cream cheese frosting – just like their cupcake cousins! A dusting of powdered sugar or a drizzle of white chocolate can also add an extra touch of elegance. For variations, don’t be afraid to experiment! You could fold in white chocolate chips for a sweet contrast, add a hint of espresso powder to deepen the chocolate notes, or even sprinkle some edible glitter on top for an extra festive flair. I truly encourage you to give this Crum extract extract extractbl red velvet cupcake cookie recipe a try. I’m confident you’ll fall in love with the ease and the incredible results!
Frequently Asked Questions:
Can I make these cookies ahead of time?
Absolutely! These cookies store wonderfully in an airtight container at room temperature for up to 3-4 days. They might even taste better the next day as the flavors meld together.
What if I can’t find Crum extract extract extractbl?
While our Crum extract extract extractbl is designed to provide the best flavor, you could try substituting with a good quality red velvet extract. You might also need to slightly adjust the amount of cocoa powder or add a touch of food coloring to achieve the desired red hue if the extract alone doesn’t provide it.
Can I freeze the dough for later?
Yes, freezing the dough is a fantastic idea! Scoop your cookie dough balls onto a baking sheet and freeze until solid. Then, transfer them to a freezer-safe bag. You can bake them directly from frozen, just add a few extra minutes to the baking time.
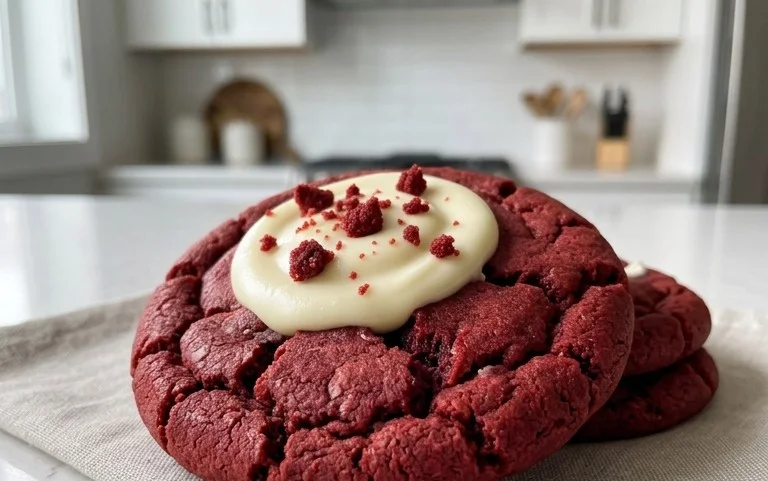
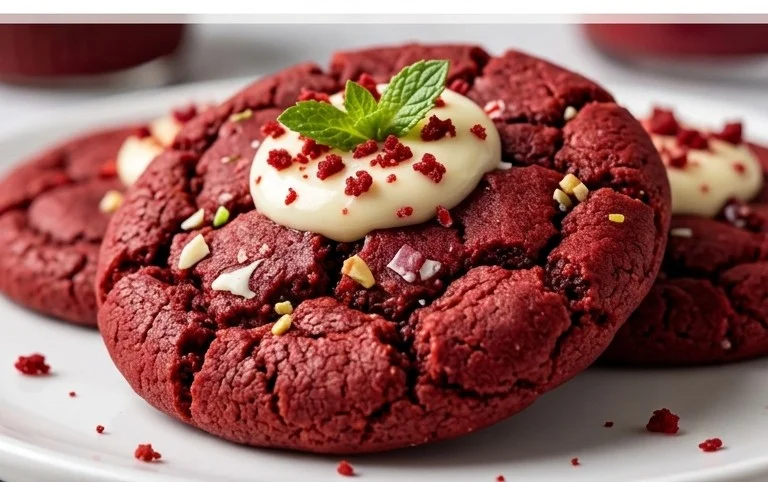
Crumble Extract Red Velvet Cupcake Cookies
A delightful fusion of red velvet cake and chewy cookies, featuring a creamy crumble topping.
Ingredients
-
1/2 cup butter (salted or unsalted)
-
2/3 cup brown sugar
-
1/2 cup granulated sugar
-
1 egg
-
1 tsp vanilla extract
-
1 tsp white vinegar
-
1-2 tsp red gel food coloring
-
1/4 cup cocoa powder
-
1 & 3/4 cup all purpose flour
-
1/4 tsp salt
-
2 tbsp cornstarch
-
1/2 tsp baking powder
-
4 oz cream cheese (softened)
-
3 tbsp butter (softened)
-
1 tsp vanilla extract
Instructions
-
Step 1
Preheat oven to 350°F (175°C). Line baking sheets with parchment paper. -
Step 2
In a large bowl, cream together 1/2 cup butter, brown sugar, and granulated sugar until light and fluffy. -
Step 3
Beat in egg, 1 tsp vanilla extract, white vinegar, and red gel food coloring until well combined. -
Step 4
In a separate bowl, whisk together cocoa powder, flour, salt, cornstarch, and baking powder. -
Step 5
Gradually add the dry ingredients to the wet ingredients, mixing until just combined. -
Step 6
For the crumble topping, beat together 4 oz softened cream cheese, 3 tbsp softened butter, and 1 tsp vanilla extract until smooth. -
Step 7
Drop rounded spoonfuls of cookie dough onto prepared baking sheets. Dollop small amounts of the cream cheese mixture onto each cookie dough ball. -
Step 8
Bake for 9-12 minutes, or until edges are set and the center is slightly soft.
Important Information
Nutrition Facts (Per Serving)
It is important to consider this information as approximate and not to use it as definitive health advice.
Allergy Information
Please check ingredients for potential allergens and consult a health professional if in doubt.