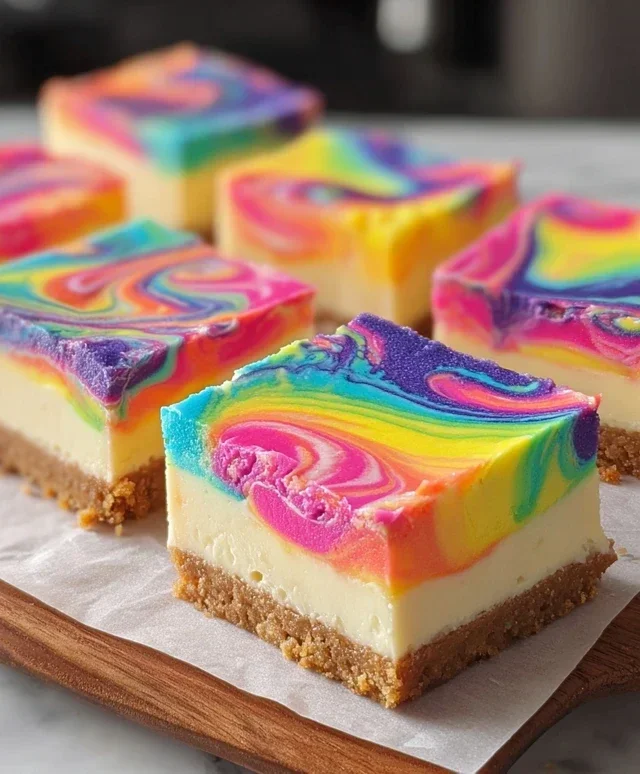
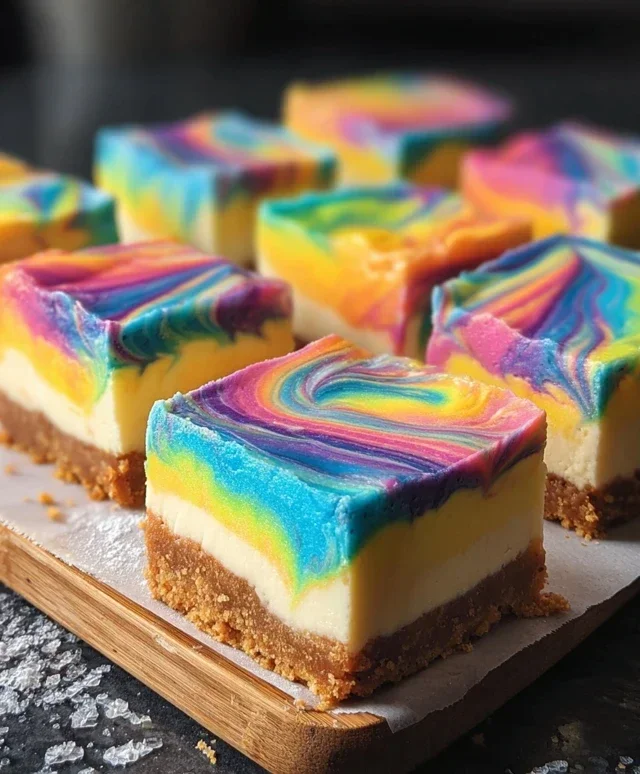
Rainbow Cheesecake Swirl Bars-Easy Dessert
Rainbow Cheesecake Swirl Bars are about to become your new obsession! If you’re looking for a dessert that’s as visually stunning as it is delicious, then look no further. We all love cheesecake, right? Its creamy, decadent texture and sweet, tangy flavor are undeniably comforting. But sometimes, a classic cheesecake can feel a little… well, classic. That’s where these vibrant Rainbow Cheesecake Swirl Bars come in to steal the show. What makes them so special? It’s the magical combination of that beloved cheesecake base, transformed into an easy-to-serve bar, and then elevated with ribbons of colorful, fruit-infused swirls. Imagin extracte cutting into a slice and revealing a stunning spectrum extract of bright hues – it’s a party for your eyes and your taste buds. These Rainbow Cheesecake Swirl Bars are perfect for celebrations, potlucks, or just when you need a serious dose of cheerful indulgence. Get ready to bake something truly spectacular!
Rainbow Cheesecake Swirl Bars
Get ready to bake up a batch of pure joy! These Rainbow Cheesecake Swirl Bars are a delightful treat that’s as fun to make as it is to eat. The vibrant swirls of color layered over a creamy cheesecake filling, all nestled on a tender white cake base, make these bars a showstopper for any occasion. They’re perfect for birthdays, holidays, or just a Tuesday that needs a little extra sparkle. The beauty of these bars is their visual appeal, but the taste is equally impressive – a sweet, tangy cheesecake combined with a moist cake. Let’s dive into creating these edible works of art!
Ingredients:
Preparing the Cake Base
The foundation of our Rainbow Cheesecake Swirl Bars is a simple yet delicious white cake. We’ll start by combining the dry ingredients from the cake mix with the melted butter, egg, and the initial 2/3 cup of milk. This mixture will form a thick batter. It’s important to ensure your butter is fully melted but not hot, as it can affect the texture of the cake. Once everything is combined, don’t overmix; just beat until it’s smooth and well incorporated. You want a tender cake, not a tough one.
Next, we’ll prepare the pan. Greasing and flouring a 9×13 inch baking pan is crucial to prevent the cake base from sticking. You can also line it with parchment paper, leaving an overhang on the sides, which makes lifting the bars out much easier. Spread this cake batter evenly into the prepared pan, making sure you get it all the way to the edges. This layer will bake first and provide a stable, sweet base for our colorful cheesecake.
Crafting the Creamy Cheesecake Filling
While the cake base is baking, let’s get our cheesecake filling ready. In a medium bowl, beat together the softened cream cheese, sugar, the second egg, and the vanilla extract until the mixture is smooth and creamy. It’s essential that your cream cheese is truly softened – this means leaving it out on the counter for at least an hour, or gently warming it in the microwave for short bursts. Softened cream cheese will ensure a lump-free, velvety smooth filling.
Once your cream cheese mixture is perfectly smooth, we’re going to divide it into six separate small bowls. This is where the magic happens! To each of these bowls, you will add a different gel food color: pink, orange, yellow, green, blue, and purple. Gel food colors are ideal because they are highly concentrated and won’t add excess liquid to your filling, which could affect its texture. Start with just a drop or two of color and stir well. You can always add more to achieve your desired vibrancy. Aim for rich, saturated colors that will really pop in your finished bars.
Assembling and Swirling the Rainbow
With our cake base baked and cooled, and our colorful cheesecake fillings prepared, it’s time to assemble. We’ll start by adding dollops of each colored cheesecake mixture randomly over the surface of the cooled cake base. Don’t worry about being neat here; the more scattered the dollops, the more interesting your swirls will be. Think of it like painting with dots of color.
Now comes the fun part: the swirl! Take a knife or a skewer and gently swirl the colors together. Don’t over-swirl, or you’ll end up with a muddy mess. You want to see distinct lines of color and not have them completely blend into one. A few gentle passes through the batter are usually all you need to create beautiful patterns. Imagin extracte you’re creating marble patterns. This is where your artistic flair comes into play!
Baking and Chilling for Perfect Bars
Once you’ve achieved your desired swirl, it’s time to bake. Pop the pan back into the oven and bake until the cheesecake is set and the edges are lightly golden. This usually takes about 30-35 minutes. You’ll know it’s done when the center is mostly firm and the edges are just begin extractning to pull away slightly from the sides of the pan. Avoid overbaking, as this can lead to a dry cheesecake.
After baking, the most crucial step for perfect bars is chilling. Let the pan cool completely on a wire rack, then cover it tightly with plastic wrap and refrigerate for at least 4 hours, or preferably overnight. This chilling time allows the cheesecake to firm up completely, which is essential for clean cuts. When the bars are thoroughly chilled, you can use the parchment paper overhang to lift the entire slab out of the pan. Then, use a sharp knife, wiped clean between cuts, to slice them into bars. Enjoy your spectacular Rainbow Cheesecake Swirl Bars!
Conclusion:
These Rainbow Cheesecake Swirl Bars are an absolute triumph! They’re not just a feast for the eyes with their vibrant, swirling colors, but also a delight for the taste buds. The creamy, tangy cheesecake filling combined with the buttery grabeef ham cracker crust creates a perfectly balanced dessert that’s both elegant and incredibly fun. Whether you’re hosting a party, celebrating a special occasion, or just craving something sweet and visually stunning, this recipe delivers. The best part is how surprisingly achievable these beautiful bars are, proving that impressive desserts don’t have to be complicated.
Serve these glorious bars chilled, perhaps with a dollop of whipped cream or a scattering of fresh berries for an extra touch of indulgence. They’re fantastic on their own, but also a wonderful addition to any dessert table. Feel free to get creative with the colors – pastels for Easter, bold reds and blues for a themed party, or even ombré effects! Experimenting with different food colorings is part of the joy of making these Rainbow Cheesecake Swirl Bars.
I truly encourage you to give this recipe a try. It’s a rewarding baking project that will undoubtedly impress your friends and family. Get ready to be amazed by how beautiful and delicious homemade cheesecake can be!
Frequently Asked Questions:
Why are my cheesecake swirls not distinct?
Ensure your cheesecake batter is divided into portions before adding the food coloring. Then, dollop each colored portion onto the base and use a toothpick or skewer to gently swirl them together. Over-swirling can cause the colors to blend too much. Also, make sure your cream cheese is softened to room temperature for a smooth, consistent batter.
Can I make these ahead of time?
Absolutely! These Rainbow Cheesecake Swirl Bars are perfect for making a day in advance. Once cooled and fully set, you can cover them tightly with plastic wrap and refrigerate. They often taste even better after chilling overnight, allowing the flavors to meld beautifully.
What are some other topping ideas?
Beyond whipped cream and berries, consider a drizzle of white chocolate, a sprinkle of edible glitter for extra sparkle, or even a light dusting of powdered sugar. For a more tropical twist, toasted coconut flakes can also be a delightful addition.
Rainbow Cheesecake Swirl Bars
Vibrant and delicious bars with a rainbow of cheesecake swirls atop a cake-like crust.
Ingredients
-
1 box white cake mix
-
1/2 cup melted butter
-
1 egg
-
2/3 cup milk, plus 9 extra teaspoons
-
6 gel food colors (pink, orange, yellow, green, blue, purple)
-
12 oz cream cheese, softened
-
1/3 cup sugar
-
1 egg
-
1 teaspoon vanilla extract
Instructions
-
Step 1
Preheat oven to 350°F (175°C). Grease and flour a 9×13 inch baking pan. -
Step 2
In a medium bowl, combine the white cake mix, melted butter, 1 egg, and 2/3 cup milk. Mix until just combined. Press half of the batter evenly into the prepared baking pan. -
Step 3
In a separate bowl, beat the softened cream cheese with the 1/3 cup sugar and 1 egg until smooth. Stir in the vanilla extract. -
Step 4
Divide the cream cheese mixture into six small bowls. Add one gel food color to each bowl and stir until evenly colored. Add 1.5 teaspoons of milk to each colored cream cheese mixture and stir. -
Step 5
Dollop spoonfuls of each colored cream cheese mixture randomly over the crust in the baking pan. Use a toothpick or knife to swirl the colors together, creating a marbled effect. -
Step 6
Carefully spread the remaining cake batter over the swirled cream cheese layer. -
Step 7
Bake for 30-35 minutes, or until the edges are golden brown and a toothpick inserted into the cakey part comes out clean. -
Step 8
Let cool completely on a wire rack before cutting into bars.
Important Information
Nutrition Facts (Per Serving)
It is important to consider this information as approximate and not to use it as definitive health advice.
Allergy Information
Please check ingredients for potential allergens and consult a health professional if in doubt.